Kubernetes pod scheduling determines where workloads run in your cluster, directly impacting both resource utilization and application performance. The scheduler evaluates numerous factors—from resource requirements to node availability and affinity rules—to place pods optimally across your infrastructure.
As clusters grow, inefficient pod scheduling can lead to resource waste and application performance issues. This article explains Kubernetes pod scheduling concepts, techniques, and best practices to help you optimize your cluster operations.
Summary of key Kubernetes pod scheduling concepts
| Concept | Description |
|---|---|
| kube-scheduler operation | kube-scheduler monitors the API server for unscheduled pods and assigns them to nodes through a two-phase process: filtering (eliminating unsuitable nodes) and scoring (ranking remaining nodes). This scheduling algorithm balances workload requirements with available resources. |
| Basic scheduling mechanisms | Configure resource requests and limits to ensure that pods receive necessary resources without overcommitting the cluster. Use nodeSelector for simple node selection and taints/tolerations to repel/attract specific pods from/to nodes based on workload requirements. |
| Advanced scheduling with node affinity | Node affinity and anti-affinity provide granular control over pod placement with both hard requirements (requiredDuringSchedulingIgnoredDuringExecution) and soft preferences (preferredDuringSchedulingIgnoredDuringExecution), enabling complex topology-aware deployments. |
| Real-world advanced patterns | Advanced scheduling techniques also include pod topology spread constraints for workload distribution across failure domains, priority classes for critical workloads, and custom schedulers for specialized placement logic beyond the default scheduler’s capabilities. |
| Inter-pod affinity and anti-affinity | It is possible to control pod placement relative to other running pods to either colocate related services for performance or spread similar pods for high availability. These rules consider the relationships among pods when making scheduling decisions. |
| Pod topology spread constraints | Distribute pods evenly across topology domains (zones, regions, and nodes) to improve application resilience and resource distribution. This balances pod distribution based on defined topology keys and skew limits. |
| Priority, preemption, and disruption budgets | Prioritize critical workloads with priority classes and configure pod disruption budgets to maintain service availability during voluntary disruptions. These mechanisms provide control over workload importance and resilience. |
| Custom schedulers and extensions | Implement specialized scheduling logic through custom schedulers or scheduler extensions for workloads with unique requirements beyond standard scheduler capabilities. These options balance customization with operational complexity. |
| Best practices | Implement resource requests and limits for all workloads, use node affinity for hardware-specific requirements, leverage pod anti-affinity for high availability, create dedicated node pools for specialized workloads, and regularly audit scheduling policies to prevent resource fragmentation. |
CloudBolt delivers continuous Kubernetes rightsizing at scale—so you eliminate overprovisioning, avoid SLO risks, and keep clusters efficient across environments.
How kube-scheduler works
kube-scheduler assigns newly created pods to nodes based on resource requirements, constraints, and optimization rules. It’s the component responsible for making intelligent placement decisions that affect your entire cluster’s performance.
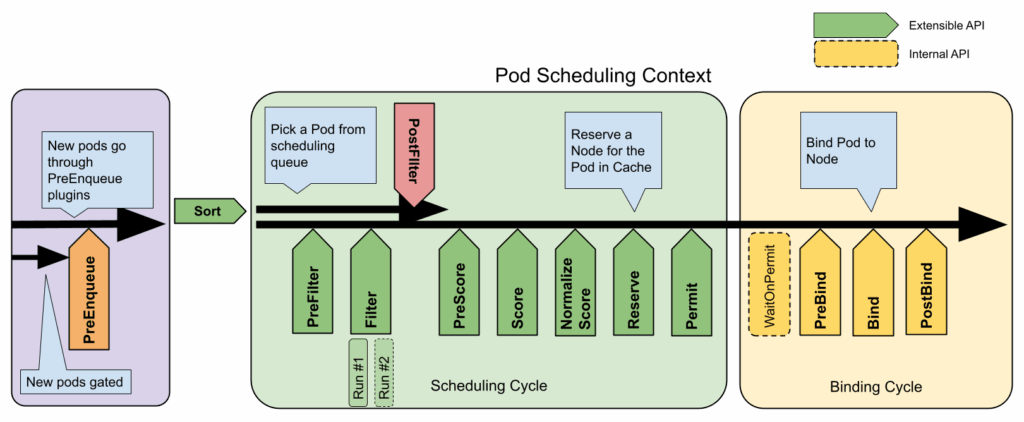
The scheduling workflow
When you create a pod, it enters an unscheduled state until the kube-scheduler assigns it to a node, as follows:
- The scheduler watches the Kubernetes API server for newly created pods with no node assignment.
- For each unscheduled pod, the scheduler selects an appropriate node.
- The scheduler informs the API server of this decision through a binding operation.
- The kubelet on the selected node then creates and runs the pod’s containers.
Filtering and scoring: The two-step node selection process
kube-scheduler uses a two-phase process to select the optimal node.
Phase 1: Filtering (predicates)
In the filtering phase, the scheduler eliminates unsuitable nodes. Common filters include the following:
- PodFitsResources: Does the node have enough CPU and memory?
- NoVolumeZoneConflict: Are the requested volumes available in this node’s zone?
- NodeSelector: Does the node match the pod’s nodeSelector field?
- PodToleratesNodeTaints: Does the pod tolerate the node’s taints?
Admins sometimes see production issues where pods remain unscheduled because of overly restrictive filters, especially when combining multiple nodeSelectors with taints.
Phase 2: Scoring (priorities)
In the scoring phase, the remaining nodes are ranked based on several priority functions:
- LeastRequestedPriority: Favors nodes with fewer requested resources
- BalancedResourceAllocation: Prefers nodes with balanced resource utilization
- NodeAffinityPriority: Gives weight to node affinity preferences
- ImageLocalityPriority: Favors nodes that already have the pod’s container images
The node with the highest final score is selected, with random selection breaking ties.
Scheduler framework
Starting in Kubernetes 1.15, kube-scheduler introduced a scheduling framework that provides a pluggable architecture for extending the scheduler. This framework divides the scheduling process into various phases: QueueSort, PreFilter, Filter, PostFilter, Scoring, Reserve, Permit, PreBind, Bind, and PostBind.
This extensible design allows for customization while maintaining a consistent core architecture. We’ll explore this further when discussing custom schedulers.
Basic scheduling mechanisms
Let’s examine the fundamental tools you can use to control pod placement.
Resource requests and limits
Resource requests and limits form the foundation of scheduling decisions. Without proper configuration here, even advanced scheduling techniques will be ineffective.
Resource requests
Resource requests specify the minimum resources a container needs:
apiVersion: v1
kind: Pod
metadata:
  name: frontend
spec:
  containers:
  - name: app
    image: images.my-company.example/app:v4
    resources:
      requests:
        memory: "64Mi"
        cpu: "250m"
This tells the scheduler: “Don’t place this pod on a node unless it has at least 64 MiB of memory and 0.25 CPU cores available.”
Resource limits
Limits enforce upper bounds on consumption:
resources:
  requests:
    memory: "64Mi"
    cpu: "250m"
  limits:
    memory: "128Mi"
    cpu: "500m"
Understanding the difference between requests and limits is important:
- Containers will get at least their requested resources.
- CPU is compressible—containers exceeding CPU limits are throttled.
- Memory is non-compressible—containers exceeding memory limits are terminated (OOMKilled).
In production environments, most applications run well with requests at 50-70% of their limits, giving them room to handle traffic spikes while preventing resource waste.
NodeSelector
NodeSelector provides a straightforward way to constrain pods to specific nodes using simple label matching:
apiVersion: v1
kind: Pod
metadata:
  name: gpu-pod
spec:
  nodeSelector:
    accelerator: nvidia-tesla-p100
  containers:
  - name: gpu-container
    image: nvidia/cuda:9.0-devel
In this example, the pod will only be scheduled on nodes labeled with accelerator=nvidia-tesla-p100, ensuring that GPU workloads run exclusively on appropriate hardware. This simple mechanism works well for basic constraints, but you’ll likely need the more powerful node affinity features as your needs grow more complex.
Taints and tolerations
While nodeSelector attracts pods to nodes, taints work in reverse—they repel pods from nodes.
Taints
Let’s assume we have a pod defined with a nodeSelector from the previous example created.
Apply a taint to a node:
kubectl taint nodes node1 key=value:<taint effect>
The three taint effects are:
1. NoSchedule: Pods won’t be scheduled without matching tolerations. For example:
kubectl taint nodes node1 gpu=true:NoSchedule
This prevents any pod without a matching toleration from being scheduled on node
2.PreferNoSchedule: The system tries to avoid placing untolerated pods here. For example:
kubectl taint nodes node2 disk=ssd:PreferNoSchedule
This encourages the scheduler to place pods elsewhere but allows placement if no better options exist.
3. NoExecute: Untolerated pods are evicted if already running. For example:
kubectl taint nodes node3 maintenance=planned:NoExecute
This prevents new pods from being scheduled and evicts any running pods that don’t tolerate this taint.
Tolerations
Pods specify tolerations to run on tainted nodes:
tolerations:
- key: "example-key"
  operator: "Exists"
  effect: "NoSchedule"
A common pattern is tainting specialized hardware nodes (like GPU instances) to prevent general workloads from landing on these expensive resources:
# Taint GPU nodes
kubectl taint nodes -l hardware=gpu dedicated=gpu:NoSchedule
# Only GPU-requiring pods have this toleration
tolerations:
- key: "dedicated"
  operator: "Equal"
  value: "gpu"
  effect: "NoSchedule"
This practical FinOps playbook shows you exactly how to build visibility, enforce accountability, and automate rightsizing from day one.
Advanced scheduling techniques
As your Kubernetes environment grows, you’ll need more sophisticated control over pod placement.
Node affinity and anti-affinity
Node affinity extends nodeSelector with greater expressiveness and flexibility.
Types of node affinity
Node affinity comes in two types:
- requiredDuringSchedulingIgnoredDuringExecution: A hard requirement that must be met
- preferredDuringSchedulingIgnoredDuringExecution: A soft preference that the scheduler tries to honor
The IgnoredDuringExecution part means that the pod continues running if node labels change after scheduling.
affinity:
  nodeAffinity:
    requiredDuringSchedulingIgnoredDuringExecution:
      nodeSelectorTerms:
      - matchExpressions:
        - key: kubernetes.io/e2e-az-name
          operator: In
          values:
          - e2e-az1
          - e2e-az2
    preferredDuringSchedulingIgnoredDuringExecution:
    - weight: 1
      preference:
        matchExpressions:
        - key: another-node-label-key
          operator: In
          values:
          - another-node-label-value
This pod must run in zone e2e-az1 or e2e-az2. The scheduler will also try to place it on nodes with the label another-node-label-key: another-node-label-value when possible. The required part is a hard rule; the preferred part just helps the scheduler choose between multiple valid nodes.
When implementing node affinity in production, it’s typically best to start with softer preferredDuringScheduling rules to observe behavior before enforcing strict requirements.
Node anti-affinity Node anti-affinity is implemented using the NotIn or DoesNotExist operators:
nodeAffinity:
  requiredDuringSchedulingIgnoredDuringExecution:
    nodeSelectorTerms:
    - matchExpressions:
      - key: failure-domain.beta.kubernetes.io/zone
        operator: NotIn
        values:
        - zone1
This prevents the pod from scheduling to any node in zone1—useful when that zone is having problems.
Inter-pod affinity and anti-affinity
Inter-pod affinity and anti-affinity define rules based on what pods are already running on nodes.
Pod affinity
Pod affinity colocates related pods, which can boost performance for pods that communicate frequently:
affinity:
  podAffinity:
    requiredDuringSchedulingIgnoredDuringExecution:
    - labelSelector:
        matchExpressions:
        - key: app
          operator: In
          values:
          - redis-leader
      topologyKey: kubernetes.io/hostname
This forces follower pods to run on the same node as the leader (redis-leader) pod, reducing network latency.
Pod anti-affinity
Pod anti-affinity spreads similar pods across nodes, improving availability:
affinity:
  podAntiAffinity:
    requiredDuringSchedulingIgnoredDuringExecution:
    - labelSelector:
        matchExpressions:
        - key: app
          operator: In
          values:
          - web-store
      topologyKey: kubernetes.io/hostname
This configuration prevents multiple web application instances from running on the same node, protecting against node failures.
The topologyKey field defines the domain for the rule—hostname (node level), zone, or region. Changing this key allows you to adjust the “spread radius” of your pods.
Real-world advanced scheduling patterns
Here are some practical scenarios where advanced scheduling solves specific challenges.
Workload isolation
In multi-tenant environments, you often need to keep different tenant workloads separate from each other, which improves security and prevents noisy neighbour problems where one tenant’s workload affects another’s performance. For example, consider a SaaS platform where multiple customers share the same cluster:
affinity:
  podAntiAffinity:
    requiredDuringSchedulingIgnoredDuringExecution:
    - labelSelector:
        matchExpressions:
        - key: tenant
          operator: In
          values:
          - tenant-a
      topologyKey: kubernetes.io/hostname
When applied to tenant-a pods, this configuration ensures these pods are distributed across different nodes. Each pod with this configuration refuses to be scheduled on a node that already runs any other pod with the label tenant: tenant-a. This provides workload distribution for better fault tolerance within a single tenant’s applications, while still allowing pods from different tenants to coexist on the same nodes.
For complete multi-tenant isolation (where different tenants never share nodes), you would need to implement node affinity rules or use separate node pools for each tenant:
# Example of node affinity for strict tenant separation
affinity:
  nodeAffinity:
    requiredDuringSchedulingIgnoredDuringExecution:
      nodeSelectorTerms:
      - matchExpressions:
        - key: dedicated
          operator: In
          values:
          - tenant-a
Data locality
Network latency between processing pods and data storage can significantly impact performance for data-intensive applications like big data processing or AI training. Co-locating processing pods with data pods reduces this latency:
affinity:
  podAffinity:
    preferredDuringSchedulingIgnoredDuringExecution:
    - weight: 100
      podAffinityTerm:
        labelSelector:
          matchExpressions:
          - key: app
            operator: In
            values:
            - data-store
        topologyKey: kubernetes.io/hostname
This example shows how a data processing pod can be scheduled on the same node as its data-store pods, reducing network hops and improving throughput for data-intensive operations.
High availability
For critical services that need maximum uptime, you want to configure replicas run on different infrastructure components to survive various failure scenarios:
affinity:
  podAntiAffinity:
    requiredDuringSchedulingIgnoredDuringExecution:
    - labelSelector:
        matchExpressions:
        - key: app
          operator: In
          values:
          - critical-service
      topologyKey: kubernetes.io/hostname
    preferredDuringSchedulingIgnoredDuringExecution:
    - weight: 100
      podAffinityTerm:
        labelSelector:
          matchExpressions:
          - key: app
            operator: In
            values:
            - critical-service
        topologyKey: topology.kubernetes.io/zone
This setup forces pods to run on different nodes (a hard requirement) and tries to place them in different zones when possible (a preference). This pattern is very typical for database clusters and API gateways setups.
Additional scheduling concepts
Beyond basic and advanced mechanisms, several additional features can further enhance your scheduling strategy.
Pod topology spread constraints
These constraints distribute pods evenly across your cluster topology:
spec:
  topologySpreadConstraints:
  - maxSkew: 1
    topologyKey: topology.kubernetes.io/zone
    whenUnsatisfiable: DoNotSchedule
    labelSelector:
      matchLabels:
        app: web-store
Key components include:
- maxSkew: The maximum difference in pod count between any two domains
- topologyKey: The label defining the topology domain (zone, region, node)
- whenUnsatisfiable: What to do when constraints can’t be met
Experience shows that topology spread constraints are particularly useful for stateless services, where consistent performance across regions is required but affinity rules for each component need not be manually configured.
Priority and preemption
These allow critical pods to evict less important ones when resources are constrained.
First, define a priority class:
apiVersion: scheduling.k8s.io/v1
kind: PriorityClass
metadata:
  name: high-priority
value: 1000000
globalDefault: false
description: "Critical system pods"
Then assign it to a pod:
spec:
  priorityClassName: high-priority
Using proper priority classes can save the infrastructure during resource crunches, allowing critical components like monitoring and security tools to keep running even when clusters are under pressure.
Pod disruption budgets
PDBs limit how many pods are available/unavailable simultaneously during voluntary disruptions like node drains:
apiVersion: policy/v1
kind: PodDisruptionBudget
metadata:
  name: web-pdb
spec:
  minAvailable: 2
  selector:
    matchLabels:
      app: web
This PDB maintains at least two web pods during maintenance operations.
A common mistake is making PDBs too restrictive. If minAvailable is too high or maxUnavailable is too low, you can block cluster maintenance operations. Allowing roughly 25% of pods to be unavailable for most services strikes a good balance.
Custom schedulers and optimization
While the default scheduler is flexible, some organizations have unique requirements and can benefit from customized scheduling logic. Consider a custom scheduler when you need:
- Specialized placement decisions for unique hardware
- Domain-specific constraints not expressible through standard mechanisms
- Optimization for metrics not considered by the default scheduler
However, custom schedulers come with significant development and operational costs. Before building one, explore whether the scheduler framework extensions can meet your needs.
Custom scheduler approaches
When implementing custom scheduling logic, you face a key architectural decision: modify the default scheduler or deploy an additional custom scheduler alongside it. Each approach offers distinct advantages and tradeoffs.
Modified default scheduler
Extending the default scheduler through the scheduler framework is generally the preferred approach for most scenarios:
apiVersion: kubescheduler.config.k8s.io/v1
kind: KubeSchedulerConfiguration
profiles:
- schedulerName: default-scheduler
  plugins:
    filter:
      enabled:
      - name: "MyCustomFilter"
    score:
      enabled:
      - name: "MyCustomScore"
        weight: 5
Advantages:
- Leverages existing scheduler code and optimizations
- Requires only the modified components to be maintained
- Changes affect all workloads without modifying existing deployments
- Typically has better performance characteristics
- Easier to keep updated with new Kubernetes releases
Disadvantages:
- Modifications apply globally, potentially affecting all workloads
- Requires careful testing to avoid breaking existing scheduling behaviors
- May require careful coordination during cluster upgrades
Standalone custom scheduler
Deploying a separate scheduler instance allows for more radical departures from default behavior:
spec:
  schedulerName: my-custom-scheduler
Advantages:
- Complete isolation from the default scheduler
- Can implement entirely different scheduling paradigms
- Failures won’t affect pods using the default scheduler
- Can be selectively applied only to specific workloads
- Easier to implement experimental or highly specialized logic
Disadvantages:
- Requires maintaining a complete scheduler implementation
- May duplicate functionality already present in the default scheduler
- Additional operational overhead of running and monitoring multiple schedulers
- Greater risk of resource conflicts or scheduling inefficiencies
Cloud provider implementation considerations
The major cloud providers handle scheduler customization differently, affecting your implementation strategy:
Amazon EKS
Amazon EKS fully supports scheduler framework extensions, and custom schedulers can be deployed as pods within the cluster. Changes to the default scheduler require custom AMIs or post-deployment configuration. It’s important to note that EKS Fargate environments do not support custom schedulers at all, which may impact your architectural decisions if you’re using a mix of Fargate and standard EKS.
Azure AKS
Azure AKS supports scheduler extensions through the framework, and custom schedulers can be deployed as regular workloads. One challenge to be aware of is that AKS updates may override default scheduler modifications unless you use specific container hooks. AKS offers integration with Azure-specific scheduling features for hybrid environments, providing additional capabilities for complex infrastructure setups.
Google GKE
Google GKE supports both modification approaches, giving you more flexibility in your implementation. GKE Autopilot does not support custom schedulers, while GKE Standard allows full scheduler customization. GKE’s integration with Google Cloud resource APIs enables cloud-aware scheduling decisions, which can be particularly useful for workloads considering specific GCP resource characteristics.
Real-world custom scheduling examples
GPU workload optimization
Here’s an example of a custom scheduler extension that minimizes GPU fragmentation:
apiVersion: kubescheduler.config.k8s.io/v1
kind: KubeSchedulerConfiguration
profiles:
- schedulerName: gpu-aware-scheduler
  plugins:
    score:
      enabled:
      - name: "GPUFragmentationScore"
        weight: 10
This extension might implement specialized scoring to keep GPUs fully utilized rather than spreading small workloads across multiple GPUs.
Cost-aware scheduling
This is a scheduler that factors in cloud provider pricing:
spec:
  schedulerName: cost-aware-scheduler
This scheduler might place non-critical workloads on spot/preemptible instances and may consider regional pricing differences when making placement decisions.
Best practices for Kubernetes pod scheduling
Set accurate resource requests and limits
Analyze actual usage patterns with monitoring tools to understand real workload requirements. For stable workloads, set requests close to average usage plus a small buffer; for variable workloads, add a larger buffer.
In practice, many teams set arbitrary resource requests, like requesting 1 CPU core for every service. This leads to severely underutilized clusters. Use tools like Prometheus and Grafana to monitor actual usage and adjust accordingly.
As clusters grow beyond a certain size, manually monitoring and tuning resource requests becomes increasingly complex and error-prone. At scale, automated resource rightsizing tools analyze actual workload utilization patterns and intelligently adjust resource specifications based on real usage data. These tools work by collecting historical resource consumption metrics, analyzing usage patterns, and generating optimized resource settings that maintain performance while reducing waste. Consider implementing automated rightsizing for clusters with more than 20-30 applications or in environments where resource efficiency directly impacts operational costs.
Machine learning-based solutions take this approach further by continuously adapting to changing workload patterns without manual intervention. Kubernetes-native platforms like StormForge apply machine learning algorithms to automatically optimize resource allocation, balancing application performance requirements with infrastructure efficiency. This approach eliminates the guesswork in setting resource requests and limits, potentially reducing cloud costs by 30-50% while maintaining application reliability.
Design for high availability
Configure topology spread constraints or pod anti-affinity to distribute critical workloads across failure domains:
spec:
  topologySpreadConstraints:
  - maxSkew: 1
    topologyKey: topology.kubernetes.io/zone
    whenUnsatisfiable: DoNotSchedule
    labelSelector:
      matchLabels:
        app: ha-service
This configuration spreads pods across zones, minimizing the impact of zone failures.
Use pod priority with disruption budgets
Combine pod priority with disruption budgets for critical workloads:
# Define priority class
apiVersion: scheduling.k8s.io/v1
kind: PriorityClass
metadata:
  name: critical-service
value: 1000000
---
# Protect service availability
apiVersion: policy/v1
kind: PodDisruptionBudget
metadata:
  name: critical-api-pdb
spec:
  minAvailable: 4
Apply priority for deployment:
spec:
  priorityClassName: critical-service
This approach keeps critical APIs running even during node maintenance or when the cluster is under heavy load.
Balance specificity with flexibility
Rather than using too many hard constraints, employ this pattern:
affinity:
  nodeAffinity:
    requiredDuringSchedulingIgnoredDuringExecution:
      nodeSelectorTerms:
      - matchExpressions:
        - key: node-type
          operator: In
          values:
          - compute
    preferredDuringSchedulingIgnoredDuringExecution:
    - weight: 10
      preference:
        matchExpressions:
        - key: cpu-type
          operator: In
          values:
          - high-performance
This configuration has one hard requirement but uses preferences for other characteristics, maintaining flexibility without sacrificing essential requirements.
Address application-specific requirements
Different workload types need different scheduling approaches.
Stateful applications
For databases and other stateful workloads, use anti-affinity to improve data resilience:
affinity:
  podAntiAffinity:
    requiredDuringSchedulingIgnoredDuringExecution:
    - labelSelector:
        matchExpressions:
        - key: app
          operator: In
          values:
          - database
      topologyKey: kubernetes.io/hostname
Batch processing jobs
For batch workloads, use node affinity to target appropriate hardware:
spec:
  priorityClassName: "batch-priority"
  affinity:
    nodeAffinity:
      preferredDuringSchedulingIgnoredDuringExecution:
      - weight: 10
        preference:
          matchExpressions:
          - key: workload-type
            operator: In
            values:
            - batch
Machine learning workloads
For ML jobs, use nodeSelector for hardware acceleration:
spec:
  nodeSelector:
    accelerator: nvidia-v100
  containers:
  - name: trainer
    resources:
      limits:
        nvidia.com/gpu: 1
Common scheduling pitfalls to avoid
Based on our experience running large Kubernetes clusters, here are some important mistakes to avoid:
- Overly restrictive node selectors can leave pods unschedulable when infrastructure changes.
- Ignoring pod disruption budgets risks service outages during maintenance.
- Setting resources too high wastes cluster capacity.
- Setting resources too low causes performance issues and potential OOMKills.
- Complex inter-pod affinity rules can significantly slow the scheduler.
- Relying on default priorities is problematic; critical services should have appropriate priority classes.
The airline analogy translates complex cluster economics into language your execs, engineers, and FinOps teams can all understand.
Conclusion
Kubernetes pod scheduling balances workload requirements with available resources to determine optimal pod placement. The default scheduler offers a range of capabilities from basic resource requests to advanced affinity rules that can satisfy most scheduling needs.
Start with accurate resource specifications, implement basic placement constraints, and only add complexity as needed. This progressive approach delivers the optimal balance of control, performance, and operational simplicity.
Remember that scheduling is not a one-time configuration but an ongoing refinement process as your applications and infrastructure evolve.
Related Blogs
Directionally Close Isn’t Defensible: Reconciling Kubernetes Cost to the Penny
Every Kubernetes chargeback program dies in the same meeting. The platform team puts together a thoughtful dashboard with costs broken…