Kubernetes labels are key-value pairs attached to objects in Kubernetes clusters that form the foundation of resource organization and selection. More than simple metadata, labels serve as the primary mechanism that enables intelligent workload placement, resource grouping, and dynamic operations across your Kubernetes environment.
This article explores how labels enable intelligent pod scheduling and resource optimization, providing practical guidance for Kubernetes administrators, platform engineers, and DevOps practitioners. We examine key techniques for creating an effective labelling strategy that improves resource utilization while maintaining application performance and reliability.
Summary of key functions related to Kubernetes labels
| Function | Description |
|---|---|
| Pod scheduling | Labels enable the Kubernetes scheduler to determine where to place pods based on node selectors and affinity and anti-affinity rules. |
| Resource grouping | Labels allow logical grouping of resources across namespaces, making it easier to manage and query related objects. |
| Workload classification | Labels help distinguish between different workload types (production, development, testing) for targeted operations. |
| Resource tracking | Labels enable the attribution of resource usage to teams, applications, or business units for cost allocation. |
| Topology management | Labels facilitate scheduling decisions based on infrastructure topology (regions, zones, racks) for high availability. |
| Version management | Labels can help track and manage different versions of applications during updates and rollbacks. |
| Service selection | Labels determine which pods should receive traffic from services and load balancers. |
| Batch operations | Labels allow bulk operations on multiple resources that share common characteristics. |
| Resource optimization | Labels enable targeted resource optimization by identifying similar workloads with specific performance profiles. |
| Security policies | Labels control which security policies apply to which pods, including network policies and pod security contexts. |
Labels as a cornerstone of Kubernetes pod scheduling
Understanding label fundamentals
Labels in Kubernetes are simple yet powerful key-value pairs that can be attached to any Kubernetes object. They follow a specific format, where keys can have an optional prefix and must adhere to specific naming conventions: 63 characters or less and using only letters, numbers, dashes, dots, and underscores. Here’s an example.
metadata:
  labels:
    app: inventory
    tier: backend
    environment: production
    version: v1.2.3
While annotations also provide metadata, they differ significantly from labels. Annotations store non-identifying information that isn’t used for selection purposes, like build information, contact details, or deprecation warnings. Labels, on the other hand, are specifically designed for selection and grouping of objects.
Kubernetes itself uses several standard label patterns, such as kubernetes.io/hostname for node names or node.kubernetes.io/instance-type for cloud provider instance types. Creating your own custom labels for specific operational needs is a common practice and is essential for advanced scheduling strategies.
Label selectors: The core mechanism
Label selectors are the mechanism Kubernetes uses to filter and group resources based on their labels. They are the glue that holds together Kubernetes objects like pods, services, and nodes.
For example, a service chooses its pods using a selector:
spec:
  selector:
    app: inventory
    tier: backend
The Kubernetes scheduler uses similar mechanisms when determining where to place pods. When you configure pod scheduling requirements, you’re essentially telling the scheduler which labels to look for on potential target nodes.
Node selection via labels
The most basic form of label-based pod scheduling is the nodeSelector field in pod specifications:
spec:
  nodeSelector:
    disktype: ssd
    cpu: highperformance
This simple mechanism means that a pod will only be scheduled on nodes that have all the specified labels. For instance, you might label certain nodes with hardware characteristics like gpu=true or storage=fastand then direct specific workloads to those nodes.
Affinity and anti-affinity rules
While effective for simple cases, nodeSelector has limitations—it’s an all-or-nothing approach that can’t express more nuanced requirements. Node affinity provides two distinct scheduling behaviors that offer greater flexibility than basic nodeSelector:
- Required affinity rules (
requiredDuringSchedulingIgnoredDuringExecution) must be satisfied for pod placement to occur. If no nodes match the required criteria, the pod will remain in a pending state until suitable nodes become available. This is similar to nodeSelector but with more sophisticated matching capabilities. - Preferred affinity rules (
preferredDuringSchedulingIgnoredDuringExecution) influence placement decisions but don’t mandate specific requirements. The scheduler attempts to honor these preferences but will still place the pod on other nodes if preferred options aren’t available. Each preferred rule can include a weight (1-100) to indicate relative importance when multiple preferences exist.
The following code demonstrates required node affinity, which means that the pod will only be scheduled on nodes in either the us-east-1a or us-east-1b availability zones. The scheduler will not place the pod anywhere else, even if it means the pod remains unscheduled.
spec:
  affinity:
    nodeAffinity:
      requiredDuringSchedulingIgnoredDuringExecution:
        nodeSelectorTerms:
        - matchExpressions:
          - key: kubernetes.io/e2e-az-name
            operator: In
            values:
            - us-east-1a
            - us-east-1b
Pod affinity and anti-affinity rules take this concept further by allowing you to express relationships between pods themselves. In this configuration, the pod must be placed on nodes with SSD storage, but the scheduler will prefer large instances (weight 80) over high-network-performance instances (weight 20) when both options are available.
spec:
  affinity:
    nodeAffinity:
      requiredDuringSchedulingIgnoredDuringExecution:
        nodeSelectorTerms:
        - matchExpressions:
          - key: disktype
            operator: In
            values:
            - ssd
      preferredDuringSchedulingIgnoredDuringExecution:
      - weight: 80
        preference:
          matchExpressions:
          - key: instance-size
            operator: In
            values:
            - large
      - weight: 20
        preference:
          matchExpressions:
          - key: network-performance
            operator: In
            values:
            - high
Here’s an example combining both types:
apiVersion: apps/v1
kind: Deployment
metadata:
  name: web-app
spec:
  replicas: 3
  template:
    spec:
      affinity:
        nodeAffinity:
          preferredDuringSchedulingIgnoredDuringExecution:
          - weight: 100
            preference:
              matchExpressions:
              - key: node-type
                operator: In
                values: ["high-memory"]
        podAntiAffinity:
          requiredDuringSchedulingIgnoredDuringExecution:
          - labelSelector:
              matchExpressions:
              - key: app
                operator: In
                values: ["web-app"]
            topologyKey: "kubernetes.io/hostname"
This shows how labels work for both node selection (preferring high-memory nodes) and pod distribution. Conversely, web-app pods don’t get scheduled on the same host, which is much more practical for real-world scenarios.
CloudBolt delivers continuous Kubernetes rightsizing at scale—so you eliminate overprovisioning, avoid SLO risks, and keep clusters efficient across environments.
Advanced labelling strategies for pod scheduling
Topology-based scheduling
Large-scale Kubernetes environments often span multiple failure domains, such as regions, availability zones, and racks. Topology labels capture this infrastructure hierarchy:
topology.kubernetes.io/region: us-west
topology.kubernetes.io/zone: us-west-1a
These labels enable sophisticated scheduling patterns. For example, this code ensures that database replicas are distributed across different availability zones, creating resilience against zone-level failures.
podAntiAffinity:
  requiredDuringSchedulingIgnoredDuringExecution:
  - labelSelector:
      matchExpressions:
      - key: app
        operator: In
        values:
        - database-primary
    topologyKey: topology.kubernetes.io/zone
Workload classification labels
The second best practice for efficient cluster management is differentiating workloads by environment. Here’s how to implement classification labels in a deployment, which we’ll explain further below:
apiVersion: apps/v1
kind: Deployment
metadata:
  name: api-service
  labels:
    app: api-service
    environment: production
    criticality: high
    workload-type: interactive
spec:
  replicas: 3
  selector:
    matchLabels:
      app: api-service
  template:
    metadata:
      labels:
        app: api-service
        environment: production
        criticality: high
        workload-type: interactive
    spec:
      containers:
      - name: api
        image: api:v1.2.3
This deployment demonstrates the following classification patterns:
Environment labelling (environment: production) separates workloads by their deployment stage. This enables environment-specific policies, such as restricting production workloads to dedicated node pools or applying stricter security policies to production resources.
Criticality classification (criticality: high) indicates the business importance of the workload. High-criticality services might receive priority scheduling, dedicated resources, or enhanced monitoring. You could implement this through PriorityClasses that reference these labels.
Workload type designation (workload-type: interactive) distinguishes between interactive services (like APIs) and batch jobs. Interactive workloads typically need consistent performance and low latency, while batch workloads can tolerate interruptions and variable performance.
Application identification (app: api-service) provides the foundation for grouping related resources and is used by the deployment’s selector to manage its pods.
Notice that the labels appear in both the deployment metadata and the pod template. The deployment-level labels help with resource management and queries, while the pod-level labels enable services and controllers to select these specific pods.
These labels enable targeted operations and policies. For instance, you might implement the following scenarios:
- Set up tolerations that only allow production workloads on specific node pools.
- Configure monitoring systems to alert differently based on criticality levels.
- Implement custom schedulers that prioritize interactive workloads over batch jobs during resource contention.
Hardware-specific scheduling
Specialized hardware often requires specific workload placement.
First, label your nodes with hardware characteristics:
kubectl label nodes node-gpu-1 accelerator=gpu gpu-type=nvidia-v100 storage-type=nvme
kubectl label nodes node-cpu-1 cpu-type=intel-xeon storage-type=ssd
Then create pods that target this hardware:
apiVersion: v1
kind: Pod
metadata:
  name: ml-training-job
  labels:
    app: ml-training
    resource-intensive: "true"
spec:
  nodeSelector:
    accelerator: gpu
    gpu-type: nvidia-v100
  containers:
  - name: trainer
    image: ml-framework:latest
    resources:
      limits:
        nvidia.com/gpu: 1
For more sophisticated requirements, node affinity can target specific GPU models when available but accept alternatives when necessary.
Cost optimization through labels
Strategic labelling enables cost-responsible infrastructure and helps with resource cost tracking. These labels help match workload requirements with the right instance types while providing visibility into which teams or applications consume resources.
Instance type targeting (instance-type: spot) directs workloads to lower-cost infrastructure like spot instances for fault-tolerant applications, while critical services use reliable on-demand resources.
Cost center attribution (cost-center: analytics-team) enables chargeback models by tracking which teams or projects consume resources, helping organizations understand and allocate cloud costs accurately.
Priority classification (priority-class: low) indicates workloads that can be interrupted or deprioritized during resource contention, making them ideal candidates for cost-saving measures.
Spot instance suitability (suitable-for-spot: "true") explicitly marks workloads that can handle potential interruptions, enabling automated tools to place them on discounted spot instances.
apiVersion: batch/v1
kind: Job
metadata:
  name: data-processing
  labels:
    cost-center: analytics-team
    priority-class: low
    suitable-for-spot: "true"
spec:
  template:
    metadata:
      labels:
        cost-center: analytics-team
        priority-class: low
    spec:
      nodeSelector:
        instance-type: spot
        cost-tier: low
      tolerations:
      - key: "spot-instance"
        operator: "Equal"
        value: "true"
        effect: "NoSchedule"
      containers:
      - name: processor
        image: data-processor:v2.1
This practical FinOps playbook shows you exactly how to build visibility, enforce accountability, and automate rightsizing from day one.
Label selector operators and expressions
Equality-based selectors
Equality-based selectors use simple key-value matching where the label value must exactly equal the specified value, or, in the case of negation, must not equal it. This is the most straightforward type of label selection in Kubernetes.
Here’s how they work in practice:
apiVersion: v1
kind: Service
metadata:
  name: frontend-service
spec:
  selector:
    environment: production
    tier: frontend
  ports:
  - port: 80
    targetPort: 8080
This service uses equality-based selectors to route traffic only to pods with both environment=production AND tier=frontend labels. The selector acts as a filter—pods must have exact matches for both label key-value pairs to receive traffic from this service.
These selectors are straightforward but limited to exact matches or negations. They’re implemented in kubectl commands like:
# Select pods with exact label match
kubectl get pods -l environment=production

# Select pods without a specific label
kubectl get pods -l environment!=development

# Select pods with a label present (any value)
kubectl get pods -l environment

# Select pods without a label present
kubectl get pods -l '!environment'
The matchLabels section defines which pods this deployment manages. Only pods with the exact matches app=api AND version=v1.2.3 will be controlled by this deployment. Notice that the pod template includes additional labels like environment=production, but the selector only uses the labels for precise pod identification.
You can also use equality-based selectors in kubectl commands for resource queries:
# Select pods with exact label matches
kubectl get pods -l environment=production,tier=frontend

# Exclude pods with specific labels using != operator
kubectl get pods -l environment=production,tier!=frontend

# Select across multiple namespaces
kubectl get pods --all-namespaces -l app=nginx,environment!=development
The first command finds pods where the environment exactly equals production AND the tier exactly equals frontend. The second command finds pods where the environment equals production but the tier does not equal frontend.
Set-based selectors
Set-based selectors provide more flexibility than equality-based selectors, allowing matching against sets of values, checking for label existence, and performing numeric comparisons.
This deployment demonstrates multiple set-based operators:
apiVersion: apps/v1
kind: Deployment
metadata:
  name: multi-env-deployment
spec:
  replicas: 5
  selector:
    matchExpressions:
    - key: environment
      operator: In
      values: ["production", "staging"]
    - key: tier
      operator: NotIn
      values: ["deprecated", "legacy"]
    - key: monitoring
      operator: Exists
    - key: version-number
      operator: Gt
      values: ["2"]
  template:
    metadata:
      labels:
        environment: production
        tier: frontend
        monitoring: enabled
        version-number: "3"
This selector matches pods where the environment is either production or staging, the tier is not deprecated or legacy, the monitoring label exists (regardless of value), and version-number is greater than 2.
The available set-based operators include:
- In: Label value must be in the specified set.
- NotIn: Label value must not be in the specified set.
- Exists: Label key must be present (value is ignored).
- DoesNotExist: Label key must not be present.
- Gt: Label value must be greater than the specified value (numeric comparison).
- Lt: Label value must be less than the specified value (numeric comparison).
This node affinity example uses numeric operators for resource-based selection:
apiVersion: v1
kind: Pod
metadata:
  name: version-sensitive-pod
spec:
  nodeSelector:
    kubernetes.io/version: v1.25.0
  affinity:
    nodeAffinity:
      requiredDuringSchedulingIgnoredDuringExecution:
        nodeSelectorTerms:
        - matchExpressions:
          - key: node-version
            operator: Gt
            values: ["10"]
          - key: cpu-cores
            operator: Lt
            values: ["32"]
This pod requires nodes where node-version is greater than 10 and cpu-cores is less than 32 while also having the exact Kubernetes version v1.25.0.
These selectors work in kubectl commands as well:
# Select pods in multiple environments
kubectl get pods -l 'environment in (production,staging)'

# Exclude specific tiers and require monitoring
kubectl get pods -l 'tier notin (deprecated,legacy),monitoring'

# Numeric comparisons for version or resource constraints
kubectl get nodes -l 'cpu-cores lt 16,memory-gb gt 32'
Set-based selectors enable precise targeting of resources for complex operational scenarios while maintaining readability and maintainability.
Complex selector compositions
Real-world scenarios often require combining multiple selector types, but it’s important to understand that different Kubernetes objects support different selector capabilities:
- Services: Support equality-based selectors only
- Replicas sets / deployments: Support both equality-based and set-based selectors
- Network policies: Have specific syntax requirements and limitations
This deployment combines both equality-based (matchLabels) and set-based (matchExpressions) selectors:
apiVersion: apps/v1
kind: Deployment
metadata:
  name: complex-selector-deployment
spec:
  replicas: 3
  selector:
    matchLabels:
      app: database
      environment: production
    matchExpressions:
    - key: version
      operator: NotIn
      values: ["v2.1", "v2.2"]
    - key: performance-tier
      operator: In
      values: ["high", "premium"]
    - key: backup-enabled
      operator: Exists
This selector manages pods that have app=database AND environment=production (exact matches), while version is not v2.1 or v2.2, performance-tier is either high or premium, and the backup-enabled label exists.
For services, you’re limited to simple equality matching:
apiVersion: v1
kind: Service
metadata:
  name: database-service
spec:
  selector:
    app: database
    environment: production
    # Cannot use matchExpressions here
This service can only select pods using exact label matches—no set-based operators are supported.
Network policies require specific selector syntax:
apiVersion: networking.k8s.io/v1
kind: NetworkPolicy
metadata:
  name: database-network-policy
spec:
  podSelector:
    matchLabels:
      app: database
  policyTypes:
  - Ingress
  ingress:
  - from:
    - podSelector:
        matchExpressions:
        - key: tier
          operator: In
          values: ["frontend", "api"]
This policy applies to pods with app=database and allows ingress traffic only from pods where tier is either frontend or api.
For kubectl operations, you can use complex expressions:
# Combine equality and set-based selectors
kubectl get pods -l 'app=database,environment=production,version notin (v2.1,v2.2)'

# Multiple conditions with existence checks
kubectl get pods -l 'tier in (frontend,api),backup-enabled,!deprecated'
The first command finds pods where app exactly equals database and environment exactly equals production and version is not v2.1 or v2.2. This combines equality-based matching with set-based exclusion.
The second command selects pods where tier is either frontend or api and the backup-enabled label exists (regardless of value) and the deprecated label does not exist (the exclamation mark (!) is shorthand for DoesNotExist).
Labels and resource management
Resource usage pattern identification
Labels help identify and group workloads with similar resource consumption patterns. When combined with custom scheduler plugins or admission controllers, these patterns inform scheduling decisions. For example, as shown below, a custom scheduler could distribute CPU-intensive workloads across nodes to avoid CPU contention. On the other hand, admission controllers might co-locate bursty workloads with steady-state applications to improve overall resource utilization. The default Kubernetes scheduler doesn’t act on custom resource-profile labels, but these labels provide the foundation for building intelligent automation tools that can make such optimization decisions.
resource-profile: cpu-intensive
resource-pattern: bursty
memory-to-cpu-ratio: high
Grouping similar workloads
Logical grouping via labels enhances resource management. These groupings enable targeted operations like scaling similar components together or applying consistent resource policies to related workloads.
component: api
tier: frontend
app: shopping-cart
For microservices architectures, component and service labels provide the foundation for understanding application relationships, but they don’t create a complete dependency map on their own.
Resource allocation efficiency
Labels directly influence how efficiently resources are allocated. These signals help automation tools make appropriate scaling decisions. For instance, workloads labeled for vertical scaling might have their resource requests adjusted before horizontal scaling is considered.
scaling-policy: vertical-first
resource-profile: memory-intensive
optimization-target: cost
By tracking resource utilization patterns by label groups, platform teams can identify opportunities for optimization—like rightsizing resource requests or implementing custom scheduling policies for specific workload types.
Best practices for Kubernetes labelling
Set up labelling conventions and standards
Establishing consistent labelling conventions is essential for maintainable clusters. Use a common prefix for organization-specific labels, follow the Kubernetes recommended labels, document label schemas and enforce them via policies, and keep labels simple and focused on a single aspect.
Here are some recommended Kubernetes labels:
app.kubernetes.io/name: inventory
app.kubernetes.io/component: database
app.kubernetes.io/part-of: inventory-system
app.kubernetes.io/managed-by: helm
Use hierarchical and multi-dimensional labeling
Structure your labels to reflect organizational and application hierarchies, like in the following example:
org: engineering
team: platform
app: api-gateway
component: auth
environment: production
This multi-dimensional approach enables both broad and targeted operations, from selecting all production resources to focusing on just the authentication components of the API gateway.
The key is finding the right balance of granularity: too few labels limit operational flexibility, while too many create maintenance overhead.
Establish label management in multi-team environments
Coordinating labels across teams requires a deliberate approach:
- Create shared documentation for organization-wide label schemas.
- Implement validation mechanisms at CI/CD and admission control levels.
- Establish team-specific prefixes for team-managed labels.
- Use RBAC to control who can modify specific labels.
Automated tools can help maintain consistency by validating labels during CI/CD pipelines, enforcing required labels via admission webhooks, scanning and reporting on label compliance, and automatically remediating missing or incorrect labels.
Tools and techniques for working with labels
CLI commands for label management
Essential kubectl commands for working with labels include the following:
# Add or update labels
kubectl label pods my-pod environment=production tier=frontend

# Remove a label
kubectl label pods my-pod tier-

# Select resources by label
kubectl get pods -l 'environment in (production,staging),tier=frontend'

# Bulk label operations
kubectl label pods --all tier=backend -n default
For mass relabeling, consider tools like kustomize or scripting with kubectl and jq.
Visualizing and monitoring labelled resources
Several tools help visualize and monitor resources by label:
- Kubernetes Dashboard with label filtering
- Grafana dashboards grouped by labels
- Prometheus metrics with label dimensions
StormForge Optimize Live, which also provides detailed visualization of resource utilization and resource optimization of workloads by labe
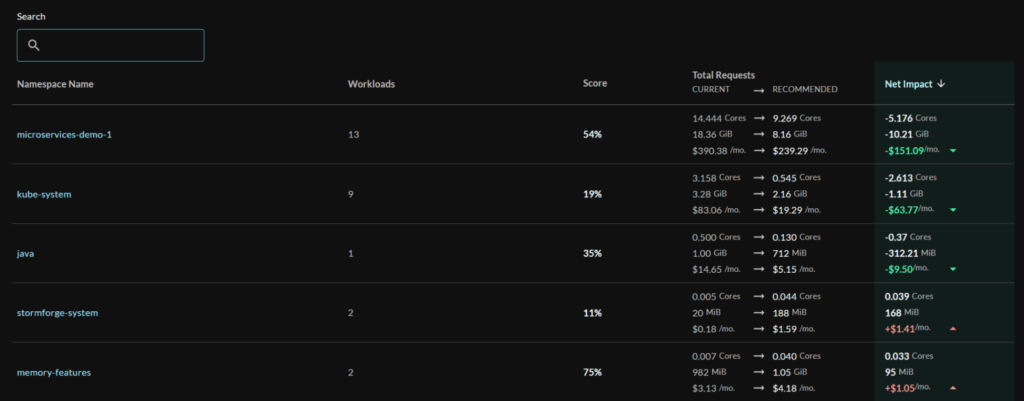
Custom dashboards that group resources by team, application, or environment enable more intuitive monitoring and help identify performance patterns across similarly labelled workloads.
Label validation and enforcement
To ensure consistency of labels, consider these techniques:
- Use Open Policy Agent / Gatekeeper to enforce label requirements.
- Implement validating admission webhooks for custom validation logic.
- Apply PolicySets in CI/CD pipelines to catch issues early.
Example policy:
deny[msg] {
  input.kind == "Pod"
  not input.metadata.labels.environment
  msg := "All pods must have an environment label"
}
Automating label management
Automation reduces the maintenance burden associated with labelling. Take these steps:
- Integrate label validation in CI/CD pipelines.
- Use GitOps workflows to manage labels declaratively.
- Implement mutating webhooks to apply default labels.
- Deploy operators that maintain labels based on observed state.
For example, a namespace controller might automatically propagate certain labels from namespaces to all resources created within them.
The airline analogy translates complex cluster economics into language your execs, engineers, and FinOps teams can all understand.
Conclusion
Labels serve as the foundation for intelligent pod scheduling and resource optimization in Kubernetes. By implementing a thoughtful labelling strategy, you can significantly improve workload placement, resource utilization, and operational efficiency.
The practices outlined in this article—from basic node selection to advanced affinity rules and comprehensive label management—provide a roadmap for harnessing the full power of Kubernetes’ scheduling capabilities. When properly implemented, these techniques enable fine-grained control over workload placement while maintaining the flexibility needed for dynamic, resilient applications.
As your Kubernetes environment grows in complexity, the value of a well-designed labelling strategy becomes increasingly apparent. Labels enable the automation and optimization mechanisms necessary for managing resources at scale, whether you’re manually tuning workload placement or implementing sophisticated automation tools that continuously optimize resource allocation.

Related Blogs

Why Cloud Resource Optimization Is Moving Beyond Recommendations
Cloud resource optimization has typically followed this pattern: teams identify inefficiencies, generate recommendations, review them, and apply changes where it feels safe to…