Kubernetes has a robust scheduling mechanism, enabling workloads to be efficiently distributed across cluster nodes. However, sometimes you need to specify where particular workloads run based on hardware requirements, geography, or other constraints.
Kubernetes node selectors provide a simple way to schedule pods on nodes with particular labels. They allow you to set simple scheduling rules to ensure workloads run on nodes matching their needs.
That said, node selectors have limitations. They support only exact label matches and do not allow advanced rules like preferences or exclusions that other features, like node affinity, allow.
In this article, you will learn about Kubernetes node selectors, including how they work, when to use them, and how to deploy them. We will walk through a step-by-step guide showing you how to configure node selectors using Kubectl and YAML manifests. We also discuss best practices and other scheduling mechanisms, like node affinity, taints and tolerations, and pod affinity/anti-affinity, which can be used alongside node selectors to satisfy more complex use cases.
Summary of Key Kubernetes Node Selector Best Practices
| Concept | Description |
|---|---|
| Use node selectors for hardware-specific workloads | Ensure resource-intensive applications run on appropriate hardware by labelling nodes with gpu=true, disk-type=ssd, or cpu=high-performance and configuring matching nodeSelectors in pods. |
| Separate workloads by environment | Keep production and development workloads isolated by labeling nodes with env=prod or env=dev and using corresponding nodeSelectors to prevent resource contention. |
| Combine with node affinity for flexibility | For complex scheduling requirements, use node affinity with operators like In, NotIn, and Exists when nodeSelector’s exact matching is too rigid. |
| Implement standardized labelling conventions | Maintain consistent labelling schemes like region=us-west, zone=us-west-1a, and node-type=compute-optimized across your cluster to avoid configuration confusion. |
| Apply taints and tolerations with nodeSelectors | Ensure critical workloads get priority on specialized nodes by combining nodeSelectors with taints, preventing less important pods from consuming resources. |
What is a Node Selector?
Let’s illustrate the concept with a simple example. Suppose you have a three-node cluster, of which two are smaller nodes with lesser hardware resources, while one is a larger node configured with more resources. You have different kinds of workloads running in your cluster, and you would like to dedicate the data processing workloads that require more CPU (e.g., Pod A in the figure below)) to the node with greater specs. Running these workloads on high-performance nodes prevents resource contention with other applications and improves throughput. Other workloads will run on the nodes with lesser specs.
The figure shows the intended allocation for high performance.
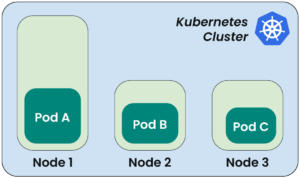
However, in the default arrangement, any pod can go to any node. So, Pod C, in this case, may end up on Node 1, which is not desired.
To solve this, you can limit the pods so that they only run on particular nodes. Kubernetes has different features to achieve this. One of them is using node selectors, which is a simple and easy method compared to more complex scheduling options like node affinity or taints and tolerations. To use this approach, we look at the definition of the pod we need to run on that specific node. We add a new property called nodeSelector to the spec section and specify a key-value pair such as app: data-processing. The key value pair app: data-processing is, in fact, a label that should be assigned to the node in advance. Labels are key-value pairs attached to Kubernetes objects, such as nodes, to group them logically.
When a pod is scheduled, the Kubernetes scheduler checks its node selector field and places it on a node with matching labels. The node selector works as a simple filtering mechanism: if a node doesn’t have the specified label, the pod won’t be scheduled.
CloudBolt delivers continuous Kubernetes rightsizing at scale—so you eliminate overprovisioning, avoid SLO risks, and keep clusters efficient across environments.
Demo: How Pod Node Selectors Affect Pod Scheduling
In this demo, we will configure a node selector in a pod specification and test both successful and failed scheduling scenarios. This demonstrates how Kubernetes uses node labels to determine pod placement, and shows what happens when matching labels aren’t available.
To proceed, make sure you have the following set up:
- A running Kubernetes cluster with at least two worker nodes. You may use minikube or kind to set one up locally.
- The kubectl command-line tool installed and configured.
Check Running Nodes
First, check the available running nodes:
# sh
$ kubectl get nodes
You should be able to see running nodes, as shown below:

Label a Node
Apply a label to one of the worker nodes. You can do this by running the command below:
# sh
$ kubectl label nodes <node_name> app=data-processing
This will add the label app=data-processing to the node.
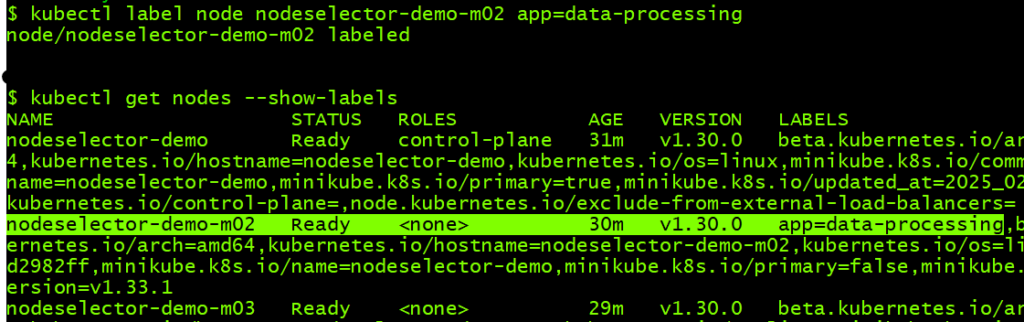
Verify that the label has been added through this command:
# sh
$ kubectl get nodes --show-labels
You should be able to see the label assigned to the node, as highlighted below.
Create a Pod with a Valid Node Selector
We want to run a pod on the labeled node to test the node selector functionality. Create a YAML file data-processing-pod.yaml with this text:
# yaml
apiVersion: v1
kind: Pod
metadata:
  name: data-processing-pod
spec:
  nodeSelector:
    app: data-processing
  containers:
  - name: my-container
    image: nginx
Then apply the YAML file to run the pod:
# sh
$ kubectl apply -f data-processing-pod.yaml
Check the pod status and where it is scheduled:

You should be able to see that the pod is running and scheduled on the node, which is labeled with the app=data-processing label, matching the nodeSelector values assigned to the pod.
Create a Pod with an Invalid Node Selector
Now let’s try a scenario in which a pod can’t be scheduled because its node selector value doesn’t match a node label. You can remove the label from the node by appending a hyphen to the label, as follows:
# sh
$ kubectl label nodes nodeselector-demo-m02 app-
Check that the label has been removed:
# sh
$ kubectl get nodes --show-labels
Recreate the pod by deleting it and then applying the YAML file again:
# sh
$ kubectl delete pod data-processing-pod
$ kubectl apply -f data-processing-pod.yaml
You will notice that the pod remains in a pending state:

Describe the pod through kubectl describe command:
# sh
$ kubectl describe pod data-processing-pod
You will notice FailedScheduling, which means that no node is available for scheduling (because no node matches the pod’s node selector).

This demonstration makes it clear that the node selector feature is a simple but rigid pod scheduling solution. When a matching labeled node exists, Kubernetes schedules the pod successfully; if no node matches, the pod remains pending. Considering other features like node affinity or taints and tolerations, and combining them with node selectors will give you more scheduling options and flexibility.
This practical FinOps playbook shows you exactly how to build visibility, enforce accountability, and automate rightsizing from day one.
Advantages and Limitations of Node Selectors
As we have seen, node selectors are a simple way of controlling pod scheduling, though there are some limitations that make them less suitable for more complex environments. Here is a brief summary of their benefits and limitations:
Node Selector Benefits
- Simplicity and ease of use: Users can control where workloads run without requiring advanced scheduling rules by adding labels to nodes and using them in pod specifications.
- Useful in small or less complex environments: Node selectors are sufficient for small clusters or light workloads. They are particularly useful where workloads and node types are clearly defined, for example, running memory-intensive workloads on highly-spec’ed nodes or isolating workloads by environment (production vs, development).
Node Selector Limitations
- Lack of flexibility compared to other mechanisms (like affinity/anti-affinity): Node selectors support exact label matching only—no preferences, fallback options, or more advanced conditions are possible. This contrasts with node affinity, which supports expressions such as “prefer but do not require.”
- Challenges in complex, large-scale environments: In a complicated, dynamic Kubernetes environment, nodes can be added or removed dynamically, which requires applying frequent updates to labels and pod specifications. Also, node selectors don’t support multiple conditions or prioritization, making them less effective when workloads require more intelligent placement strategies like spreading across zones, preferring certain nodes but allowing others, or avoiding some nodes.
Best Practices for Using Node Selectors
Node selectors are an easy-to-use way to manage workload placement in a Kubernetes cluster, but using them requires following some best practices in order to optimize cluster performance and resource utilization.
When to Use Node Selectors
Use them when you need basic constraints for workload placement. They are ideal for the following cases:
- Assigning workloads to specialized hardware (e.g., running GPU workloads on GPU nodes)
- Running workloads separated by environments. (e.g., running development and testing pods on non-prod nodes)
- Applying security and regulatory policies (e.g., running sensitive applications on specific nodes)
Again, keep in mind that this feature supports only exact label matches, so it is not ideal for complex scheduling needs where fallback options or preferences are required.
Labelling Nodes Effectively
Proper node selector configuration requires proper labeling. Follow these best practices:
- Use standard labels like
node-type=high-memory,region=us-west,env=prod, etc. - Avoid confusion and misconfigurations by keeping labels consistent across the cluster. For example, avoid assigning the
env=prodlabel to certain nodes while assigningenvironment=productionto others. - Avoid over-labeling nodes—for example, assigning the
env=production,role=backend,disk=ssd,region=us-east1, andzone=us-east1-blabels to the same node—as this makes scheduling too restrictive.
Combining Node Selectors with Other Scheduling Features
For pod scheduling flexibility, node selectors should be combined with other Kubernetes scheduling mechanisms to ensure better workload distribution and resource efficiency.
Node Affinity
Node affinity (flexible node selection) provides more capabilities than node selectors by allowing rules with conditions instead of exact matches.
For example, if you prefer to schedule pods on high-memory nodes when available, you can add the code starting with affinity under the pod spec. As with any of the examples in this article, be sure that each section of your manifest is properly indented:
# yaml
…
spec:
  affinity:
    nodeAffinity:
      preferredDuringSchedulingIgnoredDuringExecution:
        - weight: 1
          preference:
            matchExpressions:
            - key: node-type
              operator: In
              values:
              - high-memory
This specifies that it is preferred for the pod to be scheduled on high-memory nodes but that it can still run elsewhere if needed.
Taints and Tolerations
Taints keep workloads away from a node unless they have a matching toleration, which is useful for dedicating nodes to specific workloads. Taints can be configured on nodes with three possible values— NoSchedule, PreferNoSchedule, and NoExecute — which specify the action Kubernetes takes when a pod without a matching toleration needs to be deployed.
This is how you taint a node:
# sh
$ kubectl taint nodes worker-node-1 dedicated=high-memory:PreferNoSchedule
This is how you tolerate the pod:
# yaml
…
spec:
  tolerations:
    - key: "dedicated"
      operator: "Equal"
      value: "high-memory"
      effect: "PreferNoSchedule"
Here, preferNoSchedule is a soft rule, which means that Kubernetes prefers not to schedule pods on the tainted nodes, but it can do this when needed.
Pod Affinity/Anti-Affinity
Pod affinity ensures that specific pods will run on the same node or nearby nodes (e.g., microservices kept close for low latency). Pod anti-affinity keeps pods spread across multiple nodes to avoid single points of failure.
Here is an example of pod affinity, in which a rule is set to schedule a new pod on the same node. The rule uses the well known label kubernetes.io/hostname, to make sure frontend pods labeled app=frontend are running on the same node.
# yaml
…
spec:
  affinity:
    podAffinity:
      requiredDuringSchedulingIgnoredDuringExecution:
        - labelSelector:
            matchLabels:
              app: frontend
          topologyKey: "kubernetes.io/hostname"
Topology Spread Constraints
A balanced distribution of pods ensures that a workload is distributed across zones or nodes to avoid resource congestion or single-zone failures.
Here is an example of a topology spread constraint to distribute pods with the label app: web evenly across different availability zones. It ensures that the maximum difference between the number of pods in any zone is one(maxSkew: 1) but will still schedule pods even if perfect distribution can’t be achieved (ScheduleAnyway).
# yaml
…
spec:
  topologySpreadConstraints:
    - maxSkew: 1
      topologyKey: "topology.kubernetes.io/zone"
      whenUnsatisfiable: ScheduleAnyway
      labelSelector:
        matchLabels:
          app: web
Resource Requests and Limits
It is important to always define pods with CPU and memory requests, even when using node selectors, to avoid overloading nodes and, primarily, to ensure that pods will be scheduled on nodes that have the necessary resources. It is generally considered a best practice to leave CPU limits unset to avoid unnecessary throttling and to set memory limits equal to requests. Read this series of articles for more in-depth information on how Kubernetes resource requests and limits really work. Creating and setting optimal resource request values for workloads is key to keeping costs low and reliability high, but can be extremely difficult to do without well-informed automation using a tool like StormForge’s Optimize Live.
Here’s an example of pod resource request and limit configuration:
# yaml
…
spec:
  containers:
  - name: my container
    image: nginx
    resources:
      requests:
        memory: "512Mi"
        cpu: "250m"
      limits:
        memory: "1Gi"
        cpu: "500m"
Custom schedulers
Kubernetes supports custom schedulers overriding the default behavior for large-scale or complex workloads. For example, a custom scheduler may prioritize workloads based on AI model needs or business rules. To use a custom scheduler, specify it in your pod definition as follows:
# yaml
…
spec:
  schedulerName: my-custom-scheduler
Note that this is an advanced use case. Please visit the kubernetes documentation for more information on implementing a custom scheduler.
The airline analogy translates complex cluster economics into language your execs, engineers, and FinOps teams can all understand.
Conclusion
Kubernetes node selectors are useful for small or less complex environments where precise node selection is needed. They are an easy-to-use feature and a good starting point for node-based scheduling.
However, node selectors have limitations in big, dynamic environments. They do not provide alternative options, and their use can lead to inefficient resource utilization if not managed properly. To avoid this, it is recommended to apply best practices as needed, which includes labeling nodes correctly and combining node selectors with node affinity, taints and tolerations, pod affinity/anti-affinity, and topology spread constraints for better scheduling efficiency.You can read more about Kubernetes taints in this article.
Related Blogs

Why Cloud Resource Optimization Is Moving Beyond Recommendations
Cloud resource optimization has typically followed this pattern: teams identify inefficiencies, generate recommendations, review them, and apply changes where it feels safe to…