An Azure Network Security Group (NSG) is a core component of Azure’s security fabric. Leveraging an NSG, you can filter traffic to and from Azure resources that you have commissioned on an Azure Virtual Network (VNet).
At its core, an NSG is effectively a set of access control rules you assign to an Azure resource. It inspects inbound and outbound traffic and uses these rules to determine whether it should grant or deny access to a particular network packet. At a high level, Azure groups NSG rules into inbound and outbound. The management and configuration of these rules are similar to those you find on a traditional firewall. Using the Azure Portal, Azure PowerShell, or Azure CLI, you can manage an Azure NSG and specify the source and destination IPs, port, and protocol.
Azure NSG Capabilities
Azure NSGs control access and manage communication between:
- Individual workloads hosted on one or more Azure VNets.
- Connectivity between on-prem environments and Azure via an Application Gateway, VPN Gateway, Azure Firewall, Azure Bastion service, and Virtual Network Appliances.
- Connections to and from the Internet.
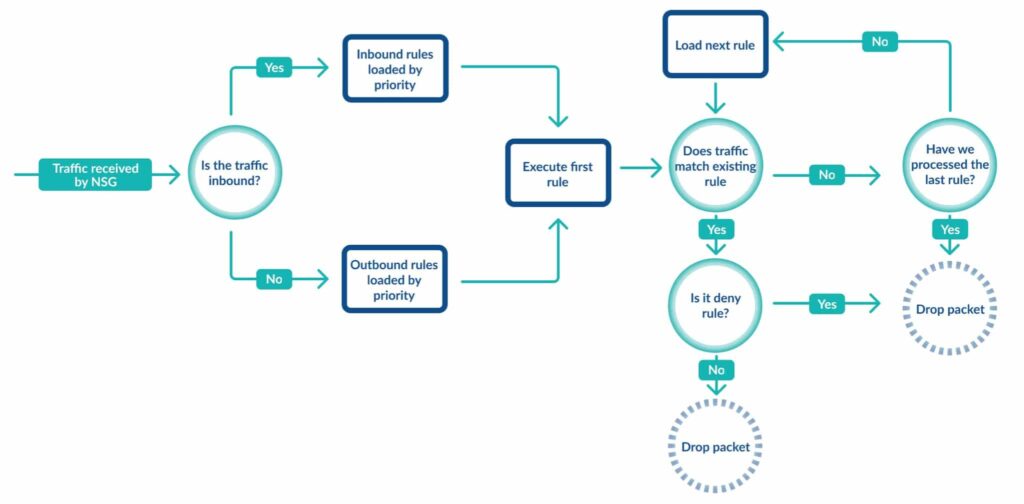
The diagram below details the flow of network traffic and the rule enforcement protocol an Azure NSG follows.
A standard Azure subscription can have up to 5,000 NSGs, and each NSG can have a maximum of 1,000 rules. The table below specifies the rule setting and its associated properties.
A standard Azure subscription can have up to 5,000 NSGs, and each NSG can have a maximum of 1,000 rules. The table below specifies the rule setting and its associated properties.
| Rule Setting | Properties |
|---|---|
| Name | The name of the rule. This setting is a free text field but must be unique within the NSG. |
| Priority | This setting needs to be a number between 100 and 4096. The Azure NSG processes its rules in order of priority, with lower numbers processed before higher ones. It is important to note that the Azure NSG will stop processing a network packet when it finds a matching rule. Therefore, should you have another rule with the same attributes lower in the priority list, the NSG will not process it. |
| Source or Destination | This setting defines the source or destination of the network traffic. It can be set to “Any” for traffic from anywhere, or you could lock it down to a single IP address or an IP range that you need to specify in CIDR notation, e.g., 10.0.0.0/16. |
| Protocol | This NSG setting describes the network protocol of your rule. You can set it to look for “Any” protocol or specify one of TCP, UDP, ICMP, ESP, or AH. |
| Direction | This setting defines the direction of the network traffic, and you can set it to either Inbound or Outbound. |
| Port Range | The port range setting describes the port or ports of the rule. You can specify a single port, e.g., 80, or a range of ports, e.g., 1000-2000. |
| Action | This setting defines the action the rule will execute. You can set it to either “Allow” or “Deny.” |
CloudBolt makes Azure work for your organization — not the other way around. Self-service provisioning, built-in governance, and unified orchestration help teams move faster while IT stays in control.
Azure NSG Rule Enforcement
When you create an Azure NSG, Azure populates it with six default security rules, as illustrated in the image below.
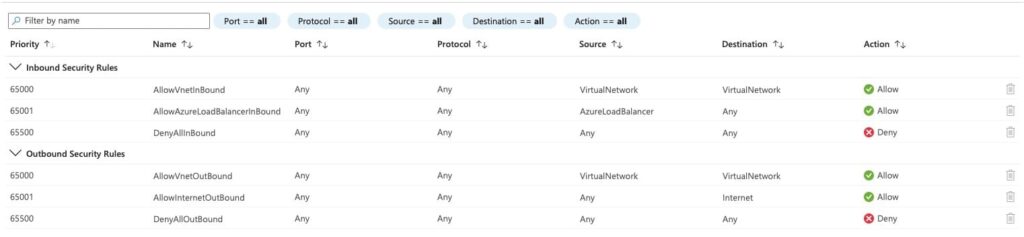
The table below provides details on each rule and its purpose.
| Rule Name | Description |
|---|---|
| AllowVnetInbound | This default rule allows all inbound traffic inside the virtual network. It permits all hosts within the same Vnet and connected subnets to communicate with each other. Note that this rule allows all inbound traffic between all hosts. If your security strategy requires locking some services, you will need to configure additional deny rules to enforce it. |
| AllowAzureLoadBalancerInBound | This rule allows communication between an Azure Load Balancer and your Azure resources, i.e., VNet or Virtual Machine (VM). Typically, Azure uses this rule to send and receive heartbeats between your VM and the Load Balancer. |
| DenyAllInbound | This default rule, as the name implies, blocks all inbound traffic. Azure only enforces it after processing every other rule in the list as it has the lowest priority. |
| AllowVnetOutbound | This default rule allows all outbound traffic inside the virtual network. It permits all hosts within the same Vnet and connected subnets to communicate with each other. Note that this rule allows all outbound traffic between all hosts. If your security strategy requires locking some services, you will need to configure additional deny rules to enforce it. |
| AllowInternetOutBound | This default rule allows all outbound traffic to the Internet. If your security configuration states that only specific ports and services should be allowed to access the Internet, you will need to configure additional rules. |
| DenyAllOutbound | This default rule, as the name implies, blocks all outbound traffic. Azure only enforces it after processing every other rule in the list as it has the lowest priority. |
Rule Priorities
As mentioned, Azure NSGs execute rules in order of priority, with the lower numbered priorities processed before high numbers. However, you can also nest NSGs for a particular resource, as shown in the image below. In the diagram, there is a VM running a web server connected to a subnet. That subnet forms part of a more extensive virtual network. The Azure administrator has configured three NSGs and attached one to the virtual network, subnet, and VM’s network card.
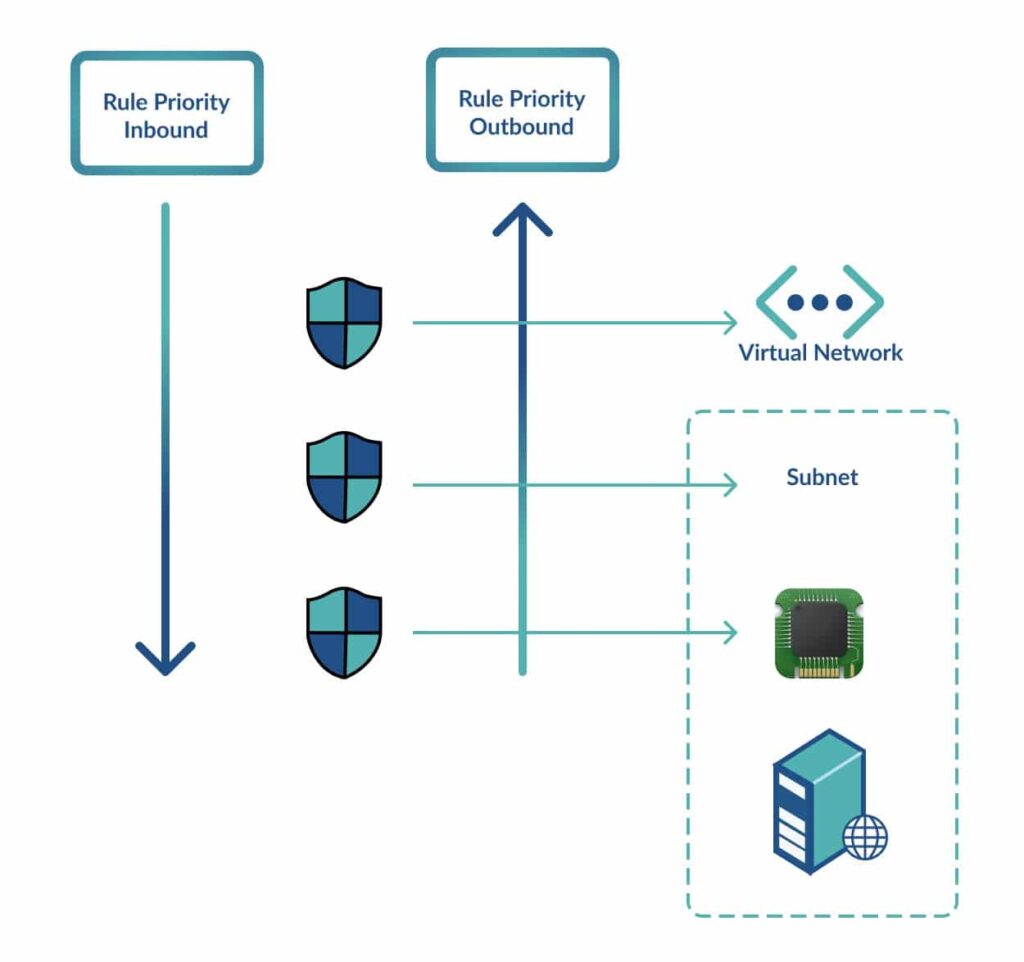
As there are three active Azure NSGs, configuring rules for the VM requires setting the correct configuration on all three NSGs. For example, if you want to allow access from the Internet to Port 80 (the default HTTP port) on the VM, you will need to create an inbound rule on all three NSGs. Since inbound traffic first traverses the virtual network, then routes to the subnet, and finally the VM’s network card, every NSG needs an allow rule. These explicit allow rules are required because each NSG has the default DenyAllInbound rule.
For outbound traffic, NSG rules are enforced in reverse. For example, let’s assume the webserver also provides an SMTP service to other VMs hosted on the same VNet and your security policies dictate that you cannot send any SMTP traffic to the Internet. In that case, you would need to configure an allow SMTP rule on the VM network card’s NSG and the subnet’s NSG to allow SMTP traffic to flow between the VMs within the VNet. The DenyAllOutbound rule on the virtual network’s NSG will prevent any Internet-bound SMTP traffic from leaving the VNet.
See how enterprises are using CloudBolt to simplify Azure management at scale.
Azure NSG Flow Logs
The primary purpose of an Azure NSG is to protect resources commissioned on an Azure virtual network. However, security best practices state that continuous monitoring of your environment is vital. As incoming alerts can help you identify any security incidents, putting measures in place that monitor your environment is crucial.
Azure NSG Flow Logs is a feature provided by Azure Network Watcher. This service allows you to log IP traffic information for data flowing through your configured NSGs. Azure sends this flow log data to an Azure storage account where you can access it or export it for analysis by a SIEM or IDS.
Azure NSG Flow Log Use Cases
Azure NSG Flow Logs give you the insight you need to monitor your environment for security, compliance, and performance. By analyzing data on the current state of your Azure virtual network, they provide vital information such as which services have connections, where those connections are coming from, and which ports are open to the Internet. You can leverage Azure Flow Logs in several different use cases, as illustrated in the table below.
| Use Case | Examples |
|---|---|
| Network Monitoring | ● Identify unknown or suspicious network traffic.● Monitor bandwidth consumption and traffic levels.● Leverage filtering by IP and port to baseline application behavior.● Export log data for reporting or live monitoring dashboard feeds. |
| Usage Monitoring and Optimization | ● Identify the top talkers in your network.● Leverage Geo-IP and identify cross-region traffic.● Utilize flow log data for capacity forecasting.● Identify and resolve unoptimized traffic rules. |
| Compliance | ● Verify your traffic rules adhere to network isolation and compliance obligations. |
| Network Forensics and Security Analysis | ● Export flow log data to any IDS or SIEM.● Analyze network flow from suspicious IPs or network interfaces. |
How Azure NSG Flow Logs Work
Azure NSG Flow Logs record all IP flows in and out of an NSG, and Azure collects this data at one-minute intervals. The service stores the logged information in JSON format with a default retention period of one year for all logs. It is vital to note that Azure sets NSG Flow Logs to be disabled by default. However, you can activate and manage this service using several Azure management capabilities, including the Azure Portal, Azure CLI, and Azure PowerShell.
Enabling Azure NSG Flow Logs using the Azure Portal
Before activating the Azure NSG Flow Logs using the Azure Portal, you need to enable the Network Watcher and register the Insights provider.
Enabling the Network Watcher via the Azure Portal is a quick, three-step process.
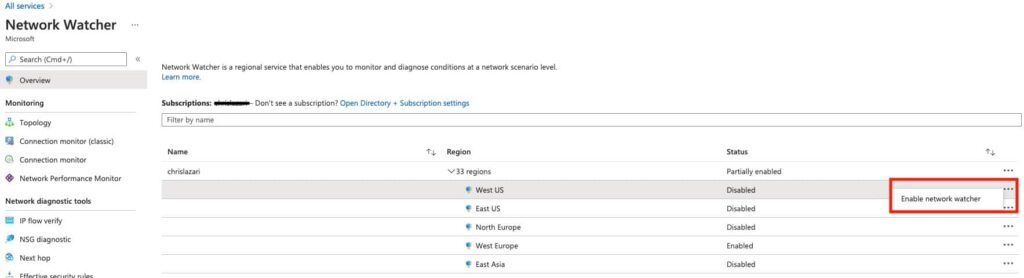
Search for Network Watcher after selecting All Services in the Azure Portal.

Then, select the region associated with your virtual network and NSG, and enable the Network Watcher as illustrated in the image below.
The Microsoft Insights provider is a prerequisite for Azure NSG flow logging. You can follow the steps below to enable it using the Azure Portal.
Search for Subscriptions after selecting All Services in the Azure Portal.

Open the relevant subscription, and on the blade menu, select Resource Providers under the Settings section.
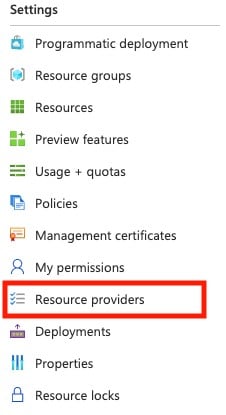
Confirm microsoft.insights displays as registered as shown in the image below.

As mentioned, NSG Flow logs require a storage account to store data. If you do not have a storage account, you will need to create one before enabling NSG flow logging.
Once you have confirmed that the Network Watcher is enabled, the Microsoft Insights Provider is registered, and you have a storage account available, you can enable Azure NSG flow logging by following these steps.
Search for Network Watcher after selecting All Services in the Azure Portal.

On the left-hand vertical navigation, select NSG flow logs.
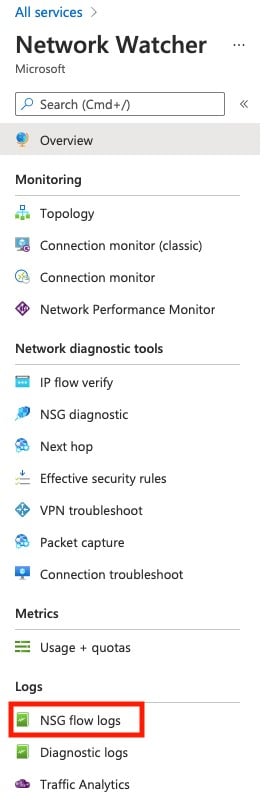
Click on the NSG you want to monitor with Azure NSG Flow Logs.

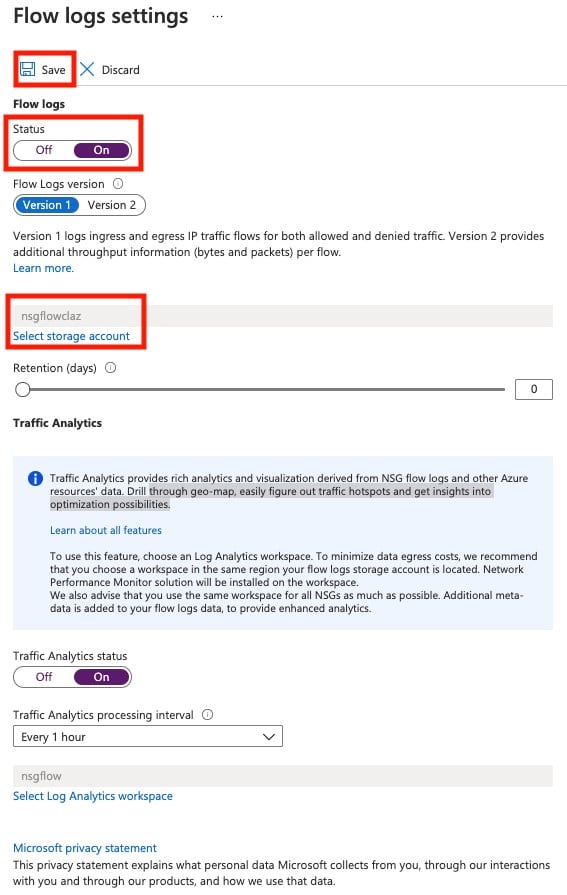
Set the Flow log status to On, select your storage account, and click Save. You can also set other options for NSG flow logs on this form. For example, version 1 only logs ingress and egress IP traffic flow for both allowed and denied traffic, whereas version 2 provides additional throughput information (bytes and packets) per flow. You can also enable Traffic Analysis if you have a Log Analytics Workspace configured. This feature offers other rich analytics and visualizations, such as the ability to drill through geo-map, quickly figure out traffic hotspots, and get insights into optimization possibilities.
Enabling Azure NSG Flow Logs using the Azure CLI
You can also enable Azure NSG Flow Logs using the Azure CLI. As with the Azure Portal, you first need to register the Insights Provider. The Azure CLI command for actioning this step is:
az provider register --namespace Microsoft.Insights
Once you have confirmed registration of the Insights Provider, you can run this command to enable NSG Flow logging:
az network watcher flow-log create --resource-group resourceGroupName --enabled true --nsg nsgName --storage-account storageAccountName --location location
Azure also allows you to configure additional settings for Azure NSG flow logging via the Azure CLI. For example, if you want to enable logging with version 2, you can run this command:
az network watcher flow-log create --resource-group resourceGroupName --enabled true --nsg nsgName --storage-account storageAccountName --location location --format JSON --log-version 2
Enabling Azure NSG Flow Logs using Azure PowerShell
You can also manage Azure NSG Flow Logs with Azure PowerShell.
First, you need to set your variables, as shown in the script example below.
$NW = Get-AzNetworkWatcher -ResourceGroupName NetworkWatcherRg -Name NetworkWatcher_
$nsg = Get-AzNetworkSecurityGroup -ResourceGroupName nsgRG -Name nsgName
$storageAccount = Get-AzStorageAccount -ResourceGroupName StorageRG -Name contosostorage123 Get-AzNetworkWatcherFlowLogStatus -NetworkWatcher $NW -TargetResourceId $nsg.Id
If you want to enable Traffic Analysis, you will also need to set these parameters.
$workspaceResourceId = "/subscriptions/bbbbbbbb-bbbb-bbbb-bbbb-bbbbbbbbbbbb/resourcegroups/trafficanalyticsrg/providers/microsoft.operationalinsights/workspaces/taworkspace"
$workspaceGUID = "cccccccc-cccc-cccc-cccc-cccccccccccc" $workspaceLocation = " e.g. westcentralus"
The following Azure PowerShell commands provide examples of enabling NSG flow logging with various options.
Configure Version 1 Flow Logs
Set-AzNetworkWatcherConfigFlowLog -NetworkWatcher $NW -TargetResourceId $nsg.Id -StorageAccountId $storageAccount.Id -EnableFlowLog $true -FormatType Json -FormatVersion 1
Configure Version 2 Flow Logs and configure Traffic Analytics
Set-AzNetworkWatcherConfigFlowLog -NetworkWatcher $NW -TargetResourceId $nsg.Id -StorageAccountId $storageAccount.Id -EnableFlowLog $true -FormatType Json -FormatVersion 2
Configure Version 2 FLow Logs with Traffic Analytics Configured
Set-AzNetworkWatcherConfigFlowLog -NetworkWatcher $NW -TargetResourceId $nsg.Id -StorageAccountId $storageAccount.Id -EnableFlowLog $true -FormatType Json -FormatVersion 2 -EnableTrafficAnalytics -WorkspaceResourceId $workspaceResourceId -WorkspaceGUID $workspaceGUID -WorkspaceLocation $workspaceLocation
Query Flow Log Status
Get-AzNetworkWatcherFlowLogStatus -NetworkWatcher $NW -TargetResourceId $nsg.Id
Azure NSG Best Practices
Working with multiple NSGs can be challenging, especially if you need to understand the effective rules when two or more NSGs control your network traffic. However, following a few best practices can help you manage Azure NSGs more effectively.
Align NSGs to Resource Groups and Services
You do not need to configure an NSG for every Azure resource hosted on a virtual network. Depending on your use case, you could easily manage all your rules at the VNet or subnet level. However, it is important to keep maintainability in mind.
For example, managing all your access rules in a single NSG may seem more straightforward because you do not need to factor in any other NSG rules. However, an NSG can have up to 1,000 rules, and maintaining hundreds of allow and deny settings can become complex as you scale. In turn, this complexity can lead to oversights and misconfigurations. As with any other technology implementation, the structure needs to align with the strategy. As you develop your Azure security strategy, make sure to keep the maintainability of your NSG rules in mind.
For instance, instead of having a single NSG for an entire VNet, consider aligning your NSGs with a particular resource group or service. Using this approach allows you to manage and maintain a smaller set of rules that is easier and more efficient. It also offers additional security when you decommission services. You can delete the NSG with its resource group, mitigating the risk of open rules you no longer need.
Use Logical Naming Conventions
Azure gives you a lot of flexibility when it comes to naming resources. If you label your Azure NSGs with a naming convention that provides the reader with enough information, it will reduce the amount of effort needed to support your Azure environment. For example, if you need to commission an NSG for a VM named SRV-WEB-01, naming it NSG-SRV-WEB-01 is far easier for support to identify than a generic name such as NSG01.
Leverage IP Ranges to Streamline Rule Creation
Azure NSGs allow you to either specify a single IP address and port or enter a range. Where possible, use ranges instead of individual addresses, as it will limit the number of rules you need to create and manage. However, if you need to restrict access to a single resource, then a single IP Address and port are advisable.
Leave Spaces Between Rule Priority Numbers
As mentioned, Azure NSGs process rules in order of priority, with the lower numbers processed first. Therefore, when creating rules, leave enough space between your priorities in case you need to create a rule that requires processing before a preceding rule. For example, start your first rule with a priority of 110 instead of 100. Using this approach will give you the flexibility in the event you need to create another rule that needs to precede it.
Use Tags to Improve Readability
When you need to manage multiple objects, you can leverage virtual network service tags. These Azure resources represent a group of IP address prefixes that relate to a particular Azure service. For example, “VirtualNetwork” represents the entire VNet address range, and “Internet” indicates all external IP addresses that are publicly routable. Therefore, using the tags in your source and destination fields enhances the readability of your NSG rules.
Azure NSG Shortcomings and Limitations
Although Azure NSGs offer adequate security, they do have some limitations. Microsoft offers Azure Firewall, a highly available, managed service providing additional security features relevant to some use cases. The table below details the functionality available for both security products.
| Feature | Azure NSG | Azure Firewall |
|---|---|---|
| OSI Layers | Filters traffic on Layer 3 (network) and Layer 4 (session). | Filters traffic on Layer3 (network), Layer 4 (session), and Layer 7 (application). |
| Protocol-based traffic filtering | Yes | Yes |
| Service Tag support | Yes | Yes |
| Fully Qualified Domain Name (FQDN) Tag support | No | Yes – With Azure Firewall, you can tag a group of fully qualified domain names, like Windows Updates or Microsoft 365 services. |
| Source Network Address Translation (SNAT) | No | Yes – Azure Firewall allows you to configure a public IP to mask an internal IP. |
| Destination Network Address Translation (DNAT) | No | Yes – Azure Firewall supports DNAT, which you can use to translate incoming traffic to the private IP address of your virtual network. |
| Integrated with Azure Monitor | Yes – However, Flow Logs with Traffic Analysis is not enabled by default. | Yes – However, diagnostic logging is not enabled by default. |
| Threat Intelligence | No | Yes – Azure Firewall gives you the ability to block traffic based on Microsoft threat analytics data. |
Related Blogs
What Teams Actually Need Before They’ll Let Right-Sizing Act in Production
Most Kubernetes teams know they’re overprovisioned. The dashboards show it. The recommendations confirm it. And in most environments, the list of workloads…