Terraform is a popular Infrastructure as Code (IaC) tool among DevOps teams because it is a cloud-agnostic framework for developing and deploying infrastructure. Terraform is a declarative language, which means that the desired state is described in manifest files and modules. Terraform also allows the use of meta-arguments and expressions, that simplify the deployment of multiple similar resources.
In this article, we will look at three of the “for loop” constructs available in Terraform, their use cases and some practical examples to get you started.
💡Learn more – the key benefits of Infrastructure as Code were considered in a previous article discussing Terraform dynamic blocks.
Executive summary
Below is a summary of the three main looping constructs found within the HashiCorp Configuration Language (HCL) used by Terraform.
| Name | Description | Use cases | Example(s) |
|---|---|---|---|
| count | Basic loop meta-argument – uses a hardcoded number or used with length to loop over the number of variables in a list or map. | Deploying simple, identical resources that are unlikely to change. | count = 4 count = length(var.list) |
| for_each | More advanced loop meta-argument – accepts multiple variables from a map or set of strings in place of a number. | Deploying multiple similar resources, whilst allowing some variations e.g. name and size of AWS EC2 instances. | for_each = { “a1” = “t3.micro” “a2” = “c5.large” “a3” = “m4.xlarge” } name = each.key machine_type = each.value |
| for | Used to transform and/or filter lists, sets, tuples or maps. Can be combined with Terraform operators and functions such as if, join, replace, or lower and upper. | Filtering a variable into separate collections e.g. to create a separate set of admin and standard user objects.Performing multiple operations on objects stored in a variable. | adm_users = { for name, user in var.users : name => user if user.is_admin } std_users = { for name, user in var.users : name => user if !user.is_admin } |
“For Loop” constructs and their use cases
Since v0.12, Terraform provides three main constructs for the definition of multiple identical or similar resources.
Using the count meta-argument
The count meta-argument is the simplest of the looping constructs within Terraform. By either directly assigning a whole number or using the length function on a list or map variable, Terraform creates this number of resources based on the resource block it is assigned to. An index object is assigned to each resource represented by the number in the sequence of creation and can be used to differentiate them (e.g. to assign a unique name).
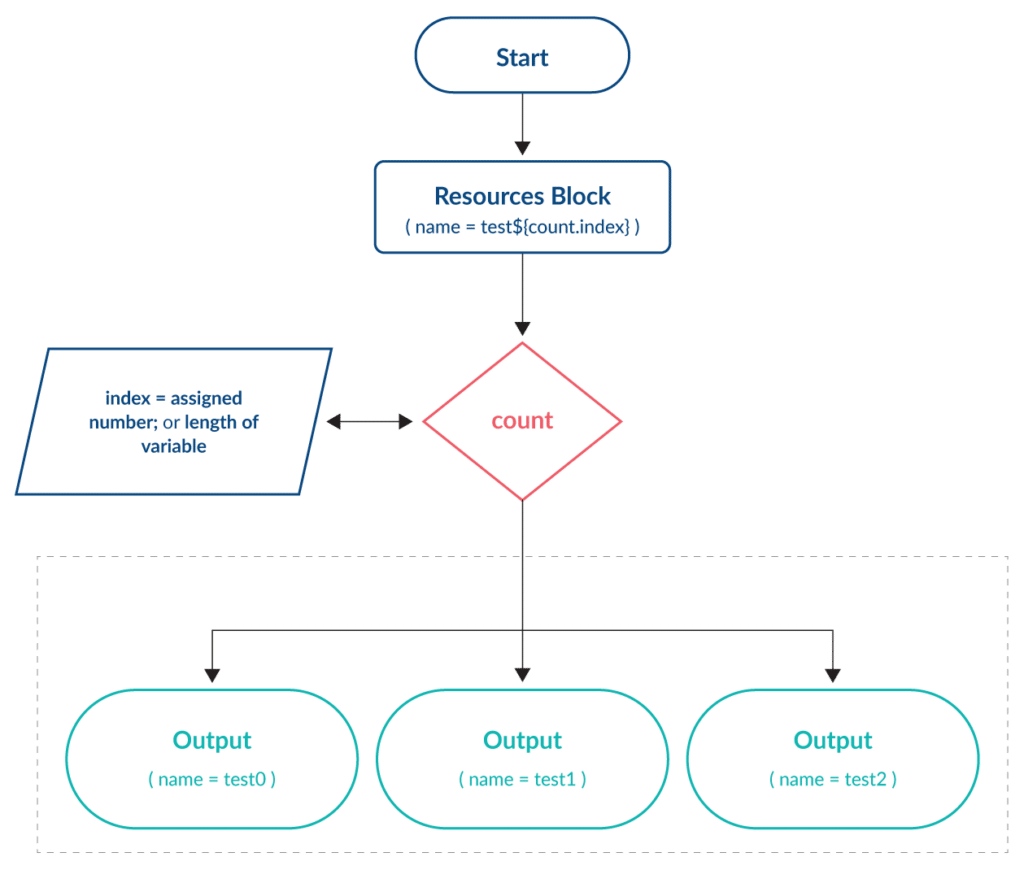
count is best used when deploying identical (or almost identical) resources that do not require any future amendments or changes. This is due to the unique index object assigned. For example, when using count with a list variable, an attempt to change a resource that has been assigned an earlier index in the sequence could have unintended consequences on subsequent resources.
This limitation is demonstrated in the tutorial section below.
Using the for_each meta-argument
The for_each meta-argument offers flexibility for deploying similar resources with variations – something that cannot be achieved using count. With for_each a map or set of strings variable is used as the input. A key and one or more values are assigned to each resource. The number of key items contained within the variable determines the number of resources created.
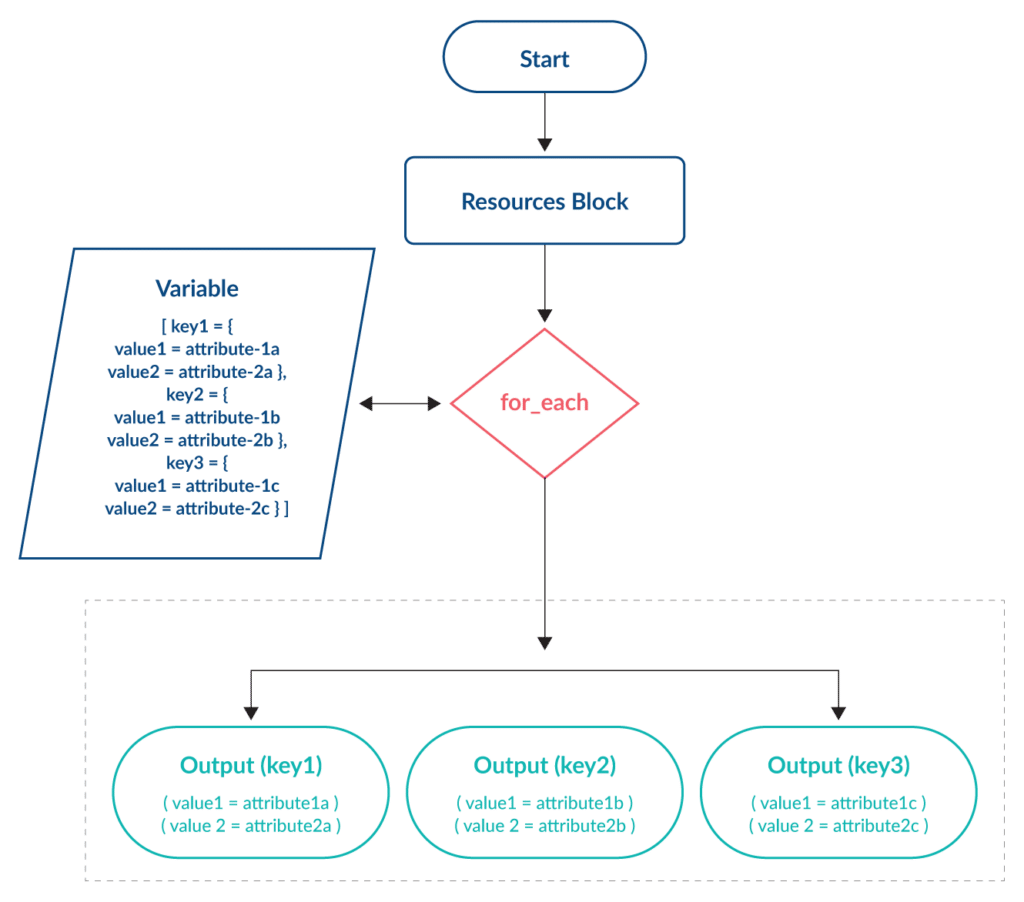
The unique key of each item is not influenced by changes made to other items within the variable, preventing the issue seen with the count meta-argument.

Again, the examples in the tutorial section demonstrate this.
Using the for expression
Unlike count and for_each, the for expression’s primary purpose is not for deploying multiple resources. It is instead a method by which variables containing lists, sets, tuples or maps can be transformed or filtered to perform other operations. A basic example often cited is to transform a list of variables into uppercase when combined with the upper function.
output "a" {
    value = [ for a in var.objects : upper(a) ]
}
Using an optional if clause, for can be used to filter variables into one or more separate collections. The below code uses the substr function and the != operator (which equates to “not equal to”) and will output all items in the objects variable in uppercase unless the first five letters of the item are equal to “lower”.
output "a" {
    value = [for a in var.objects : upper(a) if substr(a,0,5) != "lower"]
}
Tutorial
Our tutorial will use Terraform code to deploy some example resources. The examples are designed to show each of the “for loop” constructs practically and to aid your understanding. In each example, it is assumed that authentication to the relevant cloud provider has already been implemented.
Deploying Azure storage accounts using count
Azure storage accounts contain all data objects in an Azure subscription, such as blobs, file shares, queues, tables, and disks. Each storage account must have a unique namespace enabling it to be globally accessible over HTTP or HTTPS.
In our example, count is assigned a whole number (5) which represents the number of storage accounts required. This is placed at the top of the azurerm_storage_account resource block. The count.index object is attached to a standard name prefix (project1devenvironment) which provides a globally unique name for each storage account:
variable "rg_name" {
   description = "The name to assign to the resource group"
   default = "main"
}

variable "location" {
   description = "The location where resources will be created"
   default = "eastus"
}

resource "azurerm_resource_group" "main" {
   name     = var.rg_name
   location = var.location
}

resource "azurerm_storage_account" "devstorageaccounts" {
   count = 5

   name                     = "project1devenvironment${count.index}"
   resource_group_name      = azurerm_resource_group.rg.name
   location                 = azurerm_resource_group.rg.location
   account_kind             = "StorageV2"
   account_replication_type = "LRS"
   account_tier             = "Standard"
}
As can be seen in the screenshot, five storage accounts are created in the Azure subscription, using the prefix of project1devenvironment and then a unique number assigned by the count.index object.

Deploying virtual instances in GCP using count
A small variation on this would be to use a local list variable and use this to determine the number of deployed resources.
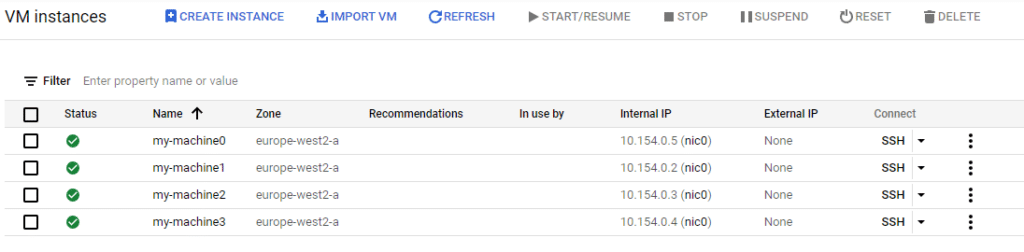
The example code will deploy four compute instances into Google Cloud Platform (GCP). The names variable contains a list of four names, and the length function used with count assigns the index object to each of the four items in the names list variable. Again, this is attached to a standard name prefix (my-machine) which is then used to create a unique name for each instance.
variable "names" {
  type = set(string)
  default = ["alpha","beta","gamma","delta"]
}

resource "google_compute_instance" "instances" {
  count = length(var.names)

  name = "my-machine${count.index}"
  zone = "europe-west2-a"
  machine_type = "e2-small"
  boot_disk {
    initialize_params {
      image = "ubuntu-os-cloud/ubuntu-2004-lts"
    }
  }
  network_interface {
    network = "default"
  }
}
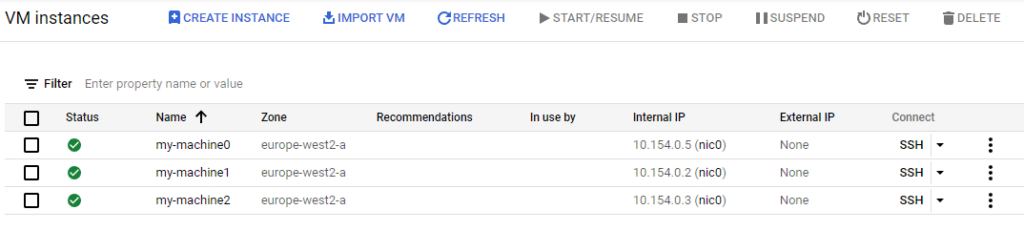
The screenshot below shows the four compute instances created using the prefix of my-machine and then a unique number assigned by the count.index object.
There are three limitations of using count to build resources such as compute instances:
- The name of each instance is unique but only based on the index number assigned – custom names cannot be set for each instance such as alpha, beta, gamma, and delta.
- All instances must be identical. For example, it’s not possible to set different machine types within this resource block. To do that, we would have to create another google_compute_instance resource block and set the desired machine type there, resulting in duplicate code for each machine type.
- If changes are required they can have unintended consequences. This is because each resource is managed using a dynamic index number, which is assigned according to the total number of items in the variable.
Watch how CloudBolt adds governance, self-service, and automation to Terraform at scale.
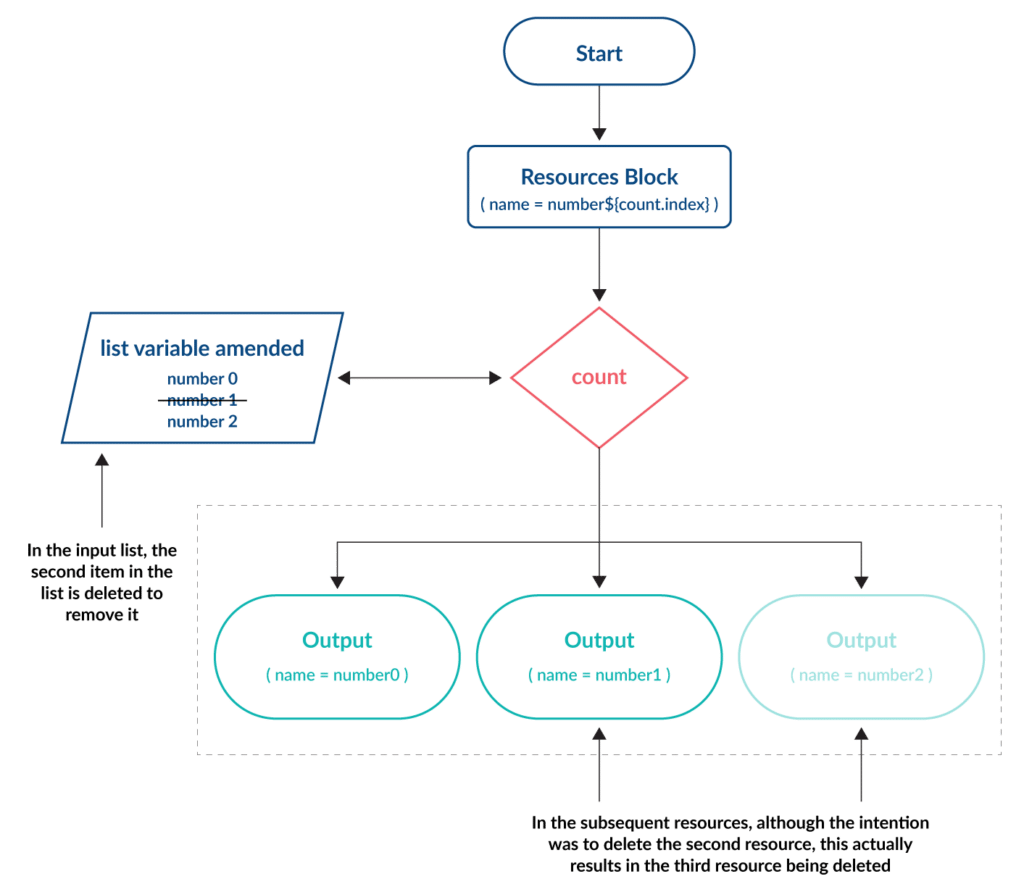
To demonstrate point 3, let’s make a simple change to the code above to remove the beta name from the variable.
variable "names" {
  type = set(string)
  default = ["alpha","gamma","delta"]
}
What you might understandably expect, is for the second instance named my-machine1 (i.e. the second machine to be created) to be deleted. However, the output of terraform plan shows the following:

Running terraform apply shows the result.
The my-machine1 instance has not been deleted, but my-machine3 has. This is because the length of the variable (the number of items contained within it) has been reduced to only three, so the fourth item is removed and not the second. When dealing with virtual compute instances, this lack of transparency could have disastrous implications.
💡 Pro-tip: use the cloud provider’s built-in protections against instance deletion or termination to prevent accidental loss of service and/or data. You can also use Terraform’s prevent_destroy argument within the lifecycle meta-argument to prevent accidental deletion of any resources that are managed via Terraform.
Deploying virtual instances in GCP using for_each
If we replace the count meta-argument from the previous example with for_each, we can immediately see that this provides the same functionality but without the same limitations.
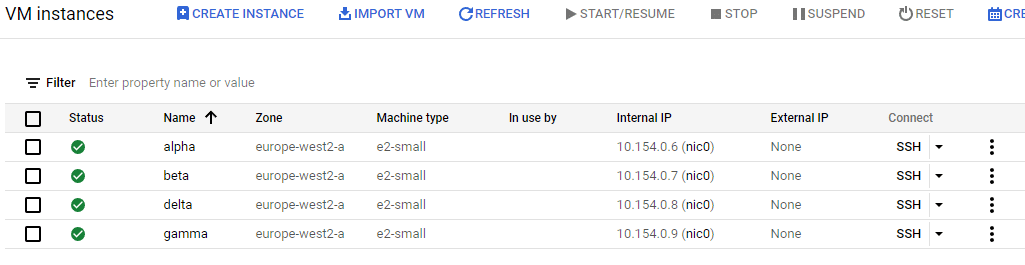
The code below will again deploy four compute instances into Google Cloud Platform. The names variable contains the same list of four names, but this time we assign this variable to the for_each meta-argument. As with count, this will iterate over the number of items in the list to create that number of resources. With for_each, we can use the each keyword to reference the value stored in the variable. Since this can be a string, we can assign the name of each resource to be the value in the variable by using each.value.
variable "names" {
  type = set(string)
  default = ["alpha","beta","gamma","delta"]
}

resource "google_compute_instance" "instances" {
  for_each = var.names

  name = each.value
  zone = "europe-west2-a"
  machine_type = "e2-small"
  boot_disk {
    initialize_params {
      image = "ubuntu-os-cloud/ubuntu-2004-lts"
    }
  }
  network_interface {
    network = "default"
  }
}
The screenshot below shows the four Ubuntu instances created. This time, the name of the instance is set to the values in the variable i.e. alpha, beta, gamma, and delta.
This leads us to the next advantage of for_each. As mentioned, if we want to change the machine type of one of these instances to a larger specification, it would not be possible with count. With for_each, we can change the Terraform code to use a map variable as the input, adding an attribute to set both the name and the machine type.
variable "names" {
  type = map(object({
    name    = string
    type    = string
  }))
  default = {
    "alpha" = {
      name  = "alpha"
      type  = "e2-small"
    },
    "beta" = {
      name  = "beta"
      type  = "e2-medium"
    },
    "gamma" = {
      name  = "gamma"
      type  = "e2-small"
    },
    "delta" = {
      name  = "delta"
      type  = "e2-small"
    }
  }
}

resource "google_compute_instance" "instances" {
  for_each = var.names

  name = each.value.name
  zone = "europe-west2-a"
  machine_type = each.value.type
  allow_stopping_for_update = true
  boot_disk {
    initialize_params {
      image = "ubuntu-os-cloud/ubuntu-2004-lts"
    }
  }
  network_interface {
    network = "default"
  }
}
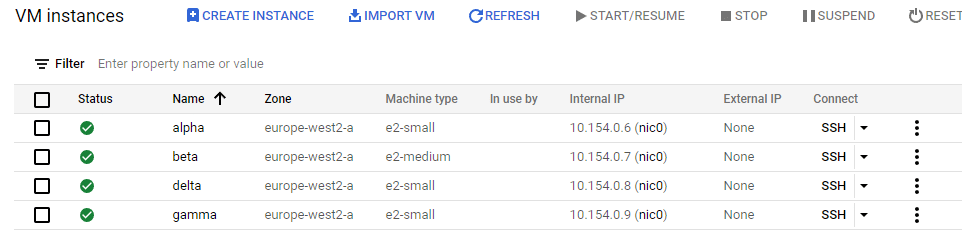
Now we are defining both the name and type values in the names variable and have changed the beta instance to be e2-medium instead of e2-small. In the resource block, each.value.name and each.value.type are used to pull those values from the variable. Running terraform plan shows that this will cause Terraform to amend the machine type of the beta instance to e2-medium.

Running terraform apply then shows this change in the console.
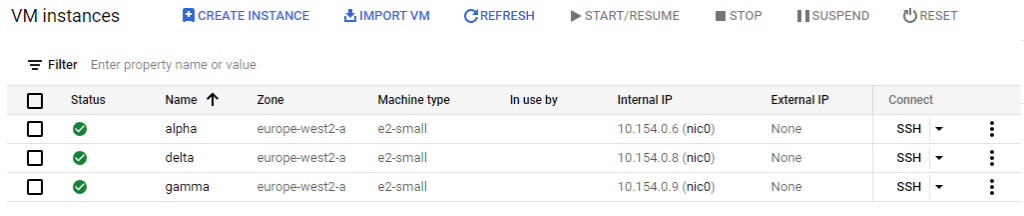
Finally, we can resolve the last limitation we saw using the count argument. The beta instance is now redundant and needs to be removed, but without affecting the other instances. Since we deployed using for_each, we can simply remove the beta entry from the map variable called names to terminate it.
variable "names" {
  type = map(object({
    name    = string
    type    = string
  }))
  default = {
    "alpha" = {
      name  = "alpha"
      type  = "e2-small"
    },
    "gamma" = {
      name  = "gamma"
      type  = "e2-small"
    },
    "delta" = {
      name  = "delta"
      type  = "e2-small"
    }
  }
}
Running terraform plan shows this will destroy the beta instance.

Finally, terraform apply shows that the beta instance has been removed from the cloud console.
Deploying AWS IAM policies using the for expression
A good use-case of using for expressions in Terraform is to simplify the management of complex resource objects. For example, when creating new S3 buckets you can update an IAM policy to provide read and write access to them. The IAM policy could then be assigned to a user, group or an IAM role, providing access. In standard Terraform code, it would require two changes to complete this – one to create the new bucket and a second to update the IAM policy with the new bucket name. By using the for_each meta-argument and the for expression, combined with a variable, both tasks are accomplished with a single code update.
The example below sets a variable called bucket_name_list with a list of bucket names to create, then uses for_each in the aws_s3_bucket resource block to create the buckets in the list. Then we create an IAM policy using two blocks:
- The aws_iam_policy_document data block creates the JSON structure for the IAM policy, but because we’re using Terraform to define it, we can use the for expression to loop through all the bucket names contained in the bucket_name_list variable. This gives the relevant permissions we want to assign to each one.
- The aws_iam_policy block resource takes takes the aws_iam_policy_document data block as an input to create the IAM policy.
variable "bucket_name_list" {
type = set(string)
default = ["demo-policy-test-01","demo-policy-test-02","demo-policy-test-03"]
}
resource "aws_s3_bucket" "s3-buckets" {
for_each = var.bucket_name_list
bucket = each.value
}
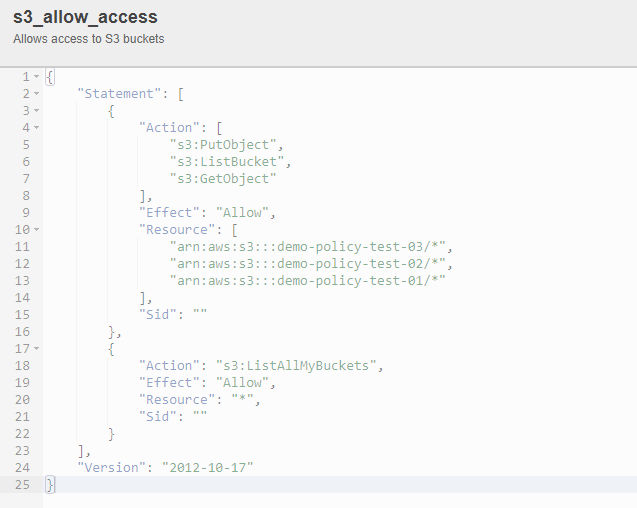
data "aws_iam_policy_document" "s3_allow_access" {
statement {
effect = "Allow"
actions = [
"s3:ListBucket",
"s3:GetObject",
"s3:PutObject"
]
resources = [
for bucket_name in var.bucket_name_list:
"arn:aws:s3:::${bucket_name}/*"
]
}
statement {
effect = "Allow"
actions = [
"s3:ListAllMyBuckets"
]
resources = [
"*"
]
}
}
resource "aws_iam_policy" "s3_allow_access" {
name = "s3_allow_access"
description = "Allows access to S3 buckets"
policy = data.aws_iam_policy_document.s3_allow_access.json
}
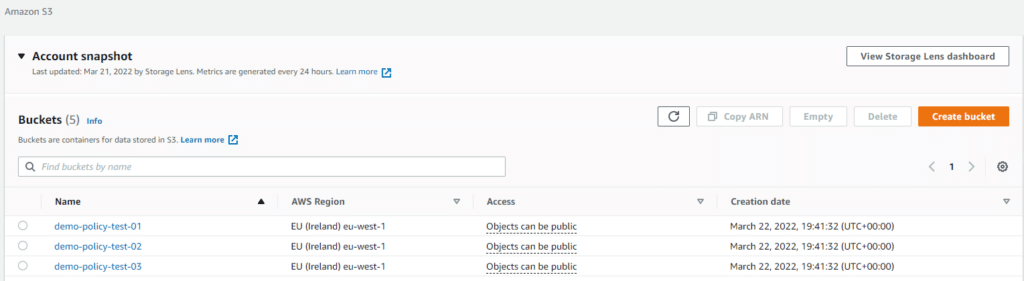
Running terraform apply with this code creates the buckets and the IAM policy.
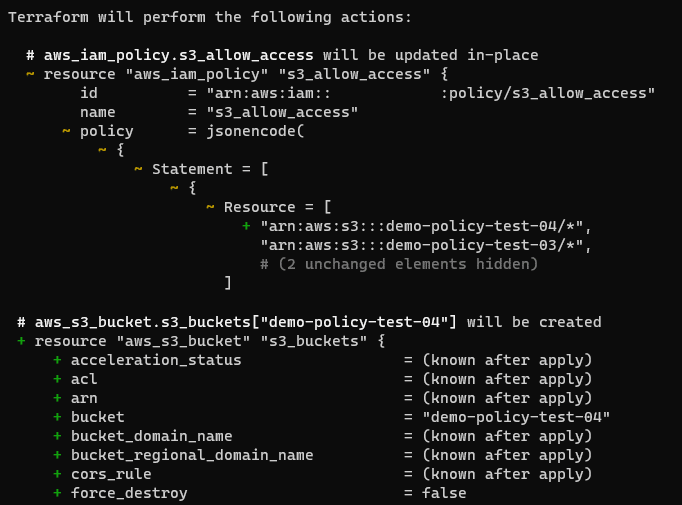
To add another S3 bucket, just add an extra name to the bucket_name_list variable.
variable "bucket_name_list" {
  type = set(string)
  default = ["demo-policy-test-01","demo-policy-test-02","demo-policy-test-03","demo-policy-test-04"]
}
Running terraform plan shows that this will create the new bucket and update the IAM policy, allowing users to access it.
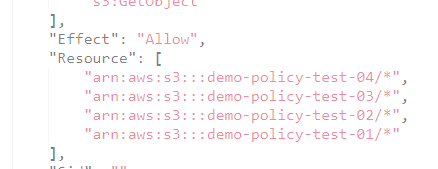
Finally, running terraform apply builds the new bucket and updates the IAM policy.

From Terraform to Kubernetes, CloudBolt gives you one control plane to orchestrate, govern, and optimize every environment.
Explore the Cloud Management Platform and see how to run the cloud like you own it.
Conclusion
“For Loop” constructs are a powerful way to reliably deploy multiple identical or similar resources with Terraform. The count meta-argument is a useful, simple tool that can deploy multiple identical resources, but with some previously highlighted limitations. The for_each meta-argument provides almost the same functionality, but has added flexibility that overcomes these limitations. It is therefore recommended for most use cases.
The for expression is a powerful tool that can be used to transform/filter variables for further actions. Or, for simplifying the management of multiple resources (when combined with the for_each meta-argument) as demonstrated in our tutorial.
With these tools (and others) Hashicorp has provided the power and flexibility to write simple and reliable code, while maintaining a declarative language. The key reminder here is to avoid complexity for the sake of “clever” code – always write from the point of view of another person maintaining the environment at a later time.

Related Blogs

How to get Slack notifications when StormForge applies recommendations
The StormForge Applier does its job quietly. It watches for recommendations, applies patches to your workloads, and moves on—no fanfare,…

When Hardware Triples in Price, Idle Capacity Becomes a Line Item.
A platform leader at a Fortune 50 company recently told his app teams something that I keep thinking about. The message was very…

StormForge vs ScaleOps: A Technical Comparison of Kubernetes Rightsizing Approaches
StormForge and ScaleOps both automate Kubernetes resource optimization, but they take meaningfully different approaches to how much control you hand over and when. This page walks through the differences in architecture, automation model,…