Terraform is one of the most popular Infrastructure as Code (IaC) tools used by DevOps professionals to deploy virtual infrastructure on-premises and within the cloud. Its chief component is the Terraform CLI, a command-line tool contained in a compiled package, available for Windows, macOS and Linux operating systems.
This article aims to cover the following topics:
- How to install the CLI locally for testing
- Basic Terraform CLI Concepts
- Essential commands for deploying infrastructure
- Advanced concepts such as Remote Backends, Modules and Workspaces
- Recommendations and best practices
Executive Summary
The table below contains a summary of the article and examples of the commands that will be discussed.
| Concept | Description | Command / Operation |
|---|---|---|
| Installation | Windows, Mac and Linux | Download and set PATH variable |
| Basic Concepts | Create working folder | terraform init |
| Deploy basic infrastructure | terraform validate, plan, apply and destroy commands | |
| Providers | provider { … } | |
| Resources | resource { … } | |
| Advanced Concepts | Remote backends for state | backend “<storage>” { … }e.g. AWS S3, Azure Blob, Google Cloud Storage, Alibaba Cloud OSS, Terraform Cloud, HashiCorp Consul |
| Modules – group resources together to simplify re-use of code | module { source = … } | |
| Workspaces – allows multiple state files to be created and accessed | terraform workspace new <name>terraform workspace select <name> | |
| Centralized operations | Use of code repositories and pipelines |
Installing Terraform
Installation steps for the Terraform CLI can vary depending on the operating system and chosen method of installation. The instructions below provide a step-by-step demonstration of the manual installation option for Windows, Mac and Linux. We will then say a few words on the use of package managers.
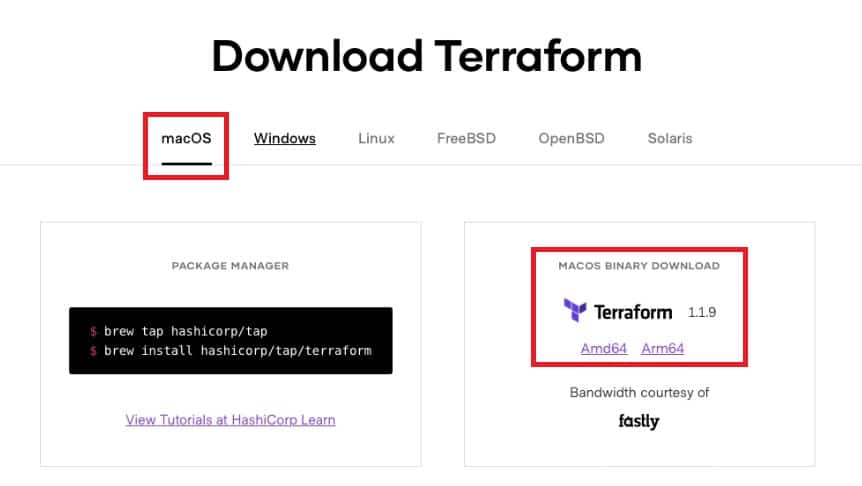
The pre-compiled binary can be downloaded here. Select the operating system and version that you need for your processor architecture. For example Windows – Amd64.
Once the file has been downloaded, move it to one of the folders in the system PATH variable, so it can be accessed from any directory.
Windows
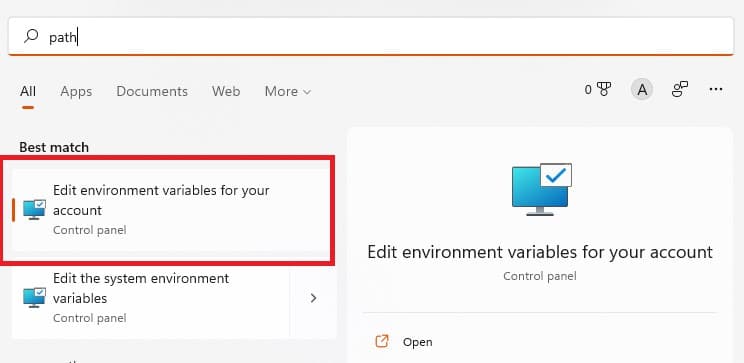
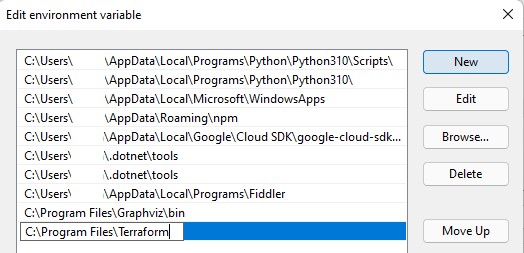
For Windows, you can see and edit your user’s path variables by typing “path” into the search bar as shown below.
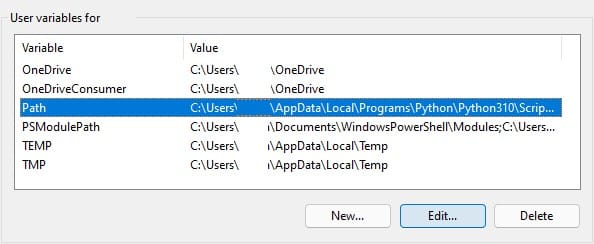
From here, you can either copy the executable into an existing folder, or create a new folder (e.g. C:\Program Files\Terraform) and then add this into your Path variable.
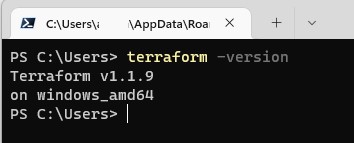
You can then open a command prompt or PowerShell window and run the command below. This will validate that the CLI has been installed correctly and is functioning.
terraform -version
MacOS
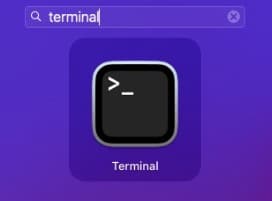
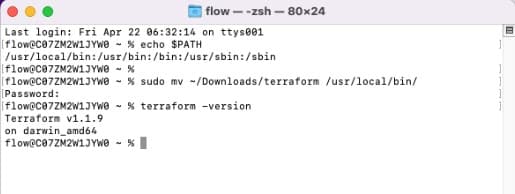
For macOS, you need to open a Terminal window from Launchpad and type “terminal” into the search bar.
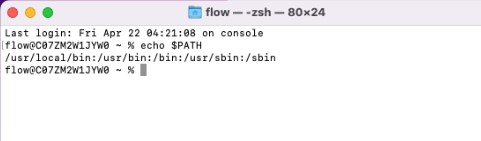
From the Mac Terminal window, run the command below to obtain a local path variable to copy the terraform package to.
echo $PATH
Next, run the command below to move the terraform package into a folder in your default path – you will be prompted for your password.
sudo mv ~/Downloads/terraform /usr/local/bin/
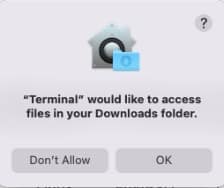
If prompted, click OK to allow Terminal to access files in your Downloads folder.
Once the file is moved, you can run the command below to validate that everything is working.
terraform -version
Linux
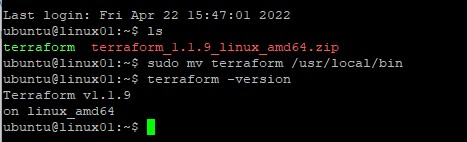
For Linux, download the package and unzip it. Then from a command line, move the file into the /usr/local/bin folder to make it globally accessible.
unzip terraform__linux_amd64.zip
sudo mv terraform /usr/local/bin
terraform -version
Watch how CloudBolt adds governance, self-service, and automation to Terraform at scale.
Install Through a Package Management System
All three operating systems can use package management systems:
- Windows: Chocolatey
- macOS: Homebrew
- Linux: dependent on distribution e.g. apt for Debian/Ubuntu, yum for Red Hat/CentOS
The advantage of package management systems is that they can track new versions as they become available from Hashicorp and allow you to easily upgrade them. The specific installation for each of these is beyond the scope of this article, but is fully documented on Hashicorp’s Learn.
Pro-tip: New Terraform releases may have consequences on current resource deployments and code structures. Always test new releases before deployment into production environments.
Getting Started with Terraform
Basic Concepts
To begin, you’ll first need to create a working directory. Here you will define information about providers, resources and any associated variables.
Below we have an example directory containing three manifest files. So Terraform can use them, we specify the “.tf” extension for these files.
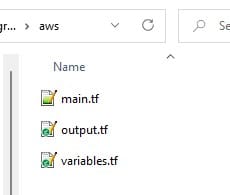
Pro-tip: you could combine these into one file, but it’s better to keep them separated so your codebase has structure as it grows. The naming convention used is your choice, but the names we use here are the ones in common use and can be understood by other Terraform engineers.
Let’s look at each file in turn. Below we see the contents of the main.tf file. This is used to declare the providers and resources that will be created.
provider "aws" {
    region = var.aws_region
}

resource "aws_s3_bucket" "s3_storage" {
   bucket = var.bucket_name
}
- The provider block is indicated by provider. A provider is a plug-in that interacts with the APIs of a service, to deploy and configure infrastructure. In this example we will use “aws”, but you can declare multiple providers by using additional provider A full list of available providers can be found here
- A resource block is indicated by resource. Resources are infrastructure objects that can be deployed within the selected provider and are defined by the provider’s plug-in. In this example, we are deploying an S3 bucket. Again, you can declare multiple resources using multiple resource
In the example file above, note that the term “var.” is used twice – this indicates a variable. Variables are used as with other languages and provide an easy way to customize deployments, without making direct changes to the Terraform code. Terraform variables can be stored in several ways, but the simplest is within the variables.tf file.
variable aws_region {
  description = "AWS region to deploy resources into"
  default = "eu-west-1"
}

variable bucket_name {
  description = "Name of the S3 bucket to create"
  default = "learning-terraform-cli-first-bucket-2022-04"
}
A variable is indicated by the word variable at the start of the block and can contain a description and a default value. In our variables.tf file, we have set the AWS region with a value of “eu-west-1” and the bucket_name variable with a value of “learning-terraform-cli-first-bucket-2022-04”. Since these are referred to in the main.tf file and we have not set any values elsewhere, these values will be used at deployment.
Finally, we have the output.tf file.
output "s3_storage_arn" {
    value = aws_s3_bucket.s3_storage.arn
}
This file is used to output information about created resources – in this case, we have output the Amazon Resource Name (ARN) of the S3 bucket. This could also be used as a mechanism to output the public IP of a virtual server, or the public DNS name of a load balancer.
Initial Deployment
To recap, we have installed Terraform and created our first working directory. Now we want to use the CLI to deploy some infrastructure. To do this we will:
- Initialize our directory
- Validate our deployment code
- Generate a dry-run plan of our proposed actions
- Deploy the infrastructure
To initialize the working directory, switch to the directory using the cd (change directory command), and run the init command.
cd <path to your working directory>
terraform init
You should see a similar result to below:
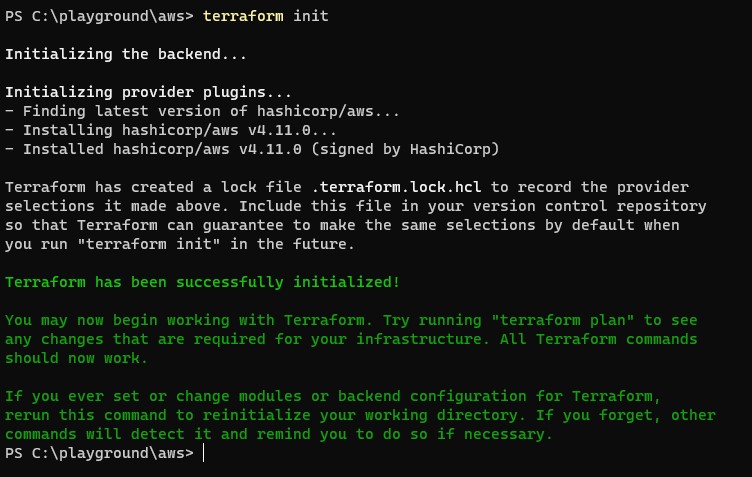
Here we can see two things:
- Terraform has initialized the “backend” – this is a concept we’ll discuss later on. For now, just know we are using a “local” backend, since we did not declare otherwise
- Terraform has initialized the provider plugins – in our case, AWS and you can see it has installed plugin version v4.11.0, which is the latest at the time of writing
With Terraform initialized, we can go ahead and validate our code using the validate command:
terraform validate

Assuming your code is error-free, you should see a success indicator.
We’re now ready to run the plan command – this will examine the files we have provided and give an estimate of the resources that will be created. In most cases, you will need to have authenticated with your provider before you do this. For several examples of AWS authentication, see here.

In our example, we are setting an environment variable so that AWS can successfully authenticate us. Once done, run the Terraform command to plan the deployment.
terraform plan
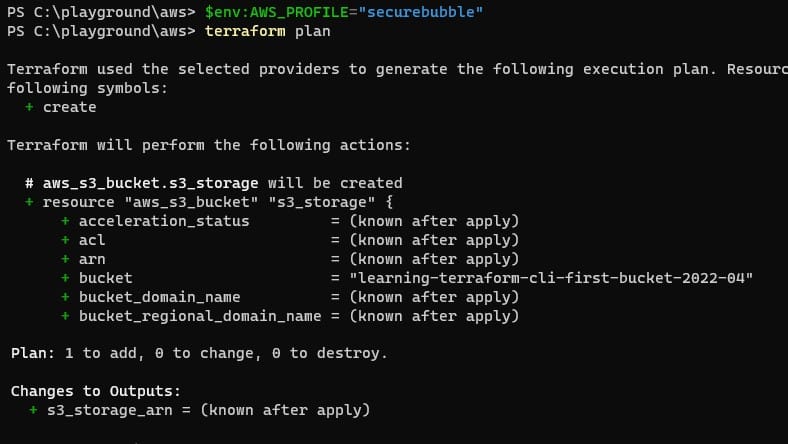
The output shows us information about the resources we plan to deploy (note the S3 bucket name has been set via the variables.tf file). The end shows a summary of the resources that will be created, changed or destroyed – please ensure that the results you see are expected, before proceeding to the next step,
Assuming all is well, the final step is to run the apply command. This will deploy the infrastructure.
terraform apply
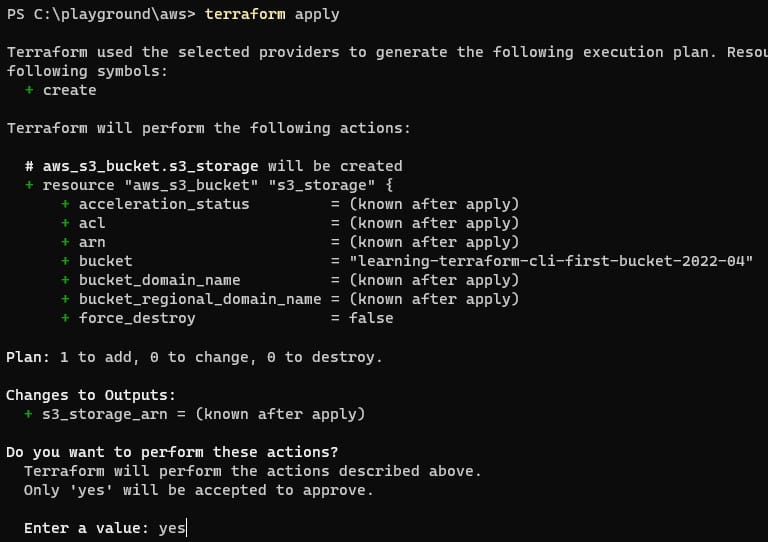
Terraform will now re-run the plan and prompt you to perform the actions outlined – when you are happy, type yes and press return.

The infrastructure will now be deployed, amended or destroyed as per the plan. Any outputs configured in the output.tf file will be shown at the end.
Once deployed, you will notice some new files and folders have been generated in the working directory.
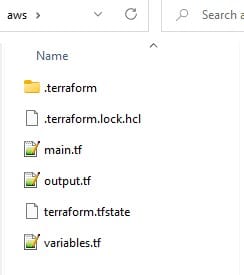
These new files include the following:
- The .terraform folder was created during the init process and contains all providers that were required and installed to create/amend the infrastructure
- The .terraform.lock.hcl file was also created during the init process and is used to track dependency locks based on the providers, modules and current configuration
- The tfstate file is crucial since it tracks the state of the infrastructure based on changes Terraform has made. This is created and updated each time an apply or destroy command is run
Pro-tip: these new files and folders are critical to the successful running of Terraform and should not be changed, moved or deleted except by using the correct Terraform commands.
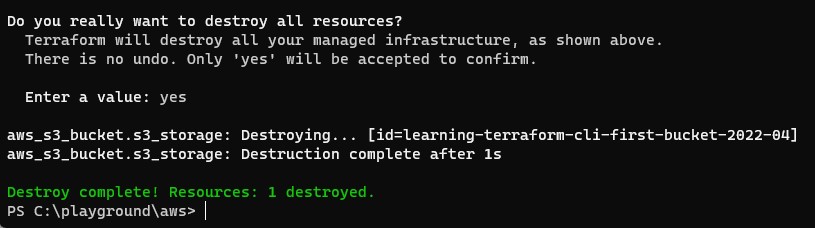
The final step we can take is to use the destroy command – this will delete any infrastructure maintained in the Terraform state and configuration files. It’s a useful command that can be used to clean up a temporary dev and test environment.
terraform destroy
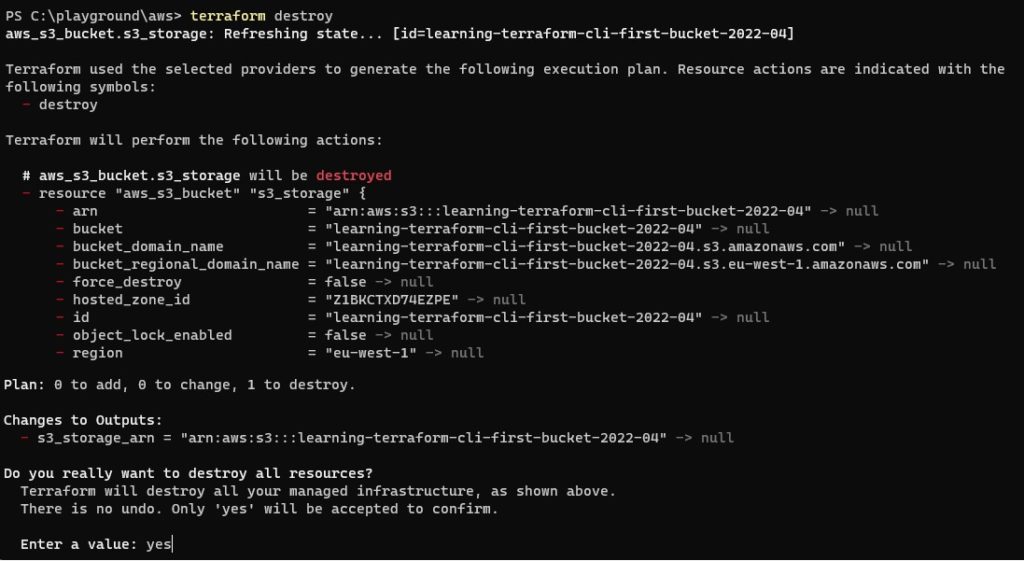
The plan stage is run again and any infrastructure that will be destroyed is indicated. If you are happy to proceed, type yes and press return to complete the process.
Advanced concepts
With the basics covered, let’s move on to some slightly more advanced CLI topics.
Remote Backends for State
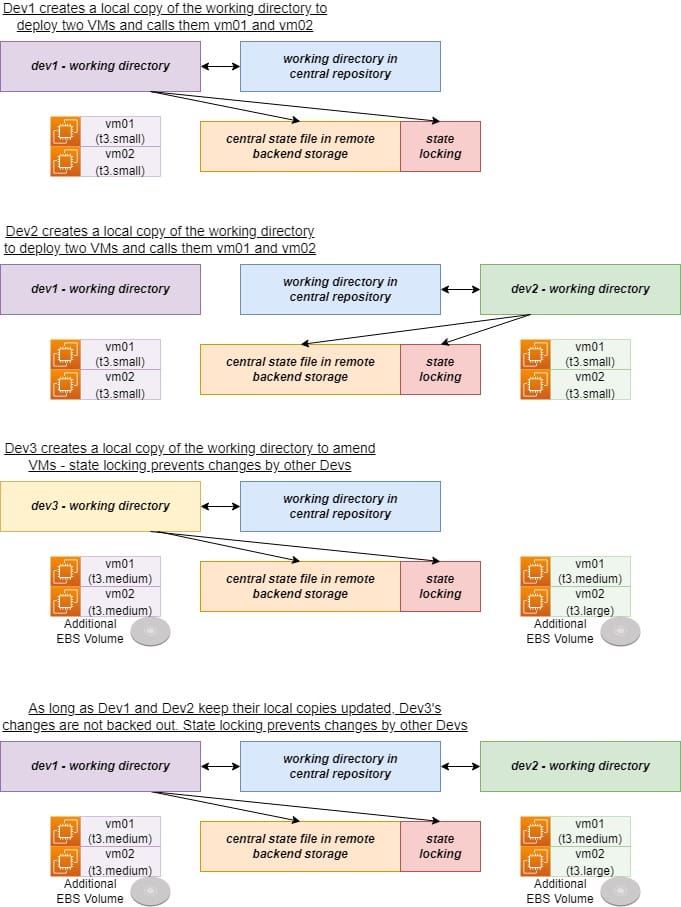
During our deployment, one of the files created was called terraform.tfstate – this is the local copy of the current state of the infrastructure. It’s important because Terraform uses this during each deployment to track what has been done, and what changes (if any) need to be made. For testing purposes, storing this file locally is not a problem, but bear in mind the ever-present risk of disk failure. Recovering the state of your local deployments could be a lot of work.
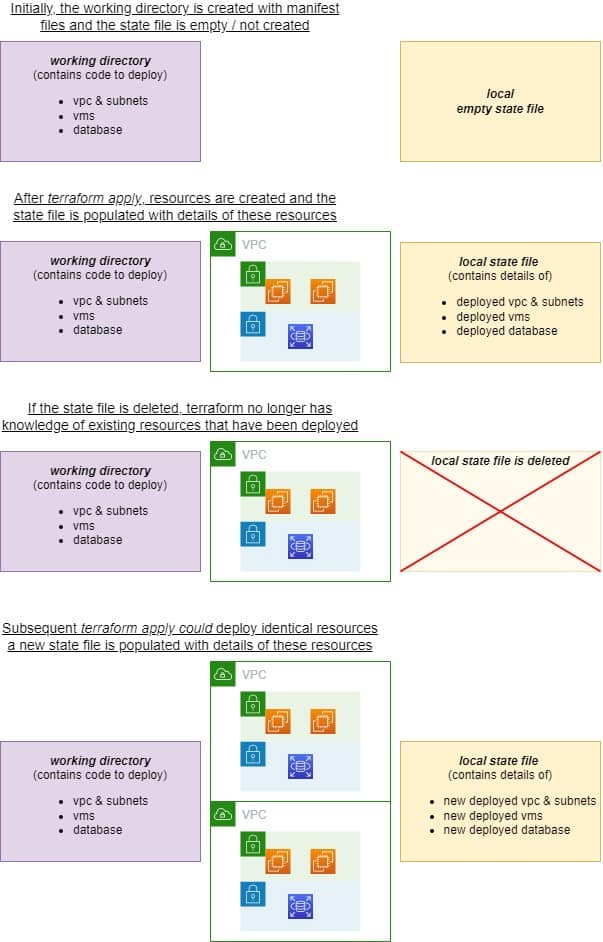
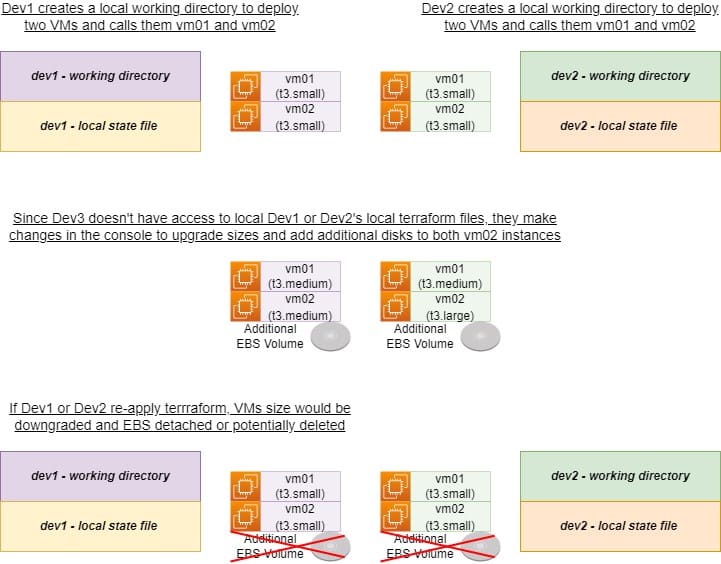
Furthermore, several environments might exist (dev, test, production etc) managed by different teams. If each developer were to store state files locally, it would quickly lead to differences between files. This creates serious problems when an apply process is completed – a developer’s work could be deleted because Terraform thinks it’s no longer required, based on the applied state file!
A simple solution might be to use a central code repository. Just check-in the state file and keep it synchronized between developers. This seems to offer a good solution, but in reality is actually quite risky and not recommended. If two developers were working concurrently, they could attempt to make changes to the same infrastructure at the same time, before checking-in their code. Again, this could lead to the deletion of infrastructure and data. Compounding this, please note that sensitive information like passwords can be committed to the Terraform state in clear text – this sensitive information would then be available to anyone with read-only access to the repository.

The solution then, is to use a remote backend. State can now be stored securely in a remote storage platform, accessible to anyone that needs it. A mechanism to lock state during deployments can also be introduced. This ensures only a single developer can apply changes at any one time. Terraform supports several remote backend platforms including AWS S3, Azure Blob Storage, Google Cloud Storage and Terraform’s Cloud platform – a full list can be found here.
With that out of the way, let’s update our code! We will create an S3 bucket, a DynamoDB table (to indicate when the state is locked) and then migrate the state into an S3 backend. First, let’s update our three files as indicated below. This will create the necessary resources and put into place some basic security measures.
variables.tf
variable aws_region {
  description = "AWS region to deploy resources into"
  default = "eu-west-1"
}

variable bucket_name {
  description = "Name of the S3 bucket to create for state"
  default = "learning-terraform-cli-terraform-state"
}

variable ddbtable_name {
  description = "Name of the Dynamo DB table to create to lock state"
  default = "learning-terraform-cli-terraform-state"
}
main.tf
provider "aws" {
    region = var.aws_region
}

resource "aws_s3_bucket" "s3-terraform-state-storage" {
   bucket = var.bucket_name
   # prevent the bucket from being deleted accidentally
   lifecycle {
      prevent_destroy = true
   }
}

# enforce AES256 server side encryption
resource "aws_s3_bucket_server_side_encryption_configuration" "s3-terraform-state-storage-encryption" {
   bucket = aws_s3_bucket.s3-terraform-state-storage.id
   rule {
      apply_server_side_encryption_by_default {
         sse_algorithm = "AES256"
      }
   }
}

# enable versioning to allow previous state files to be restored
resource "aws_s3_bucket_versioning" "s3-terraform-state-storage-versioning" {
   bucket = aws_s3_bucket.s3-terraform-state-storage.id
   versioning_configuration {
      status = "Enabled"
   }
}

# block any policies from being applied which might make the state publicly available
resource "aws_s3_bucket_public_access_block" "s3-terraform-state-storage-block" {
   bucket = aws_s3_bucket.s3-terraform-state-storage.id
   block_public_acls = true
   block_public_policy = true
   ignore_public_acls = true
   restrict_public_buckets = true
}

# create a dynamodb table for locking the state file
resource "aws_dynamodb_table" "dynamodb-terraform-state-lock" {
    name = var.ddbtable_name
    hash_key = "LockID"
    billing_mode = "PAY_PER_REQUEST"
    attribute {
       name = "LockID"
       type = "S"
   }
    lifecycle {
      prevent_destroy = true
      ignore_changes = [ name ]
   }
}
output.tf
output "s3_storage_arn" {
    value = aws_s3_bucket.s3-terraform-state-storage.arn
}
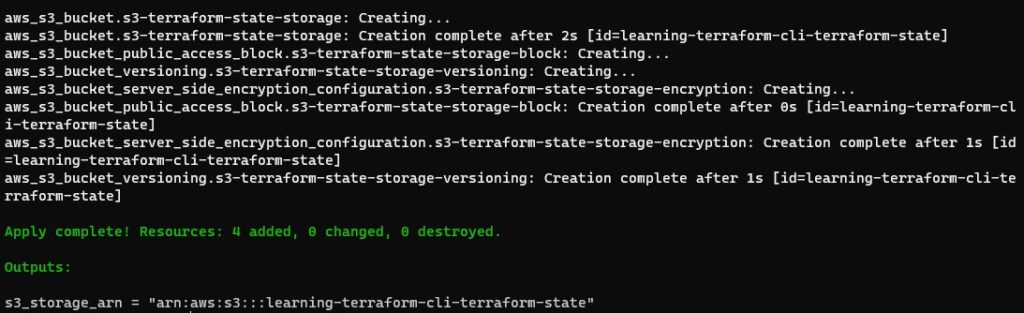
Run the terraform plan and apply commands to create the bucket.
terraform plan
terraform apply
With the S3 bucket deployed we migrate the terraform state file through an addition to the main.tf file. A terraform block indicates that Terraform should use the remote backend and provides the details for this (note, you cannot use variables in the terraform block and they must be hardcoded).
terraform {
   backend "s3" {
      encrypt = true
      bucket = "learning-terraform-cli-terraform-state"
      dynamodb_table = "learning-terraform-cli-terraform-state"
      key    = "terraform/terraform.tfstate"
      region = "eu-west-1"
   }
}
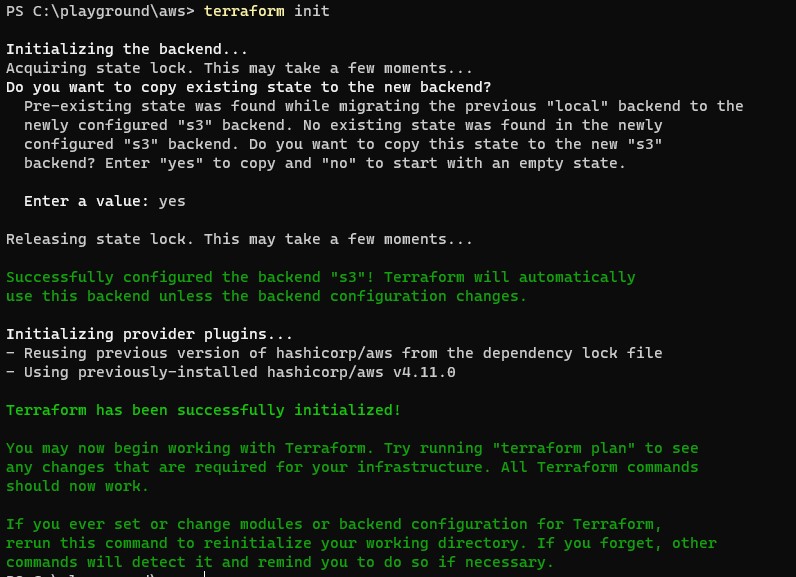
Next, run the terraform init process again and confirm the move of the state file.
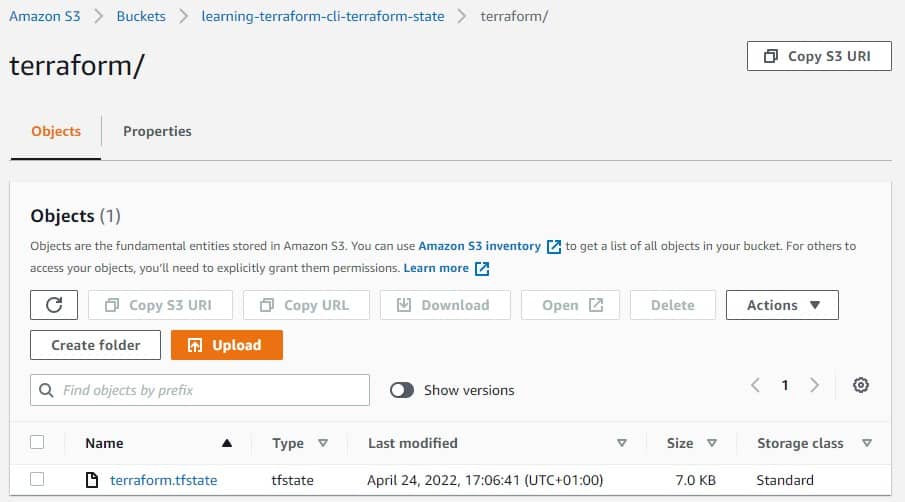
Looking within that S3 bucket, we can see the structure of our state as per the key field entered under the terraform block above.
Modules
Modules are just groups of resources that are deployed and used together – they could be in single or multiple manifest (.tf) files in a single directory. In fact, our very first Terraform example above was a module.
The main reason for writing modules is to encourage re-usability and to quicken future code deployment. For example, deploying VPC networks in a repeatable manner.
By creating a module that contains the code for each component, you can deploy multiple base configurations using variables to customize each environment. The module ensures all components are deployed to known standards.
By calling a module from a top-level working directory, it becomes known as a child module. In most circumstances, a root module would call multiple child modules. For example, to build a network environment, then deploy a web-server and then a backend database.
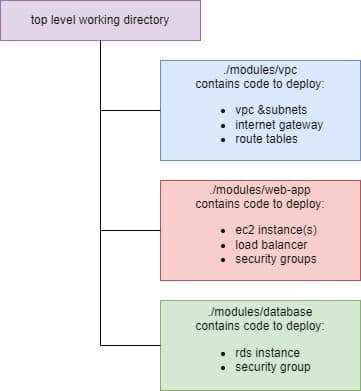
Here is an example of code in a top-level directory that demonstrates this.
module "vpc" {
    source = "./modules/vpc"
    name   = "test-vpc"
}

module "web-app" {
    source = "./modules/web-app"
    name   = "test-webapp"
}

module "database" {
    source = "./modules/database"
    name   = "test-webapp-db"
}
The next step is to create sub-directories within your top-level folder that contain the necessary code to build out your vpc, web-app and database modules.
Workspaces
Workspaces introduce the concept of separating the state of different environments or use-cases into different files. This allows identical environments to be built in an isolated fashion and prevents interference from one to the other. For example, the code modules we used to build the VPC, web server and database could be deployed into a workspace called “development”. Then, if need be, built again into a workspace called “production”. This could use the same code, but customized by different variables.
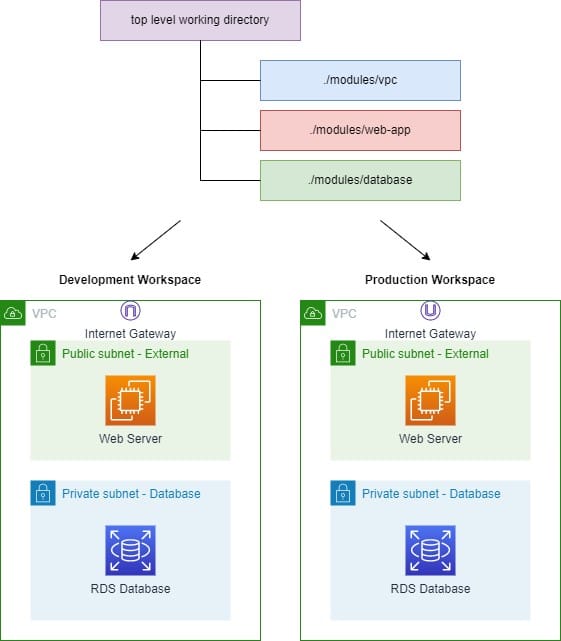
Furthermore, if a developer wanted to test the migration of an RDS database to a new version, they could select the development workspace and test the modifications without affecting the production workspace. Once the tests were completed and successful, the developer could switch to the production workspace and deploy the same changes, without writing additional code. Other use cases for separate workspaces could include:
- Building an identical version of an application in a secondary region for disaster recovery purposes
- Separating unchanging components from dynamic resources components. For example, VPC resources such as subnets, NACLs, and gateways are often static – once built, there is little reason to amend them. Any subsequent changes would need to be carefully planned. By placing these resources into a separate workspace away from other more volatile resources, you limit the chance of performing unintentional changes that cause outage
Pro-tip: your workspace strategy should be planned in advance of any key deployment as it can be a complex process to change later.
If no workspace is selected at the point of build, resources will be placed into the default workspace. To create a new workspace, use the following command:
terraform workspace new

Once you’ve created a new workspace, Terraform will automatically select it, leaving you free to create new working directories that deploy resources to it.
To switch from one workspace to another, use the select command.
terraform workspace select <name of workspace>

If you no longer require a workspace, perhaps due to a previous terraform destroy operation, you can use the delete command.
terraform workspace delete

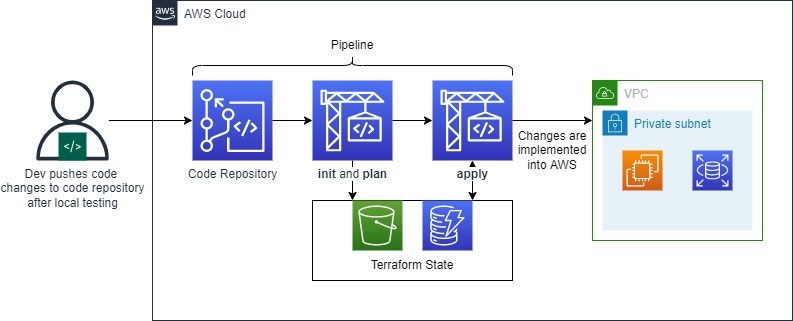
Centralized Operation of Terraform Actions
Terraform fits perfectly within the DevOps philosophy. With DevOps, we typically push infrastructure deployment and modification actions into an automated workflow or pipeline. You can do this by following the key principles outlined in this article and doing so supports stability, audit tracking, security and quality control. Developers can now write and validate Terraform code and run plan commands via their local Terraform CLI. Code can then be peer-reviewed via pull-request, prior to being committed to a central repository. This then triggers an automated workflow in the pipeline where testing can be performed. Once all processes are approved, the final apply command can be run against the build server. Since only the central build server has the permissions to make changes, it ensures that production-level changes follow a strictly approved path.
Terraform Distributions
Terraform provides two options for managed distributions. Terraform Cloud is a managed service from Hashicorp that helps to centrally manage deployments. It uses best practices out-of-the-box, such as:
- Remote backend storage for the state file
- Automation of deployments
- Workspace-based organizational models
- Version control integration and a remote private registry for module development and sharing
Terraform Enterprise also provides these benefits, but allows companies to self-host along with providing other benefits for increased security.
Recommendations
- Use security best practices for authentication – e.g. never store credentials in Terraform manifest files, and ensure credentials are not committed to version control repositories. You can do this by using environment variables, assuming an IAM role for AWS, or using managed service identities for Azure
- Plan and test the rollout of new Terraform CLI versions and providers, as this may impact your code and deployments.
- Always use remote backend state storage where possible, especially for production environments. The extra associated costs are minimal on platforms such as S3 or Azure Blob storage.
- Use Terraform modules to build consistent, repeatable resources and to increase your efficiency and reduce code duplication.
- Get into the habit of using different workspaces for different environments and for critical infrastructure. This also helps speed up deployments and minimizes the possibility of having to recover corrupted state files.
- Plan your Terraform structure and strategy before deploying any infrastructure outside of your playground – this should include your code and designing modules and workspaces.
- Use your local CLI for development and validating code changes. Then, commit to a version control repository, integrated into an automated pipeline.
From Terraform to Kubernetes, CloudBolt gives you one control plane to orchestrate, govern, and optimize every environment.
Explore the Cloud Management Platform and see how to run the cloud like you own it.
Conclusion
The Terraform CLI is a powerful tool for deploying and managing infrastructure via chosen providers. Though simple to download and use, prior planning is needed to ensure adherence to best practices, such as using remote backend state storage, modules and workspaces. As operations and development teams grow, look to centralize and automate key operations using code repositories and pipelines. You may wish to look into managed platforms like Terraform Cloud and Enterprise to simplify these processes. Whatever option you choose though, the earlier you put these best practices into operation, the easier your Terraform platforms will scale as your organization grows.
Related Blogs
Kubernetes Rightsizing Benchmarks: How Your CPU and Memory Utilization Stacks Up by Industry
Somebody pulls up a dashboard in a planning meeting and says cluster utilization is sitting at 22 percent. There is…