Terraform is an Infrastructure as Code (IaC) tool used to develop and maintain on-prem and cloud infrastructure. Organizations are adopting Terraform because IaC leverages the advantages associated with code-based lifecycle management. As a result, IaC helps to reduce the likelihood of human error and eases day-to-day management tasks like maintenance, collaboration, version control, disaster recovery, and security.
During this article, we will introduce you to the basics of Terraform by taking what we hope will be a more exciting approach: a healthy emphasis on the use of screenshots. This way, we’ll provide you with plenty of practical examples to aid your understanding and (if you wish) enable you to follow along. We will be covering the following topics:
- Setting up Terraform
- Setting up an AWS provider
- Creating an EC2 instance
- Destroying an EC2 instance
- Importing existing EC2 instances
Step 1: Setting up Terraform
To begin, fire up a browser and head to the Terraform downloads page (https://www.terraform.io/downloads). Download the relevant binary for your OS and extract the zip file into your PATH, or just update the path variable with the file location of your choice.
Alternatively, use a package manager to install Terraform via CLI. We used Brew package manager (on macOS) in the example below. Terraform V1.0.4 was already installed though, so the package manager just updated it to the latest version (V1.21.1).

Test if Terraform was installed correctly by returning its version, using terraform -v. If the version information appears, you are good to go.

Step 2: Setting up an AWS Provider
Terraform is modular and uses installable plugins to support different platforms. To work with Amazon Web Services (AWS), Terraform installs an AWS provider plugin during initialization. We must first tell Terraform that we want to use an AWS provider, allowing it to manage our AWS infrastructure.
Since we will be using AWS infrastructure during this article, perform the steps below:
- Install AWS CLI
- Use an AWS account with credentials that have the rights to create infrastructure on AWS
- Login to AWS using the AWS CLI – Terraform will use this AWS account to perform its tasks
Before we define the AWS provider, let’s step through the file structure used in Terraform projects with an example. Create a directory in a path of your choice. The example below uses the “tfss” directory. Then, create three files as below.
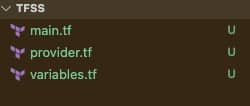
main.tfcontains the IaC that describes the AWS infrastructure we intend to createprovider.tfcontains the AWS provider configuration. This file can contain multiple provider configs if working in multi-cloud or multi-account environmentsVariables.tfis used to manage any variables used within the Terraform project
You do not need to use these naming conventions with your Terraform projects, but it’s a good practice and helps other developers. We will be creating other files during our example, so stay tuned for further explanations!
To configure the AWS provider, open the provider.tf file and add the text shown below.
terraform {
 required_providers {
   aws = {
     source  = "hashicorp/aws"
     version = "~> 3.0"
   }
 }
}

provider "aws" {
 region = var.region
}
Here, we
have defined a code block with the name terraform and have listed aws in the required_providers. We have also created a block that defines the region we want to use – a full list of AWS regions is available at https://aws.amazon.com/about-aws/global-infrastructure/regional-product-services/.
The region attribute gets its value from a region variable, and we have used var.region in the example above. We defined this variable in the variables.tf file as shown below.
Using a separate file to manage variables, you can more easily provide inputs to the Terraform code. When developing modules, input variables play a key role in providing flexibility to the end-user. You can create output variables here, so attributes are more readily visible after provisioning.
variable "region" {
   type        = string
   description = "AWS East Region"
   default     = "us-east-1"
}
This is all we need to initialize the Terraform AWS provider.
Step 3: Create an EC2 instance
Next, open the main.tf file and define your EC2 instance as code.
resource "aws_instance" "my_vm" {
 ami                       = var.ami
 instance_type             = var.instance_type
  tags = {
   Name = "My EC2 instance"
 }
}
At the moment our main.tf file contains one code block named resource. The resource type we have defined is an aws_instance, an EC2 instance, and has been named my_vm. This name is the EC2 instance reference within our Terraform project. We can use this block to define attributes such as ami, instance_type, and Name tag.
Since we will use a few more variables to define ami and instance_type values, we will update the variables.tf file below.
variable "region" {
   type        = string
   description = "AWS East Region"
   default     = "us-east-1"
}

variable "ami" {
   type        = string
   description = "Ubuntu AMI ID in N. Virginia Region"
   default     = "ami-09d56f8956ab235b3"
}

variable "instance_type" {
   type        = string
   description = "Instance type"
   default     = "t2.micro"
}
Now, open your terminal in the same directory and initialize Terraform by running terraform init. The output should look like this:
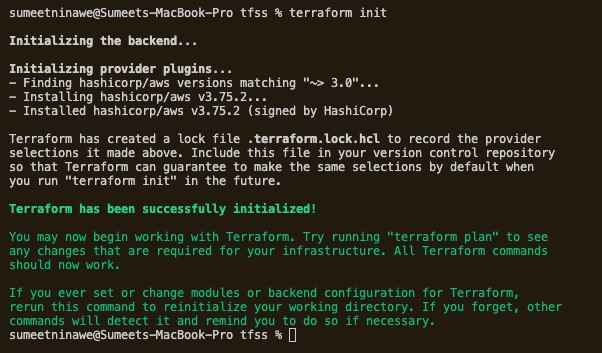
We can see below that Terraform has installed the AWS plugin and has initialized the project. To recap, we have written IaC that will create an EC2 instance called my_vm. To double-check that Terraform can do this, run the terraform plan command to perform a dry-run.
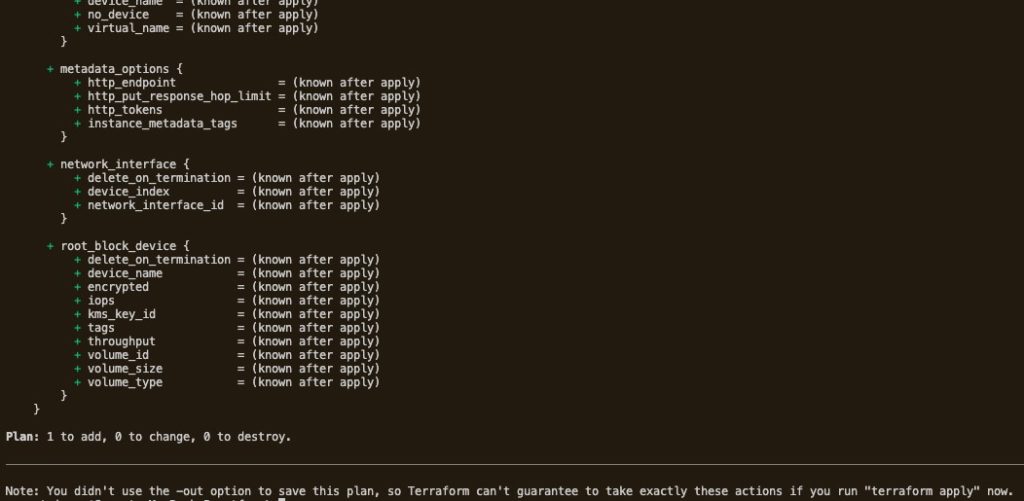
The output should end with the message above, which lists the attributes of the potential EC2 instance. It also correctly states that we will:
- Add one resource
- Change nothing
- Destroy nothing
As this looks good, let’s go ahead and run terraform apply to deploy the EC2 instance. When you run the apply command, Terraform asks for your confirmation. To confirm, type yes and hit enter.
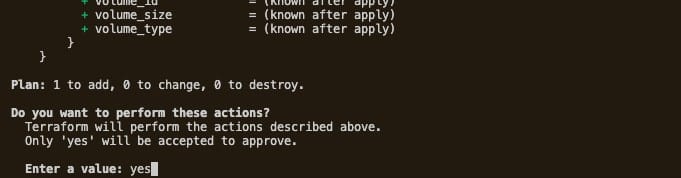
Terraform will now create the EC2 instance using the supplied AWS account. The deployment status will update every 10 seconds and notify us when deployment is complete. In our case, it took 48 seconds (see below).

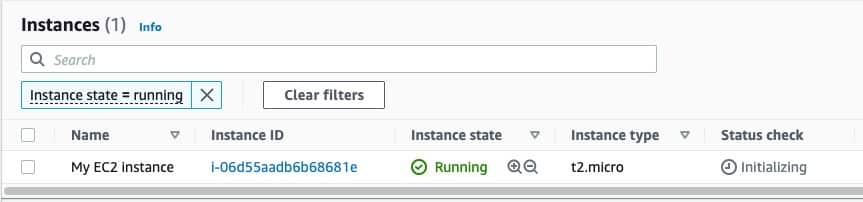
To be sure, log into your AWS account and confirm the deployment.
Let’s take a quick look at the files created in our project directory. They should look like the below.
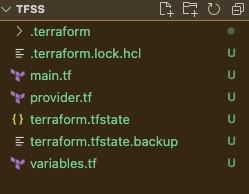
These additional files and folders were created automatically by Terraform during execution. There’s no need to edit these files, but it’s good to understand what they do.
.terraformdirectory – This directory is created when we run the terraform init command. Terraform downloads the AWS provider plugin and stores it here.terraform.tfstate– this is an important file that stores the current state of your infrastructure. Think of it as the mapping between the IaC declarations and the existing deployed infrastructure..terraform.tfstate.backup– this is simply a backup of the state file..terraform.lock.hcl– Terraform uses this lock file to avoid race conditions and is useful when collaborating as part of a team, as it prevents developers from making simultaneous changes.
Watch how CloudBolt adds governance, self-service, and automation to Terraform at scale.
Step 4: Destroying an EC2
Terraform is now managing our EC2 instance – and we didn’t even need to log into the AWS console! If we wish, we can also destroy the instance. To do so, just run terraform destroy.
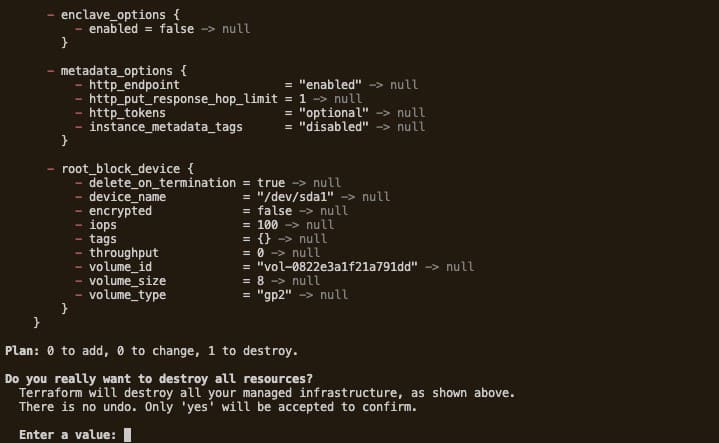
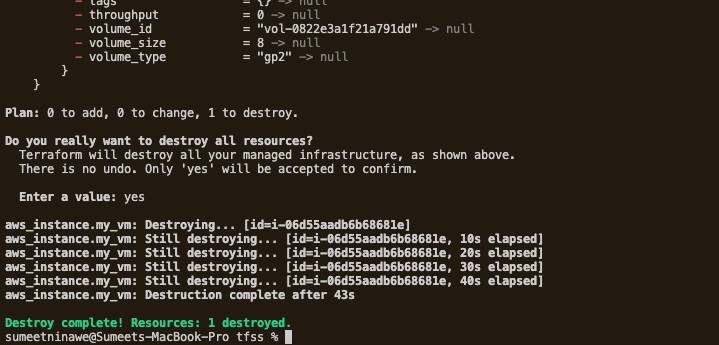
When we do this, Terraform asks for final confirmation and provides a summary of the resources it will delete. Type yes and hit enter. As shown below, Terraform will run the destroy operation immediately. As with the creation process, it will keep us updated on its progress.
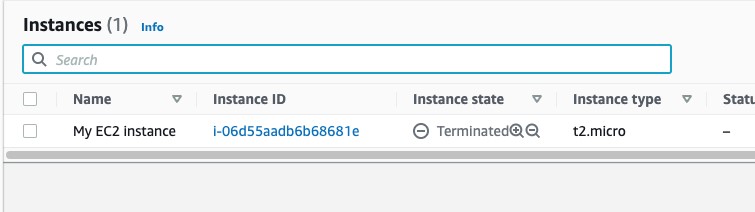
To confirm that the deletion happened, go back to your AWS console.
Step 5: Importing an existing EC2 instance
As we know, the state file is critical because it maintains the mapping of IaC resources to their real-world infrastructure. All further operations depend on this file, inluding:
- Making changes to resource attributes
- Deleting objects
- Creating additional resources
So, what happens if this state file is lost or corrupt? Terraform would believe that the referenced resources do not exist. If we were to run the apply command, it would create an entirely new set of resources and a new state file. If we used the destroy command, logically, there would be no resources to delete. They simply wouldn’t exist, and the operation would fail.
There are situations where we may want Terraform to manage pre-existing (manually deployed) infrastructure. Happily, Terraform provides a way to import existing resources into a state file, which then generates the mapping. Please note that while we can use the terraform import function, it will only create the mapping and not the corresponding IaC.
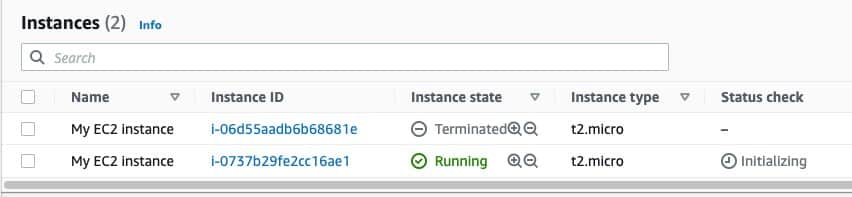
Let’s run a demonstration. Here we create an EC2 resource manually via the AWS console. Alternatively, we could have used our previous code from Step 3 and deleted the terraform.tfstate file. Either way, our newly created EC2 instance looks as below.
Before deleting the terraform.tfstate file, run the terraform plan command. This ensures that Terraform is aware of the resource via the state file. The expected output below states “No Changes” and means that Terraform is aware of the newly created EC2 instance.

Delete the terraform.tfstate and terraform.tfstate.backup files, and then rerun the plan command. The output should look like the below.
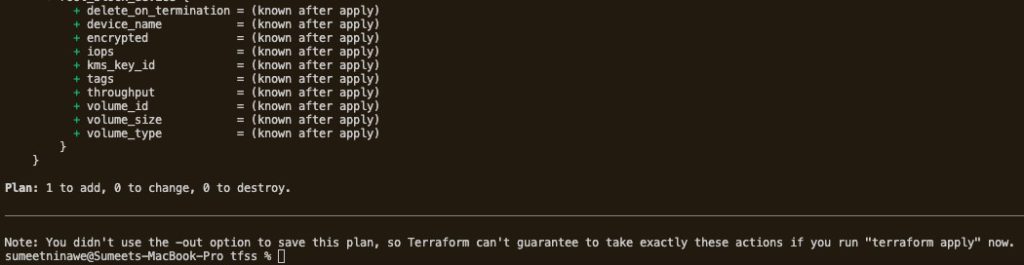
As we can see, although both the EC2 instance and the IaC exist, Terraform cannot correlate them. The output “Plan: 1 to add, 0 to change, 0 to destroy.” indicates that we need to add a new EC2 resource. This is not desirable, however, since it would just create duplicate resources.
This is where you can use terraform import to recreate the state file. Helpfully, the Terraform Registry describes how to import various resource types with the import command. See the official documentation here (https://registry.terraform.io/providers/hashicorp/aws/latest/docs/resources/instance#import).
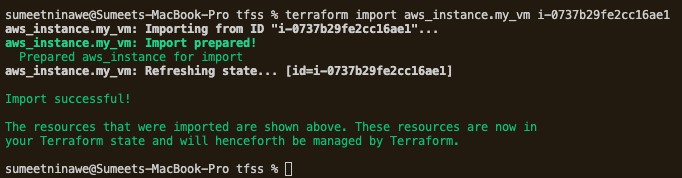
In our case, the import command references the ID of the instance. We found this by using the AWS console. We will now map the EC2 instance to the “my_vm” IaC defined in the main.tf file.
terraform import aws_instance.my_vm i-0737b29fe2cc16ae1
When we run the above command, it will provide the following output.
If we run terraform plan now, it shouldn’t tell us to create a new resource because we already generated a state file (check your project directory!). Let’s verify this.

In reality, importing infrastructure can be a tedious task. First, we must write the IaC and then map it to the resource by its key. Usually, we need to map several attributes, and if not done correctly, Terraform may not identify the correct resource. As a result, Terraform may perform a destroy or create operation on the wrong resource.
Let’s modify some attributes of our newly imported EC2 instance using AWS Console. Add a new tag, as below.
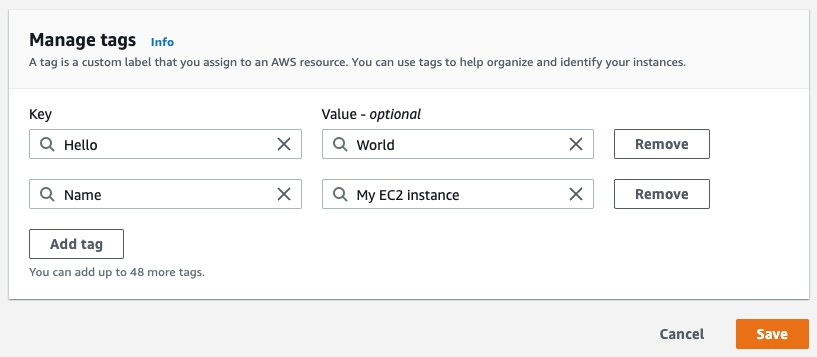
The “Name” tag was already present, but we have added a new tag with the key “Hello” and the Value “World.” Run the terraform plan command and observe the output.
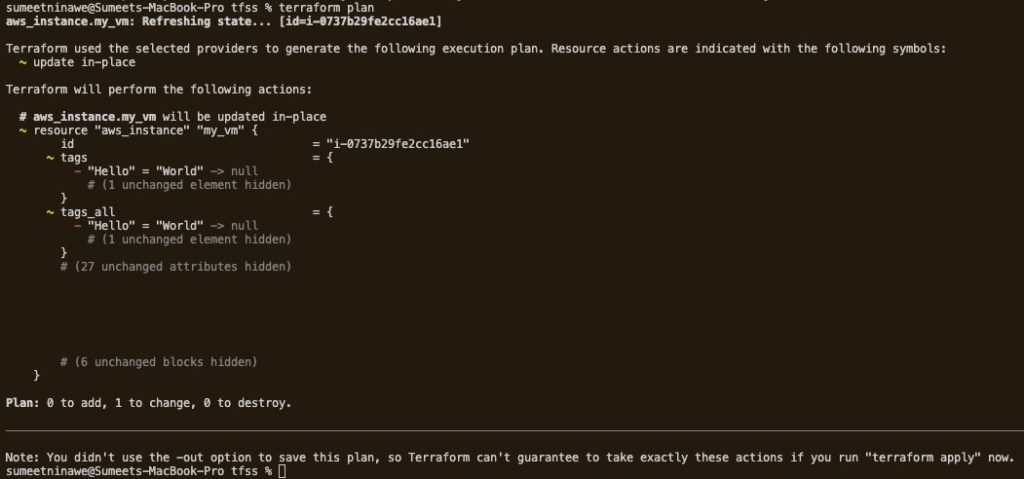
Here, Terraform detects the change and thinks the target instance deviates from the IaC. If we were to run the terraform apply command, it would remove the tag from the AWS console. However, this is not our intention when importing the instance into Terraform. Instead, resolve the deviation by modifying the IaC to accommodate the newly created tag.
resource "aws_instance" "my_vm" {
 ami                       = var.ami
 instance_type             = var.instance_type
  tags = {
   Name = "My EC2 instance",
   Hello = "World"
 }
}
Run the terraform plan command again, and it should confirm that no more changes are required.

Perfect!
From Terraform to Kubernetes, CloudBolt gives you one control plane to orchestrate, govern, and optimize every environment.
Explore the Cloud Management Platform and see how to run the cloud like you own it.
Conclusion
This was a quick and practical introduction, allowing you to get started with Terraform. We covered a range of basic (and not so basic) concepts, including:
- How to deploy an EC2 instance
- How to import existing resources
- Understanding the importance of state
- Resolving state problems
Hopefully, we have demonstrated that utilizing IaC allows you to leverage some of the advantages of more traditional code development. Infrastructure can be versioned, tracked for deviation, and rolled back to a known state with just a little know-how. IaC also provides mechanisms for safe collaboration, deployment automation, and overall ease of management.

Related Blogs
Why Cloud Resource Optimization Is Moving Beyond Recommendations
Cloud resource optimization has typically followed this pattern: teams identify inefficiencies, generate recommendations, review them, and apply changes where it feels safe to…