VMware Snapshot is a native VMware solution for quickly and easily safeguarding the data in your virtual machines (VMs). It is also one of the most popular data protection tools for virtual machines.
VMware Snapshot ensures that the generated snapshots can restore data quickly from any loss or corruption by capturing and preserving the current state of a VM.
Here, we will learn about the different VMware snapshot operations and all of the snapshot best practices that administrators must know when managing VMs.
VMware Snapshot Operations
The VMware Snapshot feature is straightforward to navigate and offers all the basic functionalities inside the vSphere environment. Below, we will tackle all of the snapshot operations and dive deep into them one-by-one.
To start, we can navigate all of our snapshots and their corresponding operations in two ways:
- Right-click on the VM > Go to “Snapshots” > A dropdown will appear showing all of the available actions.
- Select the VM > Go to “Snapshots” tab > From here, you will see the snapshot manager and all available VMware Snapshot operations.
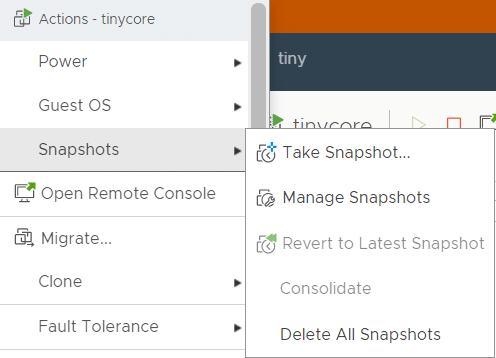
Note: If you see grayed-out snapshot operations, seek assistance from your administrator as you may not have the required privileges.
Taking a Snapshot with VMware Snapshot
Administrators take (or create) snapshots as a failsafe to enable roll back to a VM’s state at a specific point in time. For example, administrators often create snapshots as a contingency when performing tests, software updates, uninstallations, and other virtual environment changes.
A VM snapshot includes
- Settings State: VM’s settings and power state.
- Disk State: State of the VM’s associated disks.
- Memory State: Contents of the VM’s memory.
Below, we’ll demonstrate how to take a snapshot using the vSphere graphical user interface (GUI) and the PowerCLI.
vSphere GUI
To get started, click on Take Snapshot.
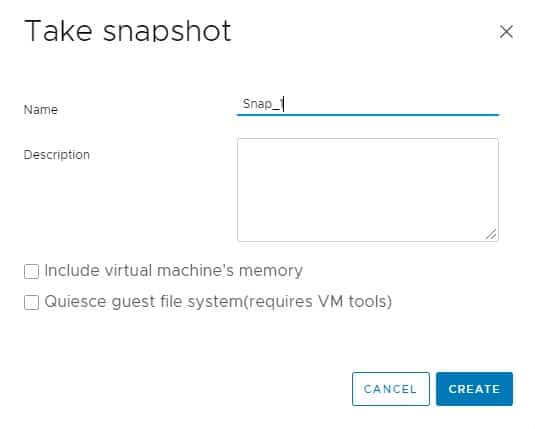
Inside the vSphere GUI environment, there are three primary methods of taking a VMware Snapshot:
- Snapshot with Virtual Machine Memory
In this method, aside from the disk state, the taken snapshot will also preserve the memory state, producing a memory snapshot.
With this option, you will be able to revert to the previous live state of the VM.
One example of a live state restoration scenario would be opening a text file and taking a memory snapshot. Afterward, the VM with the open text file goes into a blue screen. You may restore your VM from the memory snapshot taken before the blue screen incident, and it will revert to the live state where the text file is open.
To select this method, check the option “Snapshot with Virtual Machine’s Memory” and press OK. The option will only be available if you choose a powered-on VM.
- Snapshot without Virtual Machine Memory
Since you don’t need the memory state taken in this method, you may take a snapshot of the VM even if it is powered off. It is also much faster compared to taking a snapshot with the VM’s memory included. However, you cannot revert to its previous live state.
To perform a snapshot without the VM’s memory, leave the checkboxes unchecked and press OK.
- Snapshot with Quiesce File System
Quiescing indicates altering the state of running processes on a computer, bringing the on-disk data into a state where it is more suitable for backups. This process may include flushing buffers from the operating systems’ memory cache to disk or other higher-level application-specific operations.
To create this type of snapshot, check the option Quiesce guest file system and press OK. This option will also require a powered-on VM, and it will tell you that the VM needs VMware Tools installed, so install it first before taking a snapshot.
PowerCLI
Instead of performing these operations through the GUI interface, you may also use PowerCLI.
You MUST have the VMware PowerCLI module installed before running the cmdlets below. Once installed, import the module afterward. Open Powershell with elevated permissions (Run as Admin) and run the following commands to get started.
PS C:\> Install-Module VMware.PowerCLI
PS C:\> Import-Module VMware.PowerCLI
The New-Snapshot cmdlet creates a new snapshot of a VM. Here is the list of parameters that this cmdlet supports
| Parameter | Description |
|---|---|
| VM | Specifies the VMs you want to snapshot. |
| Name | Specifies a name for the new snapshot. |
| Memory | Used for taking a snapshot with memory. |
| Quiesce | User for taking a snapshot with a quiesced guest file system. |
| Server | Optional parameter for connecting to a vCenter on where the VM is residing. |
Now, let’s walk through the different PowerCLI commands you can use to create snapshots.
Snapshot without Virtual Machine Memory using PowerCLI
PS C:\> New-Snapshot -VM VM_Name -Server vCenter.domain.com -Name Snap_1
Snapshot with Virtual Machine Memory using PowerCLI
PS C:\> New-Snapshot -VM VM_Name -Server vCenter.domain.com -Name Snap_2 -Memory $true
Snapshot with Quiesce File System using PowerCLI
PS C:\> New-Snapshot -VM VM_Name -Server vCenter.domain.com -Name Snap_3 -Quiesce $true
We surveyed 300 IT leaders to find out.
Managing Snapshots
In addition to using the snapshot manager, you can use this PowerCLI command to manage snapshots.
Get all snapshots of a specific VM using the Get-Snapshot cmdlet
PS C:\> Get-Snapshot -VM VM_Name
VM snapshots generate multiple files upon creation. From a troubleshooting and debugging perspective, knowing which files are involved in the snapshot creation process is vital.
To access these snapshot files:
- Select the VM > Under Datastores tab, right-click on the Datastore of the VM > Click Browse Files > Go to the VM_name’s directory

Below are the files that comprise a snapshot.
- Snapshot List File (VM_name.vmsd)
The snapshot list file appears while spinning up a new virtual machine. It grows for every taken snapshot and is present in the VM directory regardless of whether the snapshot exists.
The snapshot list file also stores the name, description, and relationships for all VM’s snapshots.
- Snapshot State File (VM_name-snapshot#.vmsn)
The snapshot state file stores the state of the VM at the point in time of a taken snapshot. A new snapshot state file will be created for every new snapshot and deleted for every deleted snapshot.
- Disk Descriptor File (VM_name-00000#.vmdk)
The disk descriptor file contains the snapshot and the snapshot disk. Every time you take a snapshot, a disk descriptor file is created for each VM’s VMDK (base disk).
- Delta Disk File (VM_name-00000#-delta.vmdk)
The delta disk file holds the state of information of each virtual disk of the VM. The VM also stops writing to its VMDK file (base disk) and is redirected to the newly created delta disk file.
- VMEM File (VM_name-snapshot#.vmem)
The VMEM (Virtual Memory) file holds the entire contents of the VM’s memory at the time of the snapshot creation. The creation of the VMEM file only happens when you have selected the Snapshot with Virtual Machine Memory option.
Deleting Snapshots in the vSphere GUI
Administrators cannot correctly execute certain VMware functions if a VM has an existing snapshot. Examples include increasing disk space (corruption on the snapshot may occur) and performing storage vMotion migration.
Deleting a snapshot does not change the VM or other snapshots as it undergoes a consolidation process wherein the delta disk file is committed and merged to the base disk.
There are two types of snapshot deletion processes
1. Delete Snapshot
From the snapshot manager, select a snapshot and press the “Delete” button. The consolidation process takes place on the snapshot files of the deleted snapshot to the parent disk (delta disk or base disk).
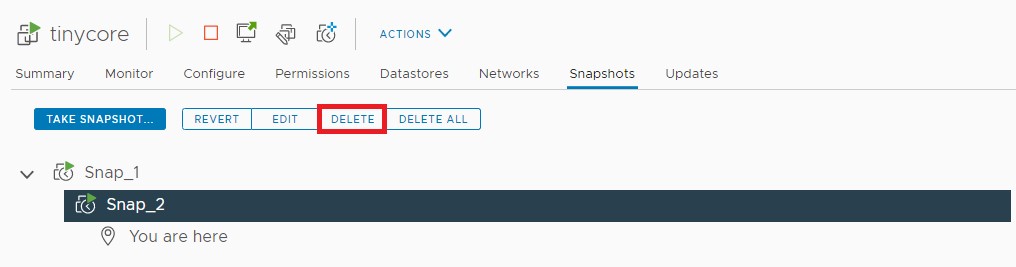
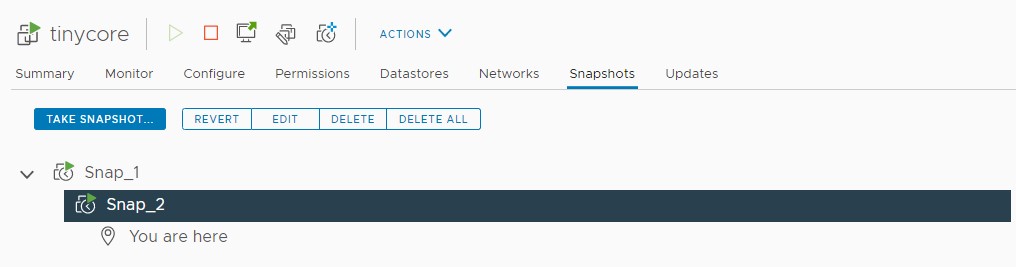
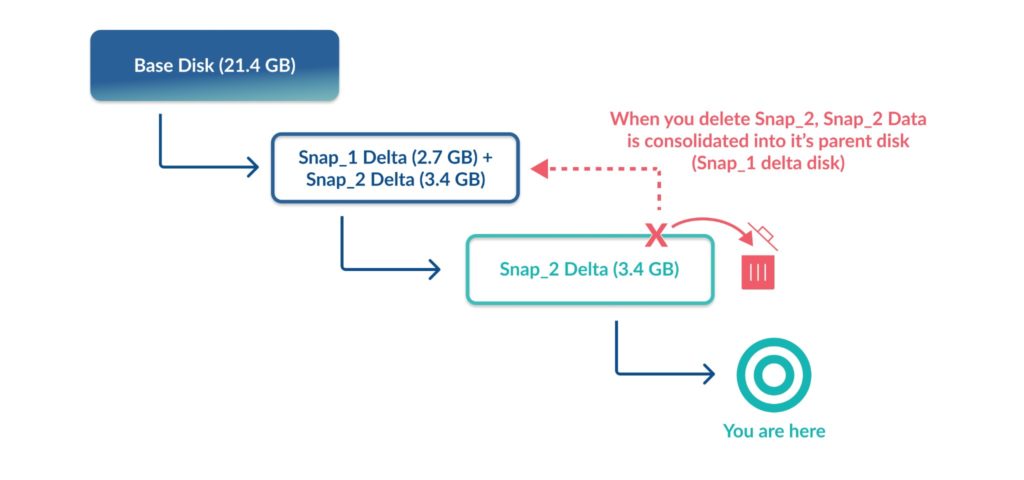
In the example below, deleting snapshot “Snap_2” will trigger a consolidation process in which it will merge the snapshot files of Snap_2 to the parent disk, Snap_1 delta disk.
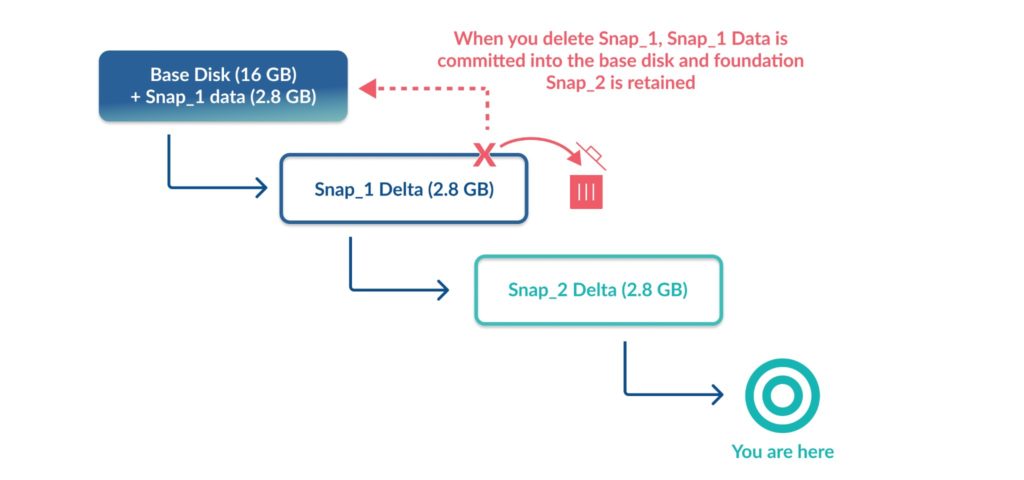
Deleting the snapshot “Snap_1” will also trigger the consolidation process in which it will merge the snapshot files of Snap_1 to the VM base disk.
2.Delete All Snapshots
To initiate the deletion of all snapshots, hit the “Delete All” button in the Snapshot Manager.
The Delete All function uses a top-bottom approach when cleaning up snapshot disks, as it first deletes and consolidates the snapshot nearest to the base disk and moves on to the following snapshot.
In this example, the snapshot “Snap_1” consolidation process will start. Once done, the same process will happen for every following snapshot.
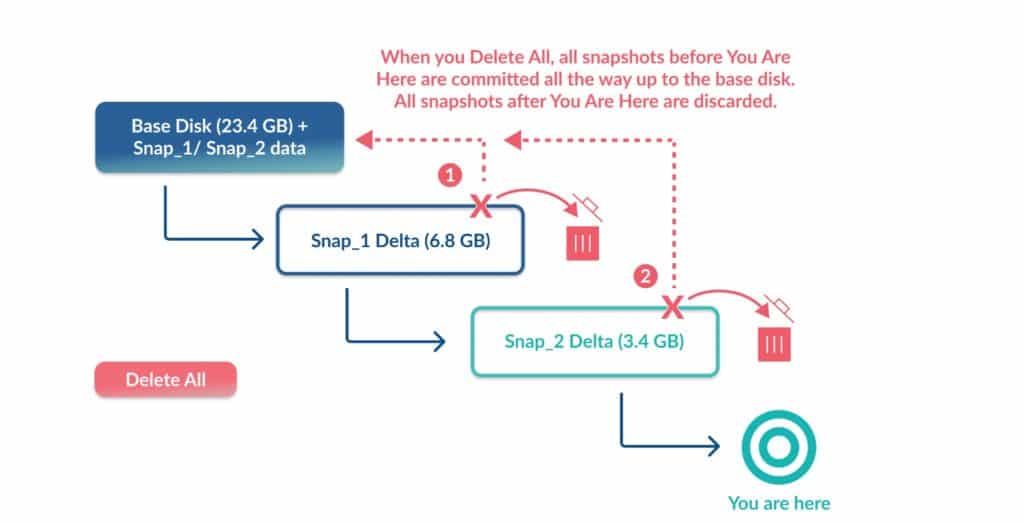
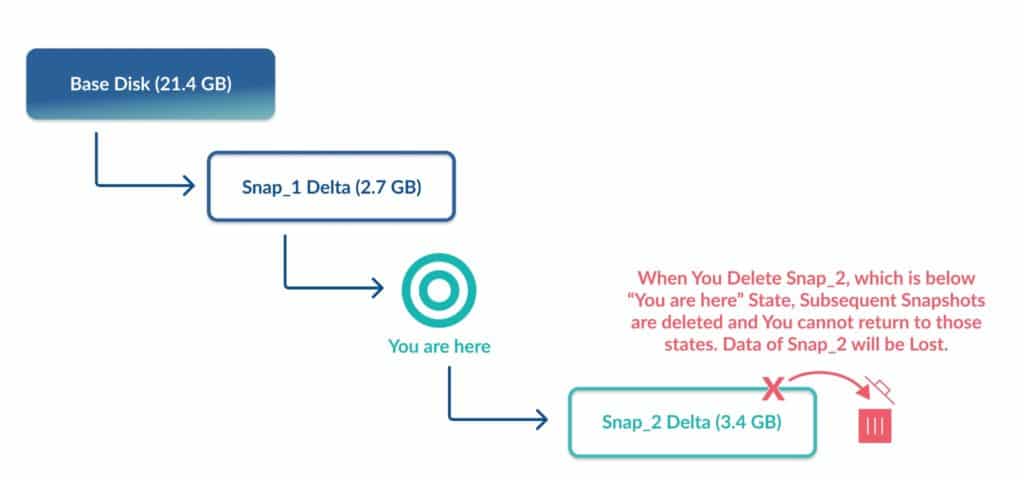
There will be instances that you will revert to an earlier snapshot version, and a snapshot will appear below the “You are here” mark.
For example, if you try to delete Snap_2 using Delete or Delete All functions, the consolidation process will not take place, and the process will instead discard the snapshot together with its snapshot files.
Deleting Snapshots with PowerCLI
In PowerCLI, administrators use the Remove-Snapshot cmdlet to delete a snapshot of a VM. It is used together with the Get-Snapshot cmdlet.
| Parameter | Description |
|---|---|
| Snapshot | Specifies the snapshots for removal. |
| RemoveChildren | Indicates that you also want to remove the children of the specified snapshots. |
Single snapshot removal example.PS C:\> Get-Snapshot -VM VM_Name -Name ‘Snap_1’ | Remove-Snapshot
Delete All or Removing a snapshot and its children.PS C:\> Get-Snapshot -VM VM_Name -Name ‘Snap_2’ | Remove-Snapshot -Snapshot $_ -RemoveChildren
Broadcom’s VMware changes are forcing teams to reevaluate what’s next. Get a practical guide to your alternatives and what to consider before making a move.
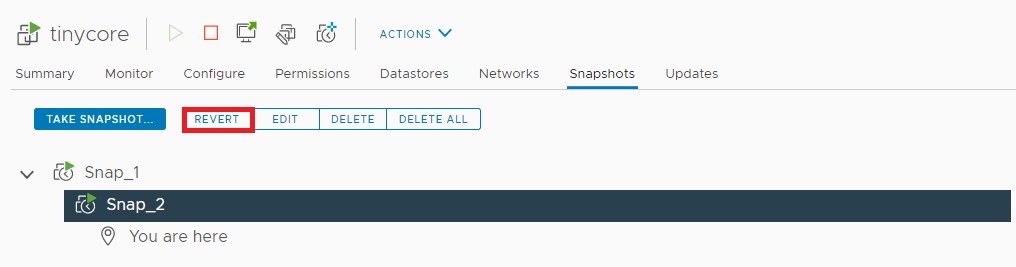
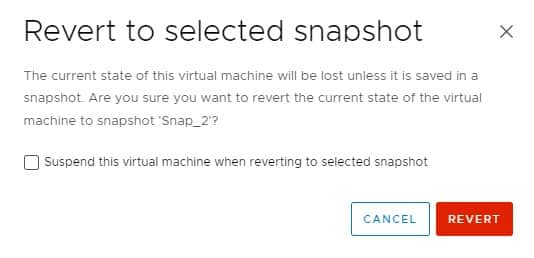
Revert to Snapshots
Revert to snapshot is a straightforward snapshot operation in vSphere environments.
From the snapshot manager, simply select your snapshot and click the “Revert” button. If a confirmation box pops up, click on “Revert” to proceed.
Manual Snapshot Consolidation
There will be instances where reverting or deleting snapshots will fail due to errors on the snapshots themselves. There are countless reasons why failure occurs, but one of the most common is disk descriptor file inconsistencies. A common method to address this issue is to perform a manual snapshot consolidation on the VM.
From the snapshot manager, click on “Consolidate”. Click on “Yes” to proceed if a confirmation box pops up.
The vCenter Server will also display a warning alarm if the VM needs consolidation.

VMware Snapshot Best Practices
Now that we’ve discussed VMware snapshots and their corresponding operations in detail, here is the list of best practices in maintaining your VMware snapshots.
Snapshots vs. Backups
Since a VM writes all of the state changes from the latest snapshot to the delta disk file, a snapshot will depend on the VM’s parent base disk when reverting.
In the event of a corrupted parent base disk, administrators will not be able to properly revert to a snapshot as they will not be able to consolidate the disk correctly. As a result, you must have independent backups as VM snapshots alone can’t cover all data loss scenarios.
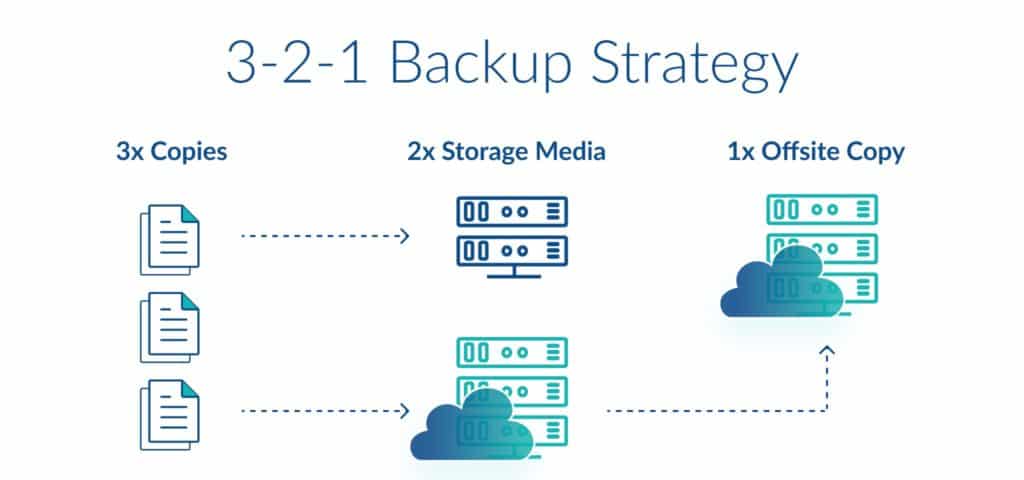
The 3-2-1 backup strategy is an excellent example of snapshots incorporated into backups. The rule states that you must store “3” copies of production data to “2” internal locations and store “1” copy outside of the enterprise for disaster recovery.
Snapshot Aging For More Than 72 Hours
The snapshot file grows as all the state changes write to the latest delta disk file. An outage may occur if no free space remains on the datastore due to the snapshot growing in size. As a result, keeping a VMware snapshot for too long will also negatively impact the VM’s performance.
For this reason, we recommend not using a single snapshot for more than 24-72 hours.
Administrators can monitor the aging snapshots in multiple ways.
Here is a PowerCLI script that will filter and return all aging snapshots for more than three days.
Retrieve VM snapshots older than three days.PS C:\> Get-VM | Get-Snapshot | Where {$_.Created -lt (Get-Date).AddDays(-3)} | Select-Object VM, Name, Created, SizeMB
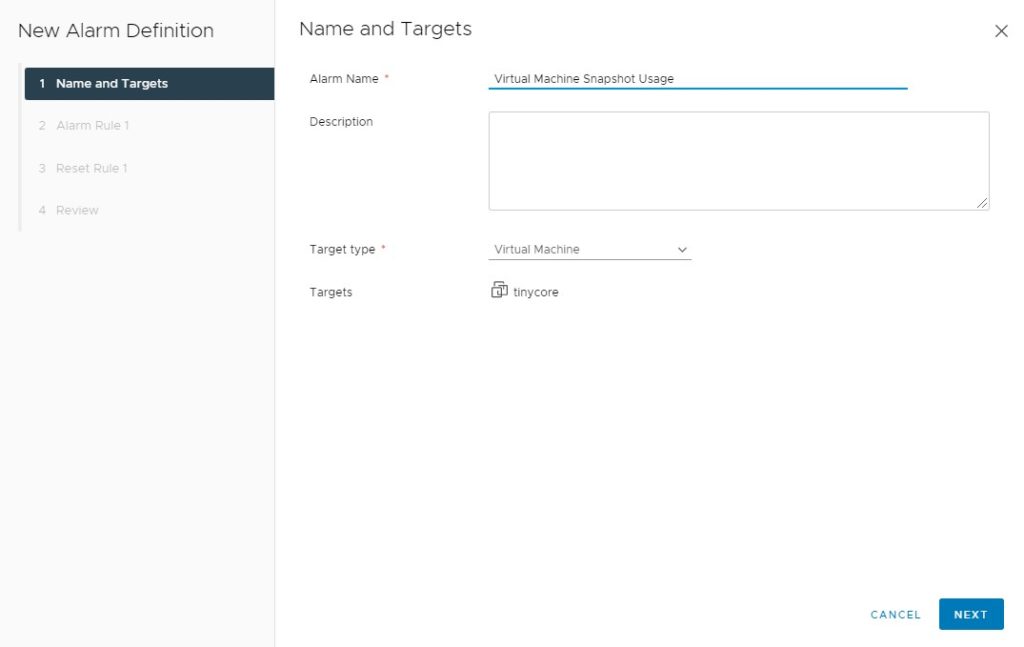
Administrators may also monitor an aging snapshot by targeting its snapshot size by setting a virtual machine alarm definition.
To configure a vCenter alarm:
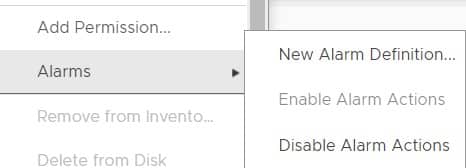
1. Right-click on the VM > Alarms > New Alarm Definition
2. Type in your alarm name
3. Under Monitor > click Virtual Machines > Next
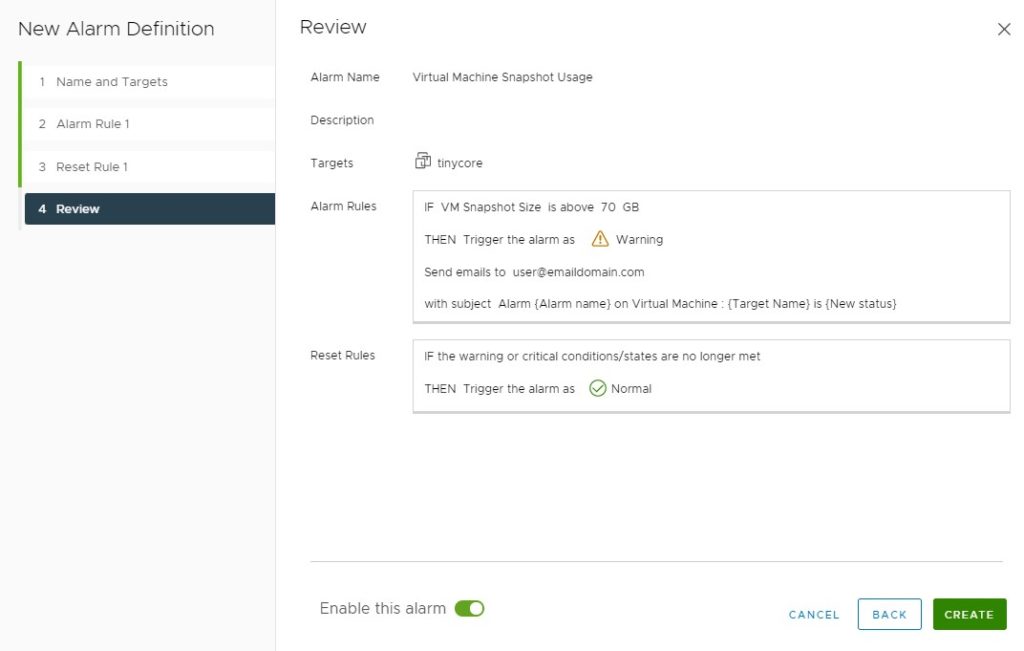
4. Trigger Type > click or search for VM Snapshot Size (GB) > Set the operator to “is above” and specify your trigger conditions > Add additional alarms and triggers for warning and critical severities if needed.
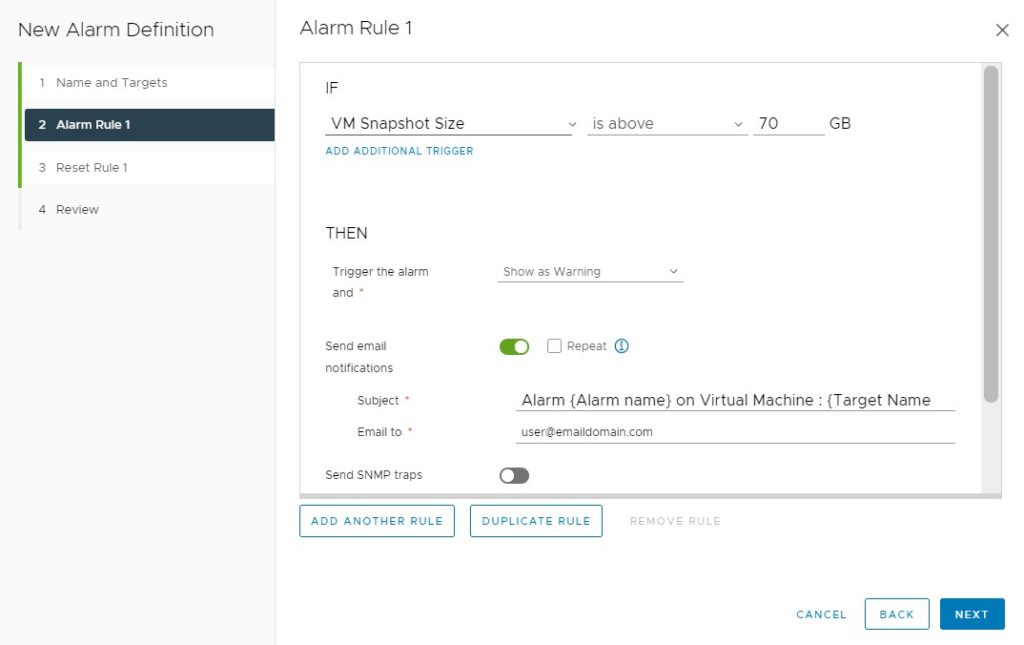
5. Select the action that you want to occur when the alarm is triggered. > click Next
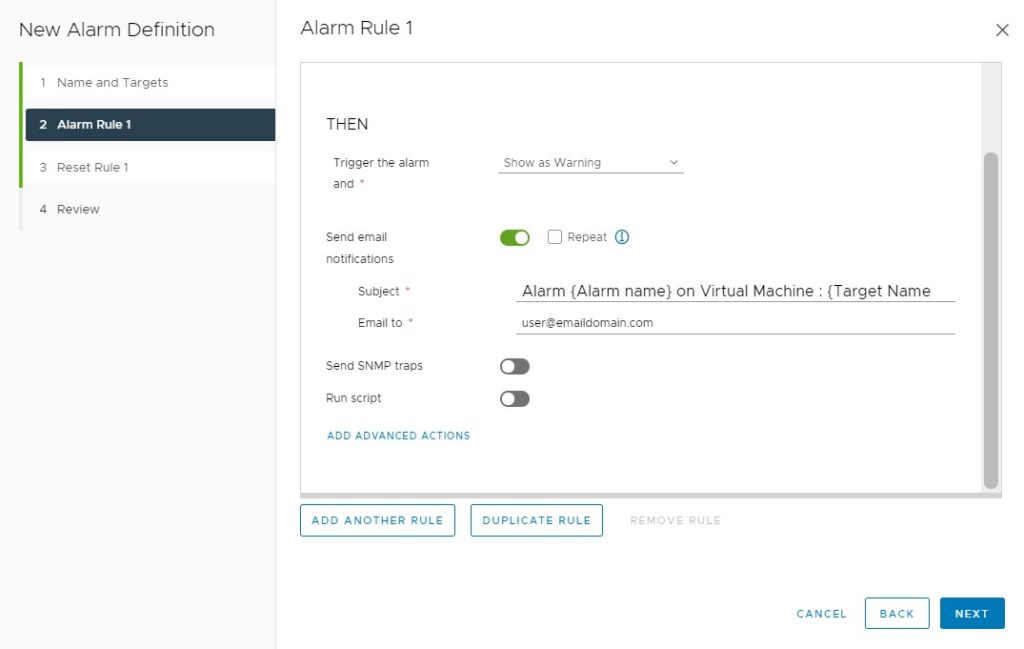
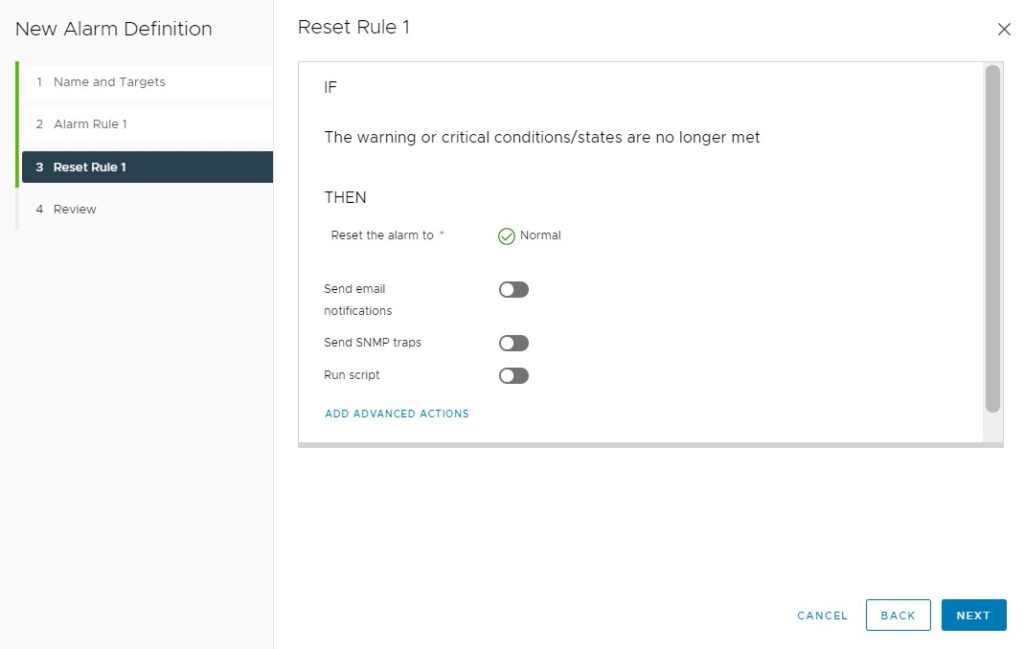
6. Set your Reset Rules just how you set your Alarm rules on the previous step > click Next.
7. Review your set alarms > Create
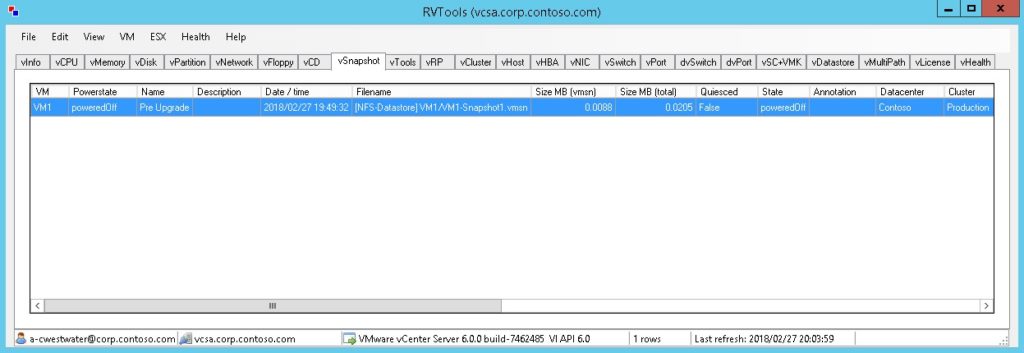
Another great alternative is a free-to-download third-party program called RVTools.
Once downloaded, open RVTools and connect to your vCenter. Once connected, go to the vSnapshot tab to check all of your snapshots information, including the size and age.
Control the Number of VM Snapshots
We generate a snapshot chain when taking multiple snapshots on a single VM. The maximum supported amount in a snapshot chain is 32 snapshots. However, VMware recommends not to take more than three snapshots per VM.
A longer snapshot chain may lead to longer consolidation times when deleting or reverting to snapshots, which may also negatively impact the performance of your VMs.
We can control the number of VM snapshots taken per VM through the advanced configuration settings.
- Right click on the VM > Edit Settings > VM Options > Advanced > Edit Configuration
- Click on Add Row > Enter “snapshot.maxSnapshots”
- Enter the number of snapshots in the Value column > Press OK
Concerned about what Broadcom’s VMware acquisition means for your hybrid cloud? Watch experts break down real customer concerns and migration paths.
Excluding Virtual Machines From Taking Snapshots
There will be situations where an administrator needs to exclude VMs from taking snapshots due to performance and storage issues.
One example would be VMs acting as nodes for an SQL AO cluster. These VMs tend to have data that are always dynamically changing over time, and with that, the delta disk file grows larger faster than a standard VM. These VMs also need their resources, so it is better not to take snapshots to reduce the negative impact on performance.
To exclude VMs from taking snapshots, you may use the previous method and set the max snapshot to 0.
You may also exclude a specific disk of the VM by setting it to independent mode.
To configure the virtual disk as an independent disk:
- Power off the VM
- Right-click the VM > Edit Settings > Virtual Hardware > Expand the Hard Disk > Select Independent-Persistent or Independent-Nonpersistent > Click on OK
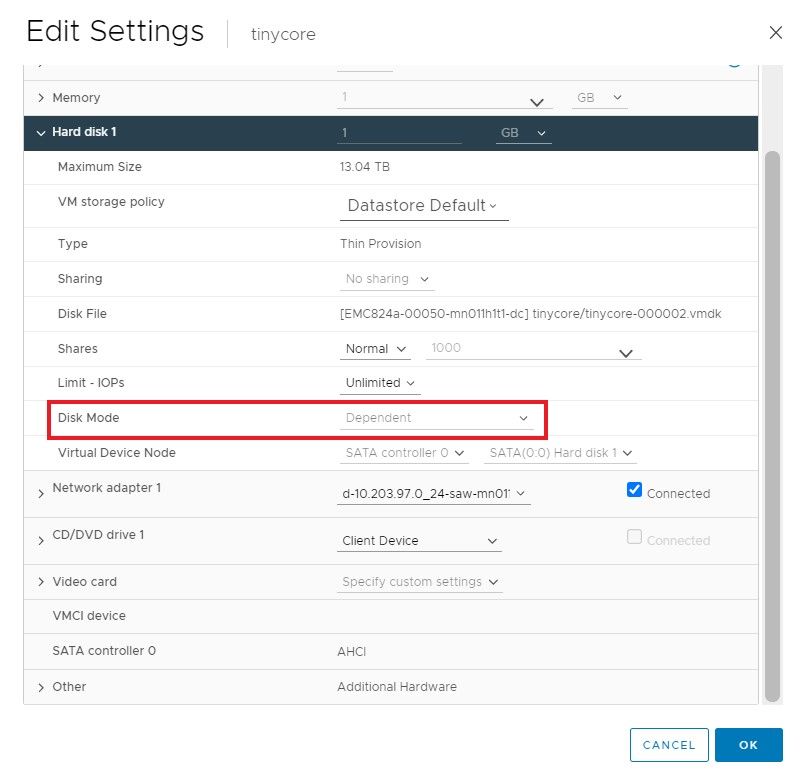
- Independent-Persistent: Changes are immediately written to the disk.
- Independent-Nonpersistent: Changes to the disk are discarded when you reset or power off the VM.
CloudBolt’s Cloud Management Platform gives you centralized governance, provisioning, and cost control across VMware and every major cloud provider — so you’re never locked in again.
Explore the Cloud Management Platform to future-proof your infrastructure.
Conclusion
VMware snapshots provide a straightforward method in preserving data in our VMs. However, the said technology has its ups and downs. We learned that we shouldn’t rely on these snapshots alone as our primary backup technology.
Incorporating snapshots with backups and following the proper best practices on snapshots will provide the best data protection to your VMs and maintain storage, stability, and performance for the whole organization.

Related Blogs

What actually happens when a workload OOMs in production
The pager goes off at 2:47 AM. CrashLoopBackOff on a payment service. The on-call rolls over, opens a laptop, runs…